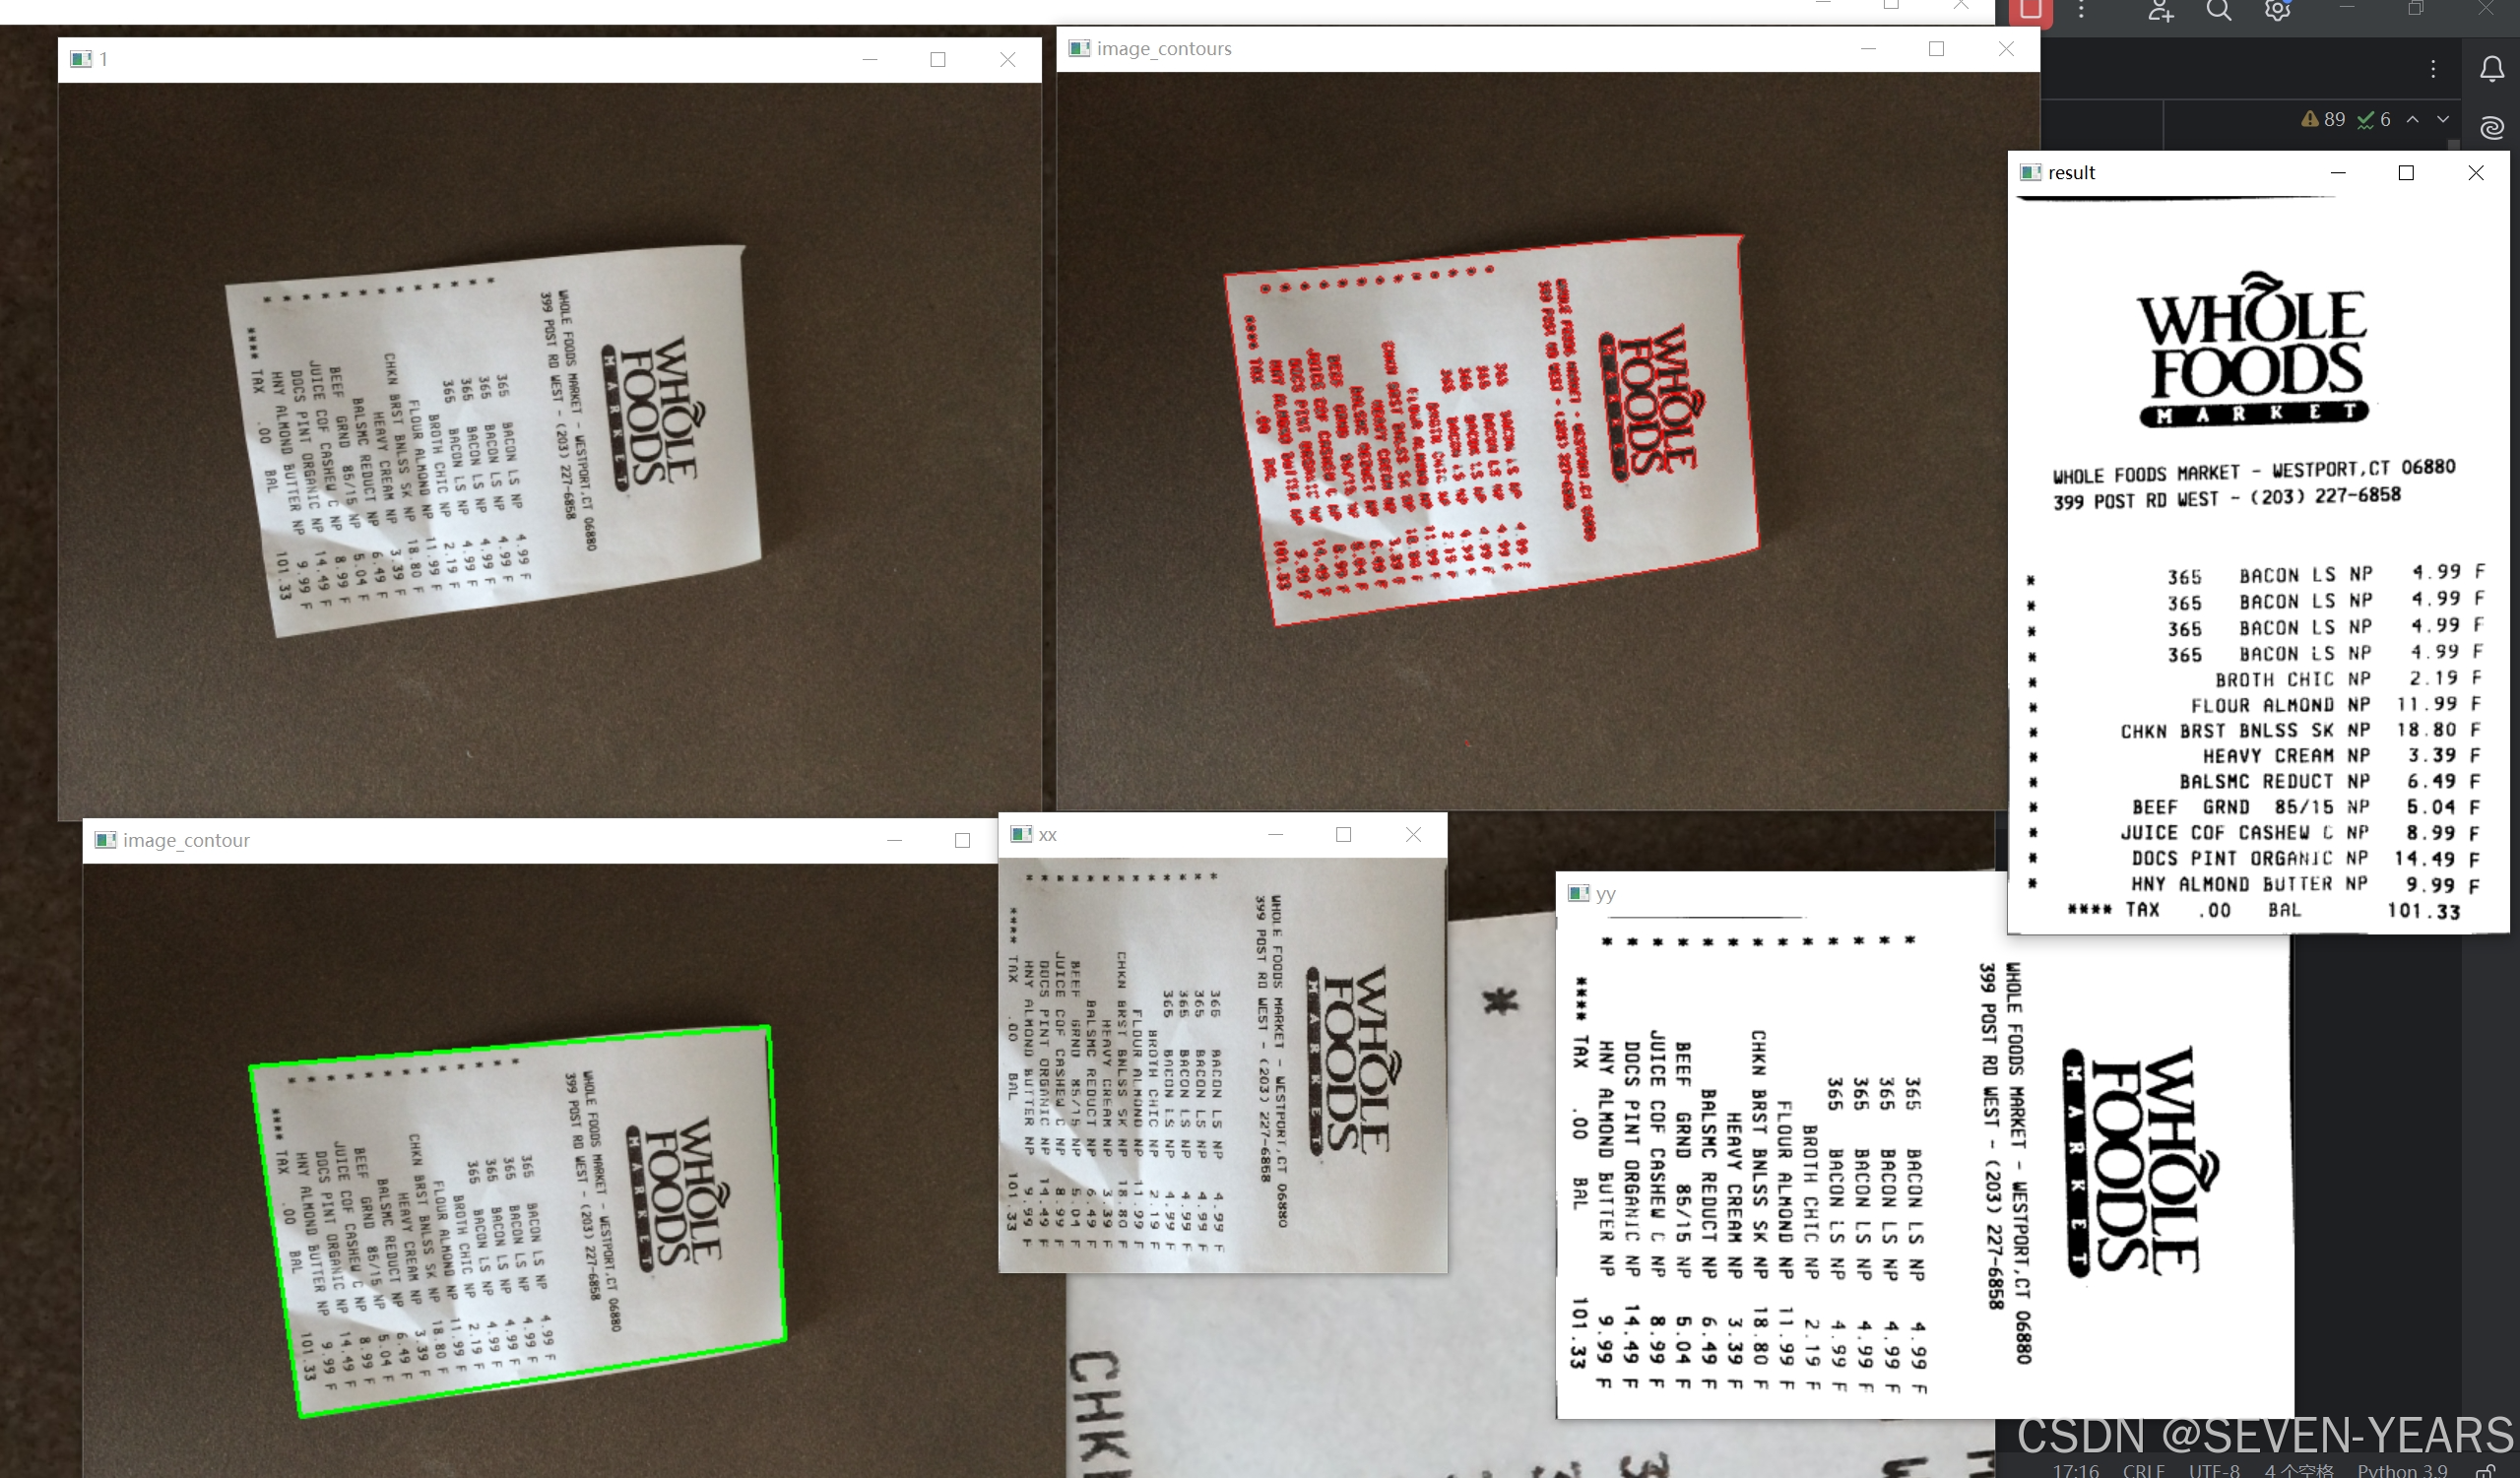
随着计算机视觉技术的发展,图像处理已成为一项重要的技能。今天,我们将探讨如何使用Python中的OpenCV库来实现对图像的自动裁剪以及一些基本的图像优化技巧。我们的目标是对一张发票图片进行处理,使其更加清晰且便于阅读。
准备工作
首先,确保你的环境中已经安装了numpy和opencv-python这两个库。如果没有安装,可以使用pip进行安装:
pip install numpy opencv-python代码解析
1. 导入所需模块
我们从导入必要的模块开始:
import numpy as np
import cv2
2. 定义辅助函数
接着定义几个辅助函数,如显示图像、排序坐标点以及进行四点变换等。
def cv_show(name, img):cv2.imshow(name, img)cv2.waitKey(0)def order_points(pts):rect = np.zeros((4,2),dtype = "float32")s = pts.sum(axis=1)rect[0] = pts[np.argmin(s)]rect[2] = pts[np.argmax(s)]diff = np.diff(pts, axis=1)rect[1] = pts[np.argmin(diff)]rect[3] = pts[np.argmax(diff)]return rectdef four_point_transform(image, pts):rect = order_points(pts)(tl, tr, br, bl) = rectwidthA = np.sqrt(((br[0] - bl[0])**2) + ((br[1] - bl[1])**2))widthB = np.sqrt(((tr[0] - tl[0])**2) + ((tr[1] - tl[1])**2))maxWidth = max(int(widthA), int(widthB))heightA = np.sqrt(((tr[0] - br[0])**2) + ((tr[1] - br[1])**2))heightB = np.sqrt(((tl[0] - bl[0])**2) + ((tl[1] - bl[1])**2))maxHeight = max(int(heightA), int(heightB))dst = np.array([[0, 0], [maxWidth - 1, 0], [maxWidth - 1, maxHeight - 1], [0, maxHeight - 1]], dtype="float32")M = cv2.getPerspectiveTransform(rect, dst)warped = cv2.warpPerspective(image, M, (maxWidth, maxHeight))return warpeddef resize(image, width=None, height=None, inter=cv2.INTER_AREA):dim = None(h, w) = image.shape[:2]if width is None and height is None:return imageif width is None:r = height / float(h)dim = (int(w * r), height)else:r = width / float(w)dim = (width, int(h * r))resized = cv2.resize(image, dim, interpolation=inter)return resized3. 处理图像
然后加载图像,并调整其大小以便处理:
image = cv2.imread('picture_video/fapiao.jpg')
ratio = image.shape[0] / 500.0
orig = image.copy()
image = resize(orig, height=500)
4. 轮廓检测与变换
接下来是轮廓检测,找到最大的轮廓,并对其进行透视变换:
gray = cv2.cvtColor(image, cv2.COLOR_BGR2GRAY)
edged = cv2.threshold(gray, 0, 255, cv2.THRESH_BINARY | cv2.THRESH_OTSU)[1]
cnts = cv2.findContours(edged.copy(), cv2.RETR_LIST, cv2.CHAIN_APPROX_SIMPLE)[1]
screenCnt = sorted(cnts, key=cv2.contourArea, reverse=True)[0]
peri = cv2.arcLength(screenCnt, True)
screenCnt = cv2.approxPolyDP(screenCnt, 0.02 * peri, True)
warped = four_point_transform(orig, screenCnt.reshape(4, 2) * ratio)
5. 最终处理
最后,对变换后的图像进行灰度化处理、阈值分割以及旋转等操作:
warped = cv2.cvtColor(warped, cv2.COLOR_BGR2GRAY)
ref = cv2.threshold(warped, 0, 255, cv2.THRESH_BINARY | cv2.THRESH_OTSU)[1]
kernel = np.ones((2, 2), np.uint8)
ref_new = cv2.morphologyEx(ref, cv2.MORPH_CLOSE, kernel)
rotated_image = cv2.rotate(ref_new, cv2.ROTATE_90_COUNTERCLOCKWISE)
6.输出结果
结论
以上就是利用Python和OpenCV实现图像自动裁剪的一个简单示例。这种方法可以广泛应用于各种需要图像预处理的场合,比如文档扫描、车牌识别等。当然,实际应用中可能还需要考虑更多细节来提高准确性和鲁棒性。希望这篇教程能够帮助到正在学习图像处理的你!


雪崩问题、服务保护方案、Sentinel快速入门)
