文章目录
- 什么是读写分离
- 基于Spring实现实现读写分离
- 项目中常用的数据源切换依赖包
什么是读写分离
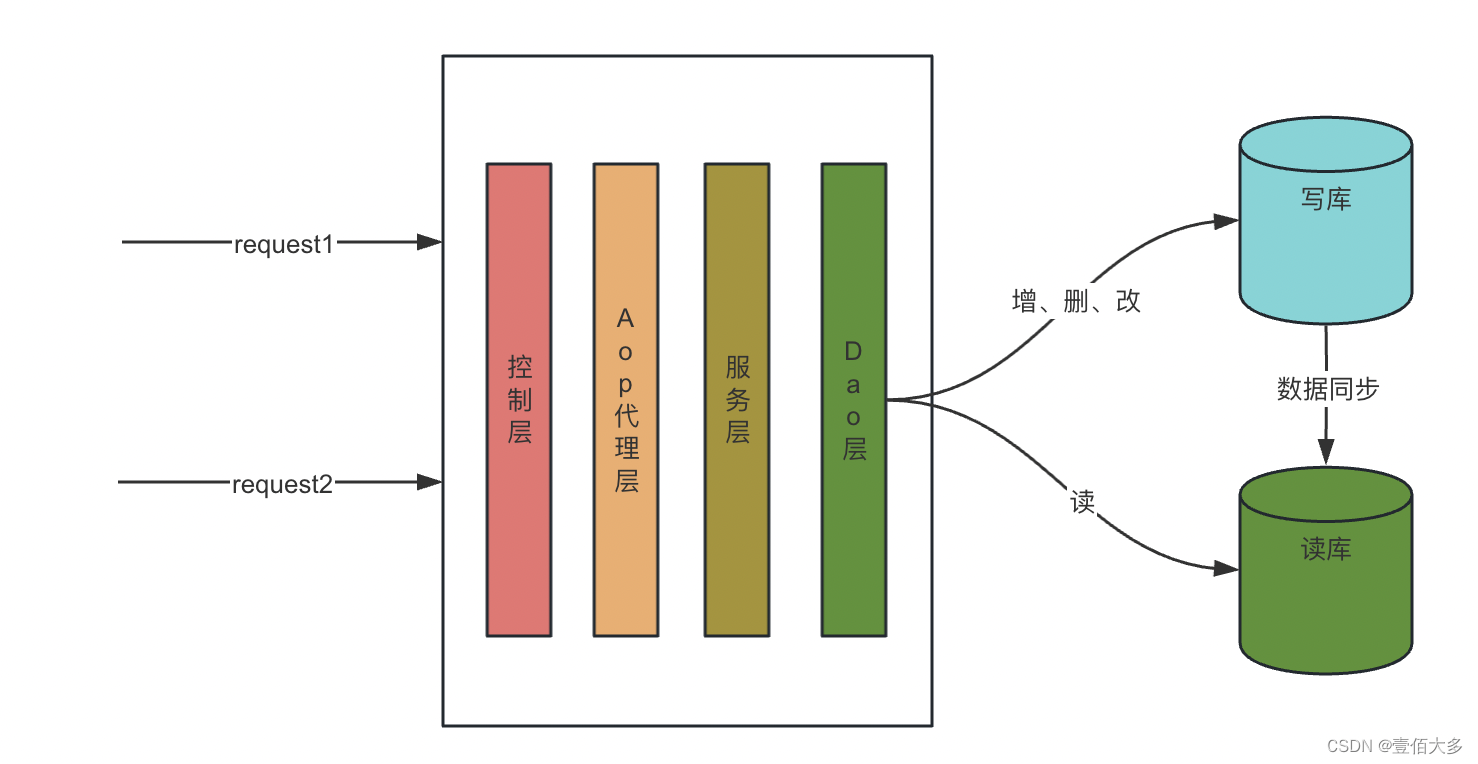
服务读写分离(Service Read-Write Splitting)是一种常见的数据库架构设计模式,旨在提高系统的性能和可扩展性。通过将读操作和写操作分离到不同的数据库实例上,可以减轻单个数据库实例的负载,提高整体系统的响应速度和可靠性。
核心思想
写操作:所有的写操作(插入、更新、删除)都发送到主数据库(Master)。
读操作:所有的读操作(查询)都发送到从数据库(Slave)。
主要步骤
主从复制:配置一个主数据库和一个或多个从数据库,从数据库实时同步主数据库的数据更新。
路由层(Routing Layer):在应用程序层或通过中间件(如代理服务器)实现读写请求的路由。写请求路由到主数据库,读请求路由到从数据库。
数据一致性:保证数据在主数据库和从数据库之间的一致性,通常使用同步或异步复制策略。
基于Spring实现实现读写分离

Spring实现应用层实现读写分离,是基于AbstractRoutingDataSource
来实现。
AbstractRoutingDataSource是基于特定的查找key路由到特定的数据源。它内部维护了一组目标数据源,并且做了路由key与目标数据源之间的映射,提供基于key查找数据源的方法。
代码实现
//实现数据源动态切换的核心代码
import org.springframework.jdbc.datasource.lookup.AbstractRoutingDataSource;
import org.springframework.lang.Nullable;
public class MyRoutingDataSource extends AbstractRoutingDataSource {@Nullable@Overrideprotected Object determineCurrentLookupKey() {return DBContextHolder.get();}
}
利用ThreadLocal获取存储或获取数据源
package com.zqtest.config;import java.util.concurrent.atomic.AtomicInteger;public class DBContextHolder {private static final ThreadLocal<DBTypeEnum> contextHolder=new ThreadLocal<DBTypeEnum>();private static final AtomicInteger counter=new AtomicInteger(-1);public static void set(DBTypeEnum dbTypeEnum){contextHolder.set(dbTypeEnum);}public static DBTypeEnum get(){return contextHolder.get();}public static void master(){set(DBTypeEnum.MASTER);System.out.println("切换到Master");}public static void slave(){//从节点进行轮训int index=counter.getAndIncrement()%2;if(counter.get()>9999){counter.set(-1);}if(index==0){set(DBTypeEnum.SLAVE1);System.out.println("切换到slave1");}if(index==1){set(DBTypeEnum.SLAVE2);System.out.println("切换到slave2");}}
}
数据源注册
package com.zqtest.config;import org.springframework.beans.factory.annotation.Qualifier;
import org.springframework.boot.context.properties.ConfigurationProperties;
import org.springframework.boot.jdbc.DataSourceBuilder;
import org.springframework.context.annotation.Bean;
import org.springframework.context.annotation.Configuration;
import org.springframework.context.annotation.Primary;import javax.sql.DataSource;
import java.util.HashMap;
import java.util.Map;@Configuration
public class DataSourceConfig {@Bean@ConfigurationProperties("spring.datasource.master")public DataSource masterDataSource(){return DataSourceBuilder.create().build();}@Bean@Primary@ConfigurationProperties("spring.datasource.slave1")public DataSource slave1DataSource() {return DataSourceBuilder.create().build();}@Bean@ConfigurationProperties("spring.datasource.slave2")public DataSource slave2DataSource() {return DataSourceBuilder.create().build();}@Beanpublic DataSource myRoutingDataSource( DataSource masterDataSource,DataSource slave1DataSource,DataSource slave2DataSource) {Map<Object, Object> targetDataSources = new HashMap<Object, Object>();targetDataSources.put(DBTypeEnum.MASTER, masterDataSource);targetDataSources.put(DBTypeEnum.SLAVE1, slave1DataSource);targetDataSources.put(DBTypeEnum.SLAVE2, slave2DataSource);MyRoutingDataSource myRoutingDataSource = new MyRoutingDataSource();myRoutingDataSource.setDefaultTargetDataSource(slave1DataSource);myRoutingDataSource.setTargetDataSources(targetDataSources);return myRoutingDataSource;}}spring:application:name: testdatasource:master:url: jdbc:mysql://ip1:3306/databaseusername: usernamepassword: passworddriver-class-name: com.mysql.jdbc.Driverslave1:url: jdbc:mysql://ip2:3306/databaseusername: username # 只读账户password: passworddriver-class-name: com.mysql.jdbc.Driverslave2:url: jdbc:ip3:3306/databaseusername: username # 只读账户password: passworddriver-class-name: com.mysql.jdbc.Driver
server:port: 8080
java枚举类
public enum DBTypeEnum {MASTER,SLAVE1,SLAVE2,
}
注意这里一定要加事务管理,防止代码出现多数据源问题。
import javax.annotation.Resource;
import javax.sql.DataSource;
@Configuration
@EnableTransactionManagement
public class MyBatiesConfig {@Resource(name="myRoutingDataSource")private DataSource myRoutingDataSource;@Beanpublic SqlSessionFactory sqlSessionFactory ()throws Exception{SqlSessionFactoryBean sqlSessionFactoryBean = new SqlSessionFactoryBean();sqlSessionFactoryBean.setDataSource(myRoutingDataSource);sqlSessionFactoryBean.setMapperLocations(new PathMatchingResourcePatternResolver().getResources("classpath:mapper/*.xml"));return sqlSessionFactoryBean.getObject();}@Beanpublic PlatformTransactionManager platformTransactionManager(){return new DataSourceTransactionManager(myRoutingDataSource);}
}
AOP的实现
注解实现
public @interface Master {
}
核心点
package com.zqtest.aop;import com.zqtest.config.DBContextHolder;
import org.aspectj.lang.annotation.Aspect;
import org.aspectj.lang.annotation.Before;
import org.aspectj.lang.annotation.Pointcut;
import org.springframework.stereotype.Component;@Aspect
@Component
public class DataSourceAop {@Pointcut("!@annotation(com.zqtest.annotation.Master) " +"&& (execution(* com.zqtest.service..*.select*(..)) " +"|| execution(* com.zqtest.service..*.get*(..)))")public void readPointcut() {}@Pointcut("@annotation(com.zqtest.annotation.Master) " +"|| execution(* com.zqtest.service..*.insert*(..)) " +"|| execution(* com.zqtest.service..*.add*(..)) " +"|| execution(* com.zqtest.service..*.update*(..)) " +"|| execution(* com.zqtest.service..*.edit*(..)) " +"|| execution(* com.zqtest.service..*.delete*(..)) " +"|| execution(* com.zqtest.service..*.remove*(..))")public void writePointcut() {}@Before("readPointcut()")public void read(){DBContextHolder.slave();}@Before("writePointcut()")public void write(){DBContextHolder.master();}
}
项目中常用的数据源切换依赖包
<dependency><groupId>com.baomidou</groupId><artifactId>dynamic-datasource-spring-boot-starter</artifactId><version>${version}</version>
</dependency>
dynamic-datasource-spring-boot-starter 是一个基于springboot的快速集成多数据源的启动器。
其支持 Jdk 1.7+, SpringBoot 1.4.x 1.5.x 2.x.x。
特性
1.支持 数据源分组 ,适用于多种场景 纯粹多库 读写分离 一主多从 混合模式。
2.支持数据库敏感配置信息 加密 ENC()。
3.支持每个数据库独立初始化表结构schema和数据库database。
4.支持无数据源启动,支持懒加载数据源(需要的时候再创建连接)。
支持 自定义注解 ,需继承DS(3.2.0+)。
5.提供并简化对Druid,HikariCp,BeeCp,Dbcp2的快速集成。
6.提供对Mybatis-Plus,Quartz,ShardingJdbc,P6sy,Jndi等组件的集成方案。
7.提供 自定义数据源来源 方案(如全从数据库加载)。
8.提供项目启动后 动态增加移除数据源 方案。
9.提供Mybatis环境下的 纯读写分离 方案。
10.提供使用 spel动态参数 解析数据源方案。内置spel,session,header,支持自定义。
支持 多层数据源嵌套切换 。(ServiceA >>> ServiceB >>> ServiceC)。
11.提供 基于seata的分布式事务方案。
12.提供 本地多数据源事务方案。 附:不能和原生spring事务混用。
约定
1.本框架只做 切换数据源 这件核心的事情,并不限制你的具体操作,切换了数据源可以做任何CRUD。
2.配置文件所有以下划线 _ 分割的数据源 首部 即为组的名称,相同组名称的数据源会放在一个组下。
3.切换数据源可以是组名,也可以是具体数据源名称。组名则切换时采用负载均衡算法切换。
4.默认的数据源名称为 master ,你可以通过 spring.datasource.dynamic.primary 修改。
5.方法上的注解优先于类上注解。DS支持继承抽象类上的DS,暂不支持继承接口上的DS。
快速配置数据源:
1.引入dynamic-datasource-spring-boot-starter。
<dependency><groupId>com.baomidou</groupId><artifactId>dynamic-datasource-spring-boot-starter</artifactId><version>${version}</version>
</dependency>
2.配置数据源
spring:datasource:dynamic:primary: master #设置默认的数据源或者数据源组,默认值即为masterstrict: false #严格匹配数据源,默认false. true未匹配到指定数据源时抛异常,false使用默认数据源datasource:master:url: jdbc:mysql://xx.xx.xx.xx:3306/dynamicusername: rootpassword: 123456driver-class-name: com.mysql.jdbc.Driver # 3.2.0开始支持SPI可省略此配置slave_1:url: jdbc:mysql://xx.xx.xx.xx:3307/dynamicusername: rootpassword: 123456driver-class-name: com.mysql.jdbc.Driverslave_2:url: ENC(xxxxx) # 内置加密,使用请查看详细文档username: ENC(xxxxx)password: ENC(xxxxx)driver-class-name: com.mysql.jdbc.Driver#......省略#以上会配置一个默认库master,一个组slave下有两个子库slave_1,slave_2
3.使用 @DS 切换数据源。
没有@DS 默认数据源
@DS(“dsName”) dsName可以为组名也可以为具体某个库的名称
@Service
@DS("slave")
public class UserServiceImpl implements UserService {@Autowiredprivate JdbcTemplate jdbcTemplate;public List selectAll() {return  jdbcTemplate.queryForList("select * from user");}@Override@DS("slave_1")public List selectByCondition() {return  jdbcTemplate.queryForList("select * from user where age >10");}
}


