文章目录
- node+nginx实现对react进行一键打包部署--windows版
- 1.功能展示及项目准备
- 1.1功能展示
- 1.2 项目准备
- 1.2.1技术点
- 1.2.2安装相关配置(windows)
- 2.实现
- 2.1 实现思路
- 2.2 实现步骤
- 2.1 项目准备
- 2.1.1 创建env文件
- 2.1.2 创建api/index.js文件
- 2.1.3 添加解决跨域代码
- 2.2 项目实现
- 2.1 前端部分
- 2.2.1 编写前端带代码
- 2.2 后端部分
- 2.2.1 实现node对项目打包
- 2.2.2 对项目打包文件夹重命名
- 2.2.3 对打包文件夹复制在nginx指定位置
- 2.2.4 配置nginx管理项目代码
- 2.2.5 重启nginx
- 2.2.6 完整代码
- 3.总结
node+nginx实现对react进行一键打包部署–windows版
1.功能展示及项目准备
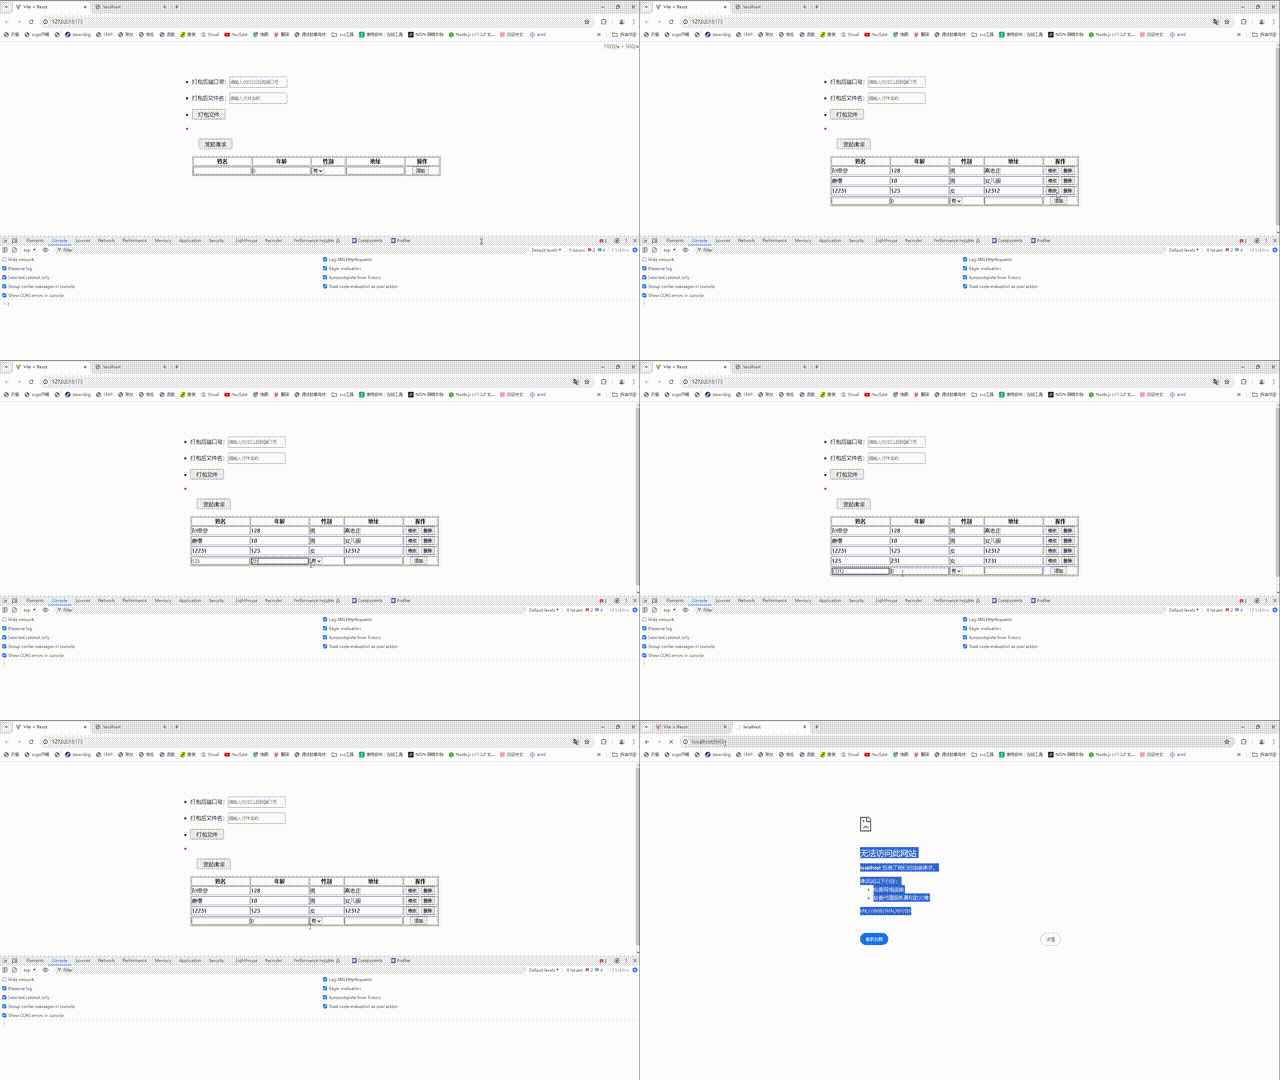
1.1功能展示

1.2 项目准备
1.2.1技术点
- react
- node
- nginx
- express
- axios
1.2.2安装相关配置(windows)
- 安装nginx
- 使用vite安装react
- 安装node
- 使用node 安装express
- 项目中安装axios (npm i axios --S)
网上有多种安装方法,
这里我就不做过多介绍了
2.实现
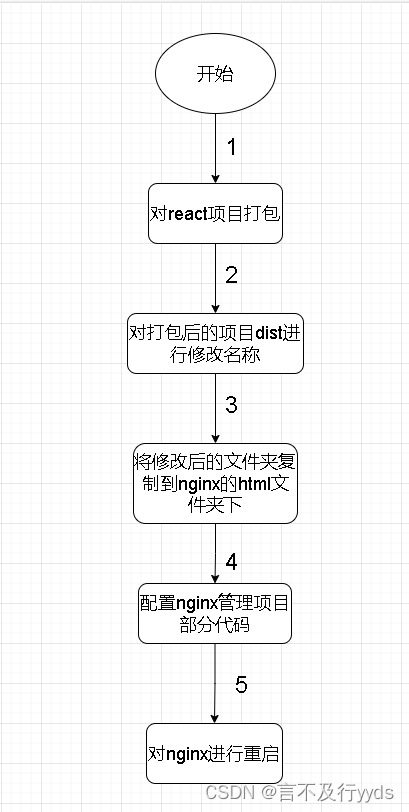
2.1 实现思路
2.2 实现步骤
2.1 项目准备
2.1.1 创建env文件
在vite创建的项目文件根目录下新建一个.env文件
//你创建的项目的路径部分路径
VITE_API_URL=D:\OneDrive\桌面\练习项目\学生信息-react
//项目的名称
VITE_APP_NAME=create
2.1.2 创建api/index.js文件
项目的src下创建api文件夹,新建index.js文件,写入以下代码
import axios from 'axios'
axios.defaults.baseURL='http://localhost:3000'export const getStuList=()=>axios({url:'/student/list',method:'get'})export const addStu=(data)=>axios({url:'/student/add',method:'post',data})export const editStu=(data)=>axios({url:'/student/edit',method:'post',data})export const delStu=(data)=>axios({url:'/student/del',method:'post',data})export const buildApp=(data)=>axios({url:'/build/app',method:'post',data})
2.1.3 添加解决跨域代码
向express的项目中的app.js添加以下代码
//用于配置解决跨域问题
var allowCrosDown=function(req,res,next){res.header('Access-Control-Allow-Origin','*')res.header('Access-Control-Allow-Methods','*')res.header('Access-Control-Allow-Headers','*')next()
}
app.use(allowCrosDown)
2.2 项目实现
2.1 前端部分
2.2.1 编写前端带代码
主要是填写要部署后的项目监听端口与文件名称
function App() {const apiUrl = import.meta.env.VITE_API_URL;const appName = import.meta.env.VITE_APP_NAME;const [port,setPort]=useState('')const [buildName,setBuildName]=useState('')const [msg,setMsg]=useState('')async function handelBuild(){let result=await buildApp({TotalPath:apiUrl+'\\'+appName,port:+port,buildName})setMsg(result.data.msg)}return (<><div className='tabelCon'><div className='options'><ul><li><label htmlFor="port">打包后端口号:</label><input type="text" name="port" value={port} onChange={e=>setPort(e.target.value)} placeholder='请输入9000以后的端口号'/></li><li><label htmlFor="buildName">打包后文件名:</label><input type="text" name="buildName" value={buildName} onChange={e=>setBuildName(e.target.value)} placeholder='请输入文件名称'/></li><li><button onClick={handelBuild} className='bulid'>打包文件</button></li><li style={{color:'red'}}>{msg}</li></ul></div>//实现添加信息删除信息部分的html代码//因为与本文章无关便不记录,与兴趣的//可以自己实现一下......</div></>)
}export default App
2.2 后端部分
2.2.1 实现node对项目打包
实现对react进行打包,实现起来就是,
- node进入前端项目的根目录
- 执行npm run build命令
// 使用 child_process.exec 函数执行命令//执行下面代码,在项目中就会看到一个dist文件夹const { exec } = require('child_process');let {TotalPath,port,buildName}=req.bodyconst command = 'npm run build';exec(`cd ${TotalPath} && ${command}`, (error, stdout, stderr) => {if (error) {res.send({msg:error})return;}});
2.2.2 对项目打包文件夹重命名
对打包后的文件进行重命名
- 使用fs.rename()对文件夹进行重命名
//buildName就是要重新命名的名称
let {TotalPath,port,buildName}=req.body
let buildPath=TotalPath+'\\'+'dist'
let newPath=TotalPath+`\\${buildName}`
fs.rename(buildPath, newPath, (err) => {if (err) res.send({msg:error});console.log('重命名成功')})
2.2.3 对打包文件夹复制在nginx指定位置
将打包的文件复制到nginx安装目录中的html文件目录下
- 创建一个文件夹
- 将打包后的内容复制过去
	let NginxPath='D:\\前端开发工具\\nginx-1.24.0'// d:\前端开发工具\nginx-1.24.0\conf\nginx.conflet NginxConf=NginxPath+'\\'+'conf'+'\\'+'nginx.conf'const directoryPath = NginxPath+`\\html\\${buildName}`;fs.mkdir(directoryPath, { recursive: true }, err => {if (err) {res.send({msg:error})console.error(`无法创建文件夹 ${directoryPath}: ${err}`);return;}console.log(`文件夹 ${directoryPath} 已成功创建`);copyFolderRecursiveSync(newPath, directoryPath );exec(`cd ${NginxPath} && ${reloadCommand}`, (error, stdout, stderr) => {if (error) {res.send({msg:error})return;}res.send({msg:'项目打包成功、修改名称成功、复制文件到nginx成功、配置成功、重启成功'})});});function copyFolderRecursiveSync(source, target) {// 判断源文件夹是否存在if (!fs.existsSync(source)) {console.log(`源文件夹 ${source} 不存在`);return;}// 创建目标文件夹(如果不存在)if (!fs.existsSync(target)) {fs.mkdirSync(target);}// 读取源文件夹中的内容const files = fs.readdirSync(source);files.forEach(file => {const srcFile = path.join(source, file);const tgtFile = path.join(target, file);// 判断文件是文件夹还是文件if (fs.lstatSync(srcFile).isDirectory()) {// 如果是文件夹,递归复制子文件夹copyFolderRecursiveSync(srcFile, tgtFile);} else {// 如果是文件,直接复制到目标文件夹fs.copyFileSync(srcFile, tgtFile);}});
}
2.2.4 配置nginx管理项目代码
配置nginx管理项目代码
- 修改nginx安装目录下conf中nginx.conf文件内容
- 编写命令,插入代码
//port监听的端口
const { exec } = require('child_process');
const path = require('path');
const fs = require('fs');
const readline = require('readline');
const serve=`   server {listen       ${port};server_name  localhost;location / {root   html/${buildName};index  index.html index.htm;}error_page   500 502 503 504  /50x.html;location = /50x.html {root   html;}}`//这里的59指的是在nginx.conf中插入的位置,//可根据自己的配置文件进行相应的修改insertContentInLine(NginxConf, serve, 59);function insertContentInLine(filePath, content, lineIndex) {// 创建读取文件的流const readStream = fs.createReadStream(filePath);const rl = readline.createInterface({input: readStream,output: process.stdout,terminal: false});let lines = [];let currentLineIndex = 1;rl.on('line', line => {lines.push(line);if (currentLineIndex === lineIndex) {lines.push(content);}currentLineIndex++;});rl.on('close', () => {// 将修改后的内容写回文件fs.writeFileSync(filePath, lines.join('\n'));console.log(`内容已成功插入到第 ${lineIndex} 行`);});
}
2.2.5 重启nginx
对nginx进行重启
- 进入nginx安装目录
- 执行nginx -s reload重启
const reloadCommand='nginx -s reload'let NginxPath='D:\\前端开发工具\\nginx-1.24.0'exec(`cd ${NginxPath} && ${reloadCommand}`, (error, stdout, stderr) => {if (error) {res.send({msg:error})return;}res.send({msg:'项目打包成功、修改名称成功、复制文件到nginx成功、配置成功、重启成功'})});
现在你就实现了点击一键部署项目在本机中了
2.2.6 完整代码
完整代码如下
const { exec } = require('child_process');
const path = require('path');
const fs = require('fs');
const readline = require('readline');
function copyFolderRecursiveSync(source, target) {// 判断源文件夹是否存在if (!fs.existsSync(source)) {console.log(`源文件夹 ${source} 不存在`);return;}// 创建目标文件夹(如果不存在)if (!fs.existsSync(target)) {fs.mkdirSync(target);}// 读取源文件夹中的内容const files = fs.readdirSync(source);files.forEach(file => {const srcFile = path.join(source, file);const tgtFile = path.join(target, file);// 判断文件是文件夹还是文件if (fs.lstatSync(srcFile).isDirectory()) {// 如果是文件夹,递归复制子文件夹copyFolderRecursiveSync(srcFile, tgtFile);} else {// 如果是文件,直接复制到目标文件夹fs.copyFileSync(srcFile, tgtFile);}});
}function insertContentInLine(filePath, content, lineIndex) {// 创建读取文件的流const readStream = fs.createReadStream(filePath);const rl = readline.createInterface({input: readStream,output: process.stdout,terminal: false});let lines = [];let currentLineIndex = 1;rl.on('line', line => {lines.push(line);if (currentLineIndex === lineIndex) {lines.push(content);}currentLineIndex++;});rl.on('close', () => {// 将修改后的内容写回文件fs.writeFileSync(filePath, lines.join('\n'));console.log(`内容已成功插入到第 ${lineIndex} 行`);});
}//暴露接口
router.post('/build/app',(req,res)=>{let {TotalPath,port,buildName}=req.body// let appPath='D:\OneDrive\桌面\练习项目\学生信息-react\create'const command = 'npm run build';const reloadCommand='nginx -s reload'const serve=`   server {listen       ${port};server_name  localhost;location / {root   html/${buildName};index  index.html index.htm;}error_page   500 502 503 504  /50x.html;location = /50x.html {root   html;}}`// 使用 child_process.exec 函数执行命令let NginxPath='D:\\前端开发工具\\nginx-1.24.0'// d:\前端开发工具\nginx-1.24.0\conf\nginx.conflet NginxConf=NginxPath+'\\'+'conf'+'\\'+'nginx.conf'let buildPath=TotalPath+'\\'+'dist'let newPath=TotalPath+`\\${buildName}`const directoryPath = NginxPath+`\\html\\${buildName}`;exec(`cd ${TotalPath} && ${command}`, (error, stdout, stderr) => {if (error) {res.send({msg:error})return;}fs.rename(buildPath, newPath, (err) => {if (err) res.send({msg:error});fs.mkdir(directoryPath, { recursive: true }, err => {if (err) {res.send({msg:error})console.error(`无法创建文件夹 ${directoryPath}: ${err}`);return;}console.log(`文件夹 ${directoryPath} 已成功创建`);copyFolderRecursiveSync(newPath, directoryPath );insertContentInLine(NginxConf, serve, 59);exec(`cd ${NginxPath} && ${reloadCommand}`, (error, stdout, stderr) => {if (error) {res.send({msg:error})return;}res.send({msg:'项目打包成功、修改名称成功、复制文件到nginx成功、配置成功、重启成功'})});});});});
})
3.总结
在这个项目中我们学会了以下知识
- node执行命令
- exec()执行
- node修改文件夹名称
- fs.rename()
- node 复制文件到指定目录下
- fs.copyFileSync
- node 向文件中插入内容


![[C++] STL数据结构小结](http://pic.xiahunao.cn/nshx/[C++] STL数据结构小结)


