模板引擎语法-标签
文章目录
- 模板引擎语法-标签
- @[toc]
- 一、用于进行判断的{% if-elif-else-endif %}标签
- 二、关于循环对象的{% for-endfor %}标签
- 三、关于自动转义的{% autoescape-endautoescape %}标签
- 四、关于循环对象的{% cycle %}标签
- 五、关于检查值是否变化的{% ifchange %}标签
- 六、关于重组对象的{% regroup %}标签
- 七、关于重置循环对象的{% resetcycle %}标签
- 八、{% url %}链接标签
- 九、输出模板标签字符的{% templatetag %}标签
- 十、关于计算比率的{% widthratio %}标签
- 十一、关于显示当前日期或时间的{% now %}标签
一、用于进行判断的{% if-elif-else-endif %}标签
1.编辑视图文件
文件路径【TmplSite/gramapp/views.py】
from django.http import HttpResponse
from django.shortcuts import render
from django.template import loader# Create your views here.def index(request):return HttpResponse("Hello, Django! You're at the gramapp index.")def grammar(request):context = {}context['title'] = "Django Template Grammar"context['gram'] = "grammar"context['t'] = "true"context['f'] = "false"template = loader.get_template('gramapp/grammar.html')return HttpResponse(template.render(context, request))
【代码分析】
| 代码 | 分析 |
|---|---|
| context[‘t’] = “true” | 在变量context中定义了第一个属性t,并赋值为字符串“true” |
| context[‘f’] = “false” | 在变量context中定义了第一个属性f,并赋值为字符串“false” |
2.编辑HTML模板文件
<!DOCTYPE html>
<html lang="en">
<head><meta charset="UTF-8"><link rel="stylesheet" type="text/css" href="/static/css/mystyle.css"/><title>{{ title }}</title>
</head>
<body><p>Hello, this is a <b>{{ gram }}</b> page!
</p>
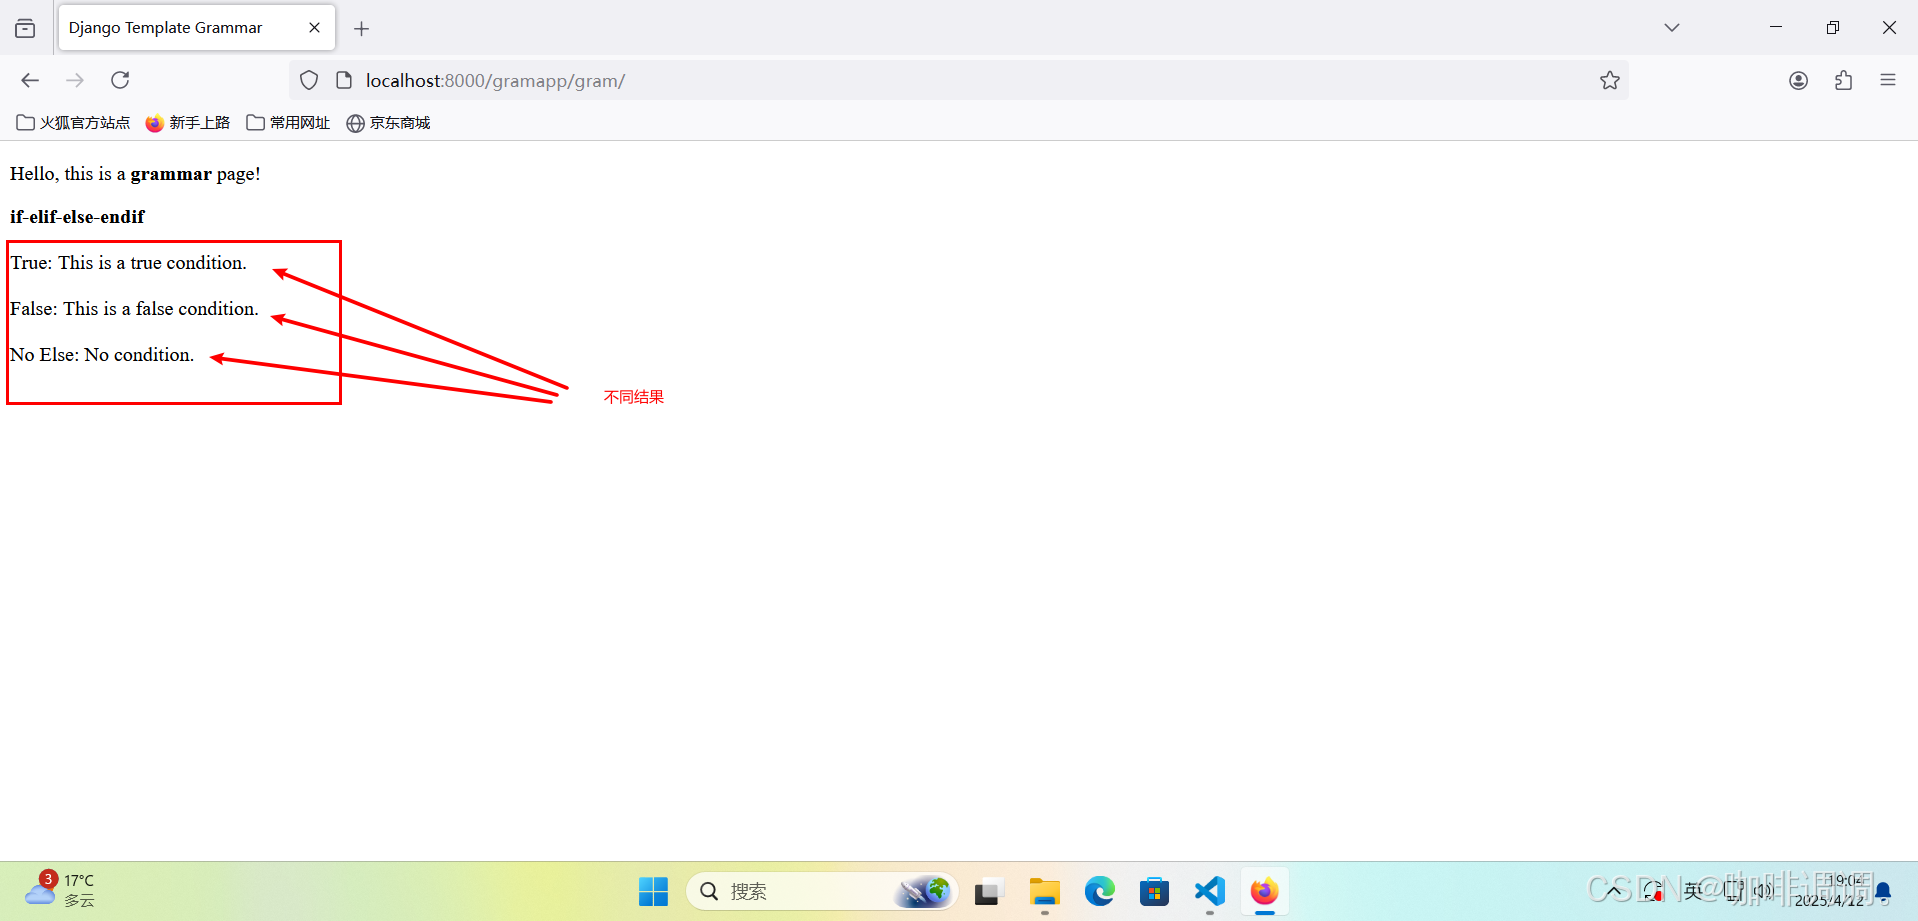
<p><b>if-elif-else-endif</b><br><br>True:{% if t == 'true' %}This is a true condition.{% elif t == 'false' %}This is a false condition.{% else %}No condition.{% endif %}<br><br>False:{% if f == 'true' %}This is a true condition.{% elif f == 'false' %}This is a false condition.{% else %}No condition.{% endif %}<br><br>No Else:{% if f == 'true' %}This is a true condition.{% elif t == 'false' %}This is a false condition.{% else %}No condition.{% endif %}<br><br>
</p></body>
</html>
【代码分析】
修改的内容,分别通过标签进行选择判断,根据判断结果选择输出不同的文本信息。
3.打开FireFox浏览器访问
【http://localhost:8000/gramapp/gram/】
二、关于循环对象的{% for-endfor %}标签
1.编辑视图文件
文件路径【TmplSite/gramapp/views.py】
from django.http import HttpResponse
from django.shortcuts import render
from django.template import loader# Create your views here.def index(request):return HttpResponse("Hello, Django! You're at the gramapp index.")def grammar(request):context = {}context['title'] = "Django Template Grammar"context['gram'] = "grammar"context['flag'] = "odd"    # "even" or "odd"context['even'] = [0, 2, 4, 6, 8]context['odd'] = [1, 3, 5, 7, 9]template = loader.get_template('gramapp/grammar.html')return HttpResponse(template.render(context, request))
【代码分析】
在修改的内容中,在变量context中添加了第一个属性flag,并赋值为“even”;
在变量context中添加了第二个属性even,并赋值为也给偶数列表(数字10以内);
在变量context中添加了第三个属性odd,并赋值为一个奇数列表(数字10以内);
2.编辑HTML模板文件
<!DOCTYPE html>
<html lang="en">
<head><meta charset="UTF-8"><link rel="stylesheet" type="text/css" href="/static/css/mystyle.css"/><title>{{ title }}</title>
</head>
<body><p>Hello, this is a <b>{{ gram }}</b> page!
</p>
<p>Numbers:<ul>{% if flag == 'even' %}{% for num in even %}<li>{{ num }}</li>{% endfor %}{% elif flag == 'odd' %}{% for num in odd %}<li>{{ num }}</li>{% endfor %}{% else %}No print.{% endif %}</ul>
</p></body>
</html>
【代码分析】
通过标签进行选择判断,根据判断结果选择输出奇数数列或偶数数列。
分别通过标签循环对象even和odd,输出奇数数列和偶数数列。
3.打开FireFox浏览器访问
【http://localhost:8000/gramapp/gram/】


三、关于自动转义的{% autoescape-endautoescape %}标签
1.编辑视图文件
文件路径【TmplSite/gramapp/views.py】
from django.http import HttpResponse
from django.shortcuts import render
from django.template import loader# Create your views here.def index(request):return HttpResponse("Hello, Django! You're at the gramapp index.")def grammar(request):context = {}context['title'] = "Django Template Grammar"context['gram'] = "grammar"context['site'] = "<a href='https://www.djangoproject.com/'>Django Home Page</a>"template = loader.get_template('gramapp/grammar.html')return HttpResponse(template.render(context, request))
【代码分析】
在变量context中添加了一个属性site,并赋值为一个超链接标签"Django Home Page"
2.编辑HTML模板文件
<!DOCTYPE html>
<html lang="en">
<head><meta charset="UTF-8"><link rel="stylesheet" type="text/css" href="/static/css/mystyle.css"/><title>{{ title }}</title>
</head>
<body><p>Hello, this is a <b>{{ gram }}</b> page!
</p>
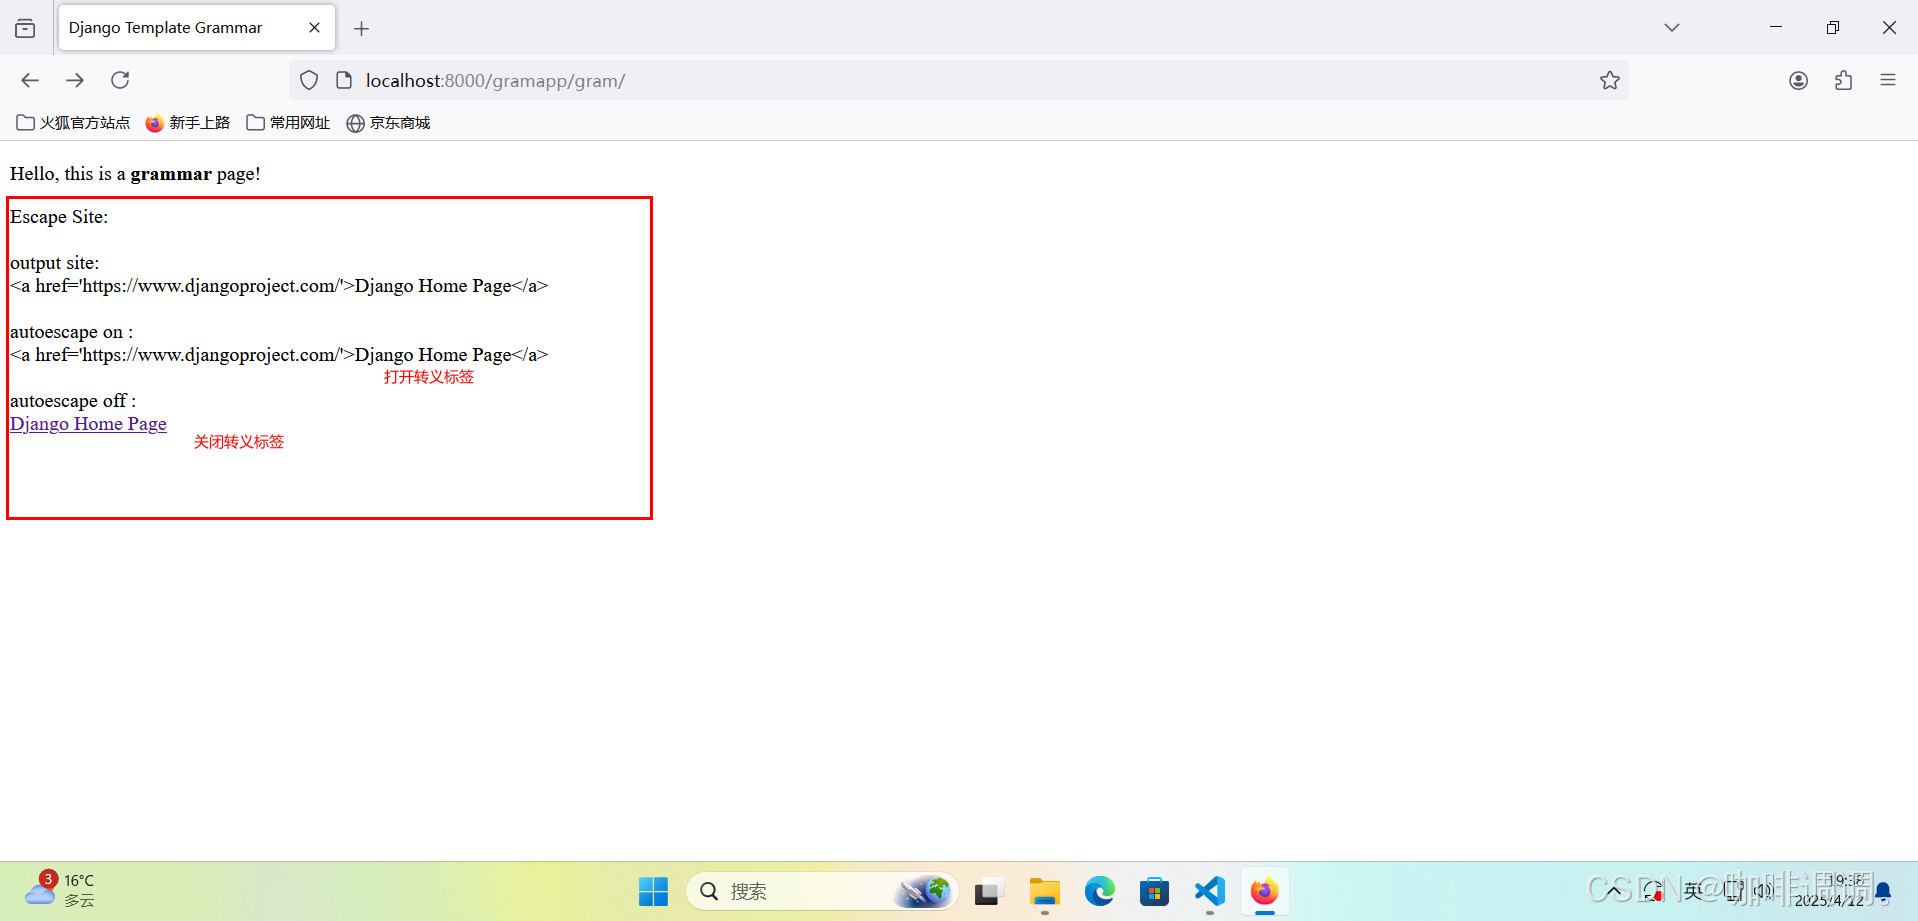
<p>Escape Site:<br><br>output site:<br>{{ site }}<br><br>autoescape on :<br>{% autoescape on %}{{ site }}{% endautoescape %}<br><br>autoescape off :<br>{% autoescape off %}{{ site }}{% endautoescape %}
</p></body>
</html>
【代码分析】
通过双大括号引用了视图定义的属性,直接在页面中进行输出;
分别通过【{% autoescape on %}】【{% endautoescape %}】自动转义标签对属性site进行打开转义操作,并在页面中进行输出;
分别通过【{% autoescape on %}】【{% endautoescape %}】自动转义标签对属性site进行关闭转义操作,并在页面中进行输出;
3.打开FireFox浏览器访问
【http://localhost:8000/gramapp/gram/】
四、关于循环对象的{% cycle %}标签
1.编辑视图文件
文件路径【TmplSite/gramapp/views.py】
from django.http import HttpResponse
from django.shortcuts import render
from django.template import loader# Create your views here.def index(request):return HttpResponse("Hello, Django! You're at the gramapp index.")def grammar(request):context = {}context['title'] = "Django Template Grammar"context['gram'] = "grammar"context['num'] = (0, 1, 2, 3, 4, 5, 6, 7, 8, 9)template = loader.get_template('gramapp/grammar.html')return HttpResponse(template.render(context, request))
【代码分析】
在变量context中添加了一个属性num,并赋值为一个元组类型的数组(用于计数);
2.编辑HTML模板文件
<!DOCTYPE html>
<html lang="en">
<head><meta charset="UTF-8"><link rel="stylesheet" type="text/css" href="/static/css/mystyle.css"/><title>{{ title }}</title>
</head>
<body><p>Hello, this is a <b>{{ gram }}</b> page!
</p>
<p class="middle">Cycle Obj:<br>{% for i in num %}{% cycle 'even' 'odd' %}{% endfor %}
</p></body>
</html>
【代码分析】
通过【{% cycle %}】循环对象标签对一组字符串进行循环遍历操作,并在页面中直接输出
3.打开FireFox浏览器访问
【http://localhost:8000/gramapp/gram/】

4.继续编辑视图文件
文件路径【TmplSite/gramapp/views.py】
from django.http import HttpResponse
from django.shortcuts import render
from django.template import loader# Create your views here.def index(request):return HttpResponse("Hello, Django! You're at the gramapp index.")def grammar(request):context = {}context['title'] = "Django Template Grammar"context['gram'] = "grammar"context['len'] = (0, 1, 2)template = loader.get_template('gramapp/grammar.html')return HttpResponse(template.render(context, request))
【代码分析】
在变量context中添加了一个属性len,并赋值为一个元组类型的数组(用于计数);
5.继续编辑HTML模板文件
<!DOCTYPE html>
<html lang="en">
<head><meta charset="UTF-8"><link rel="stylesheet" type="text/css" href="/static/css/mystyle.css"/><title>{{ title }}</title>
</head>
<body><p>Hello, this is a <b>{{ gram }}</b> page!
</p>
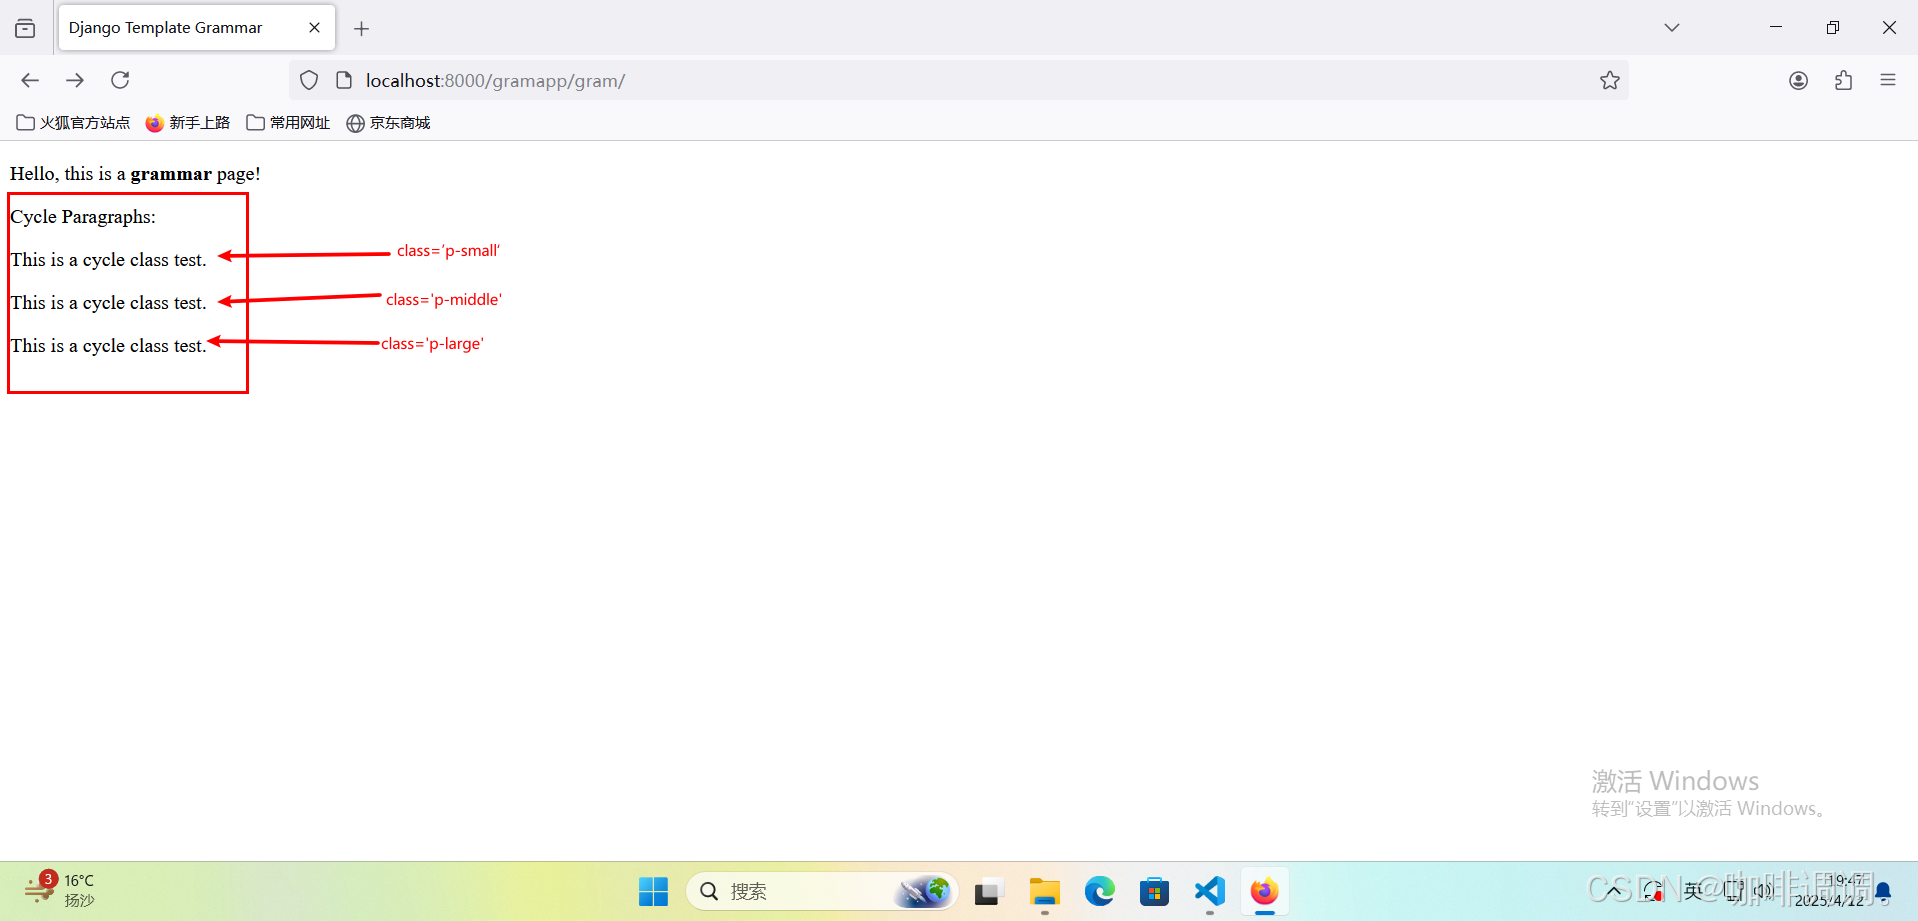
<p>Cycle Paragraphs:<br>{% for j in len %}<p class="{% cycle 'p-small' 'p-middle' 'p-large' %}">This is a cycle class test.</p>{% endfor %}
</p></body>
</html>
【代码分析】
通过【{% cycle %}】循环对象标签对一组CSS样式表进行循环遍历操作,这组不同的样式均内置于同一个段落标签;
6.打开FireFox浏览器访问
【http://localhost:8000/gramapp/gram/】
五、关于检查值是否变化的{% ifchange %}标签
1.编辑视图文件
文件路径【TmplSite/gramapp/views.py】
from django.http import HttpResponse
from django.shortcuts import render
from django.template import loader# Create your views here.def index(request):return HttpResponse("Hello, Django! You're at the gramapp index.")def grammar(request):context = {}context['title'] = "Django Template Grammar"context['gram'] = "grammar"context['num'] = (0, 1, 2, 3, 4, 5, 6, 7, 8, 9)context['changed'] = 'watchchange'template = loader.get_template('gramapp/grammar.html')return HttpResponse(template.render(context, request))
【代码分析】
在变量context中添加了一个属性changed,并赋值为一个字符串,用于判断内容是否改变;
2.编辑HTML模板文件
<!DOCTYPE html>
<html lang="en">
<head><meta charset="UTF-8"><link rel="stylesheet" type="text/css" href="/static/css/mystyle.css"/><title>{{ title }}</title>
</head>
<body><p>Hello, this is a <b>{{ gram }}</b> page!
</p>
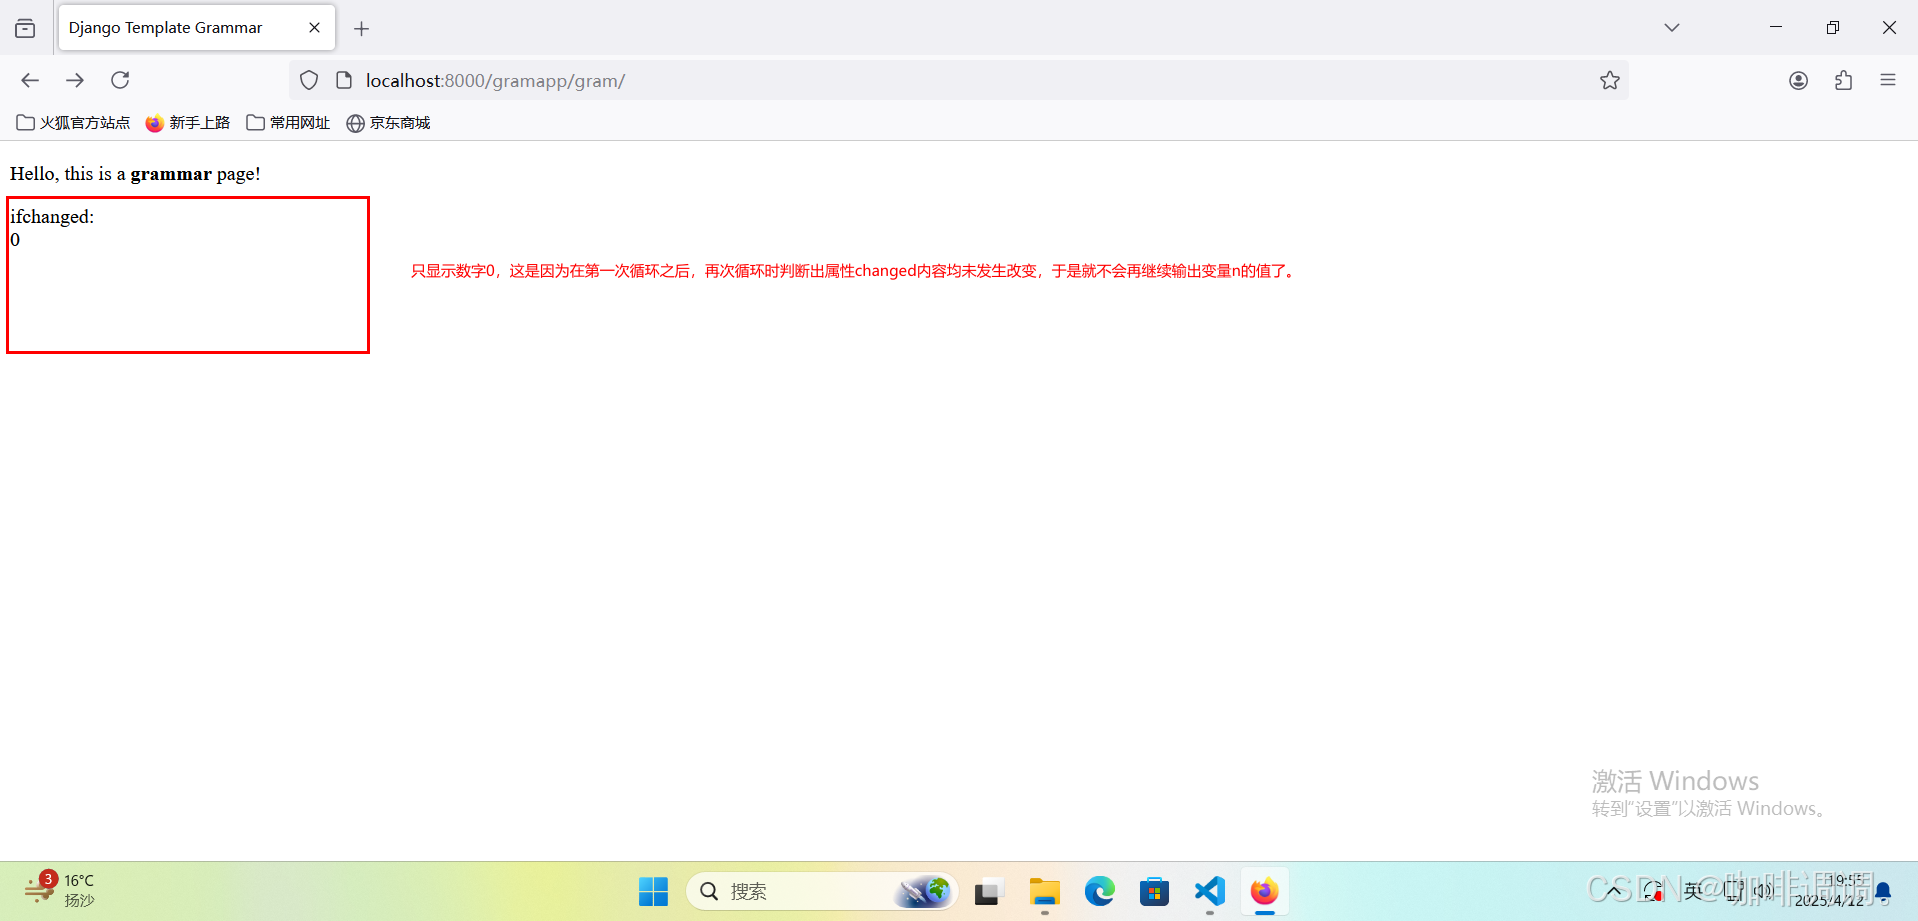
<p class="middle">ifchanged:<br>{% for n in num %}{% ifchanged changed %}{{ n }}{% endifchanged %}{% endfor %}
</p></body>
</html>
【代码分析】
通过【{% ifchanged-endifchanged %}】标签判断属性changed的内容是否改变;
并根据上面判断的结果来输出变量n的值;
3.打开FireFox浏览器访问
【http://localhost:8000/gramapp/gram/】
4.继续编辑HTML模板文件
<!DOCTYPE html>
<html lang="en">
<head><meta charset="UTF-8"><link rel="stylesheet" type="text/css" href="/static/css/mystyle.css"/><title>{{ title }}</title>
</head>
<body><p>Hello, this is a <b>{{ gram }}</b> page!
</p>
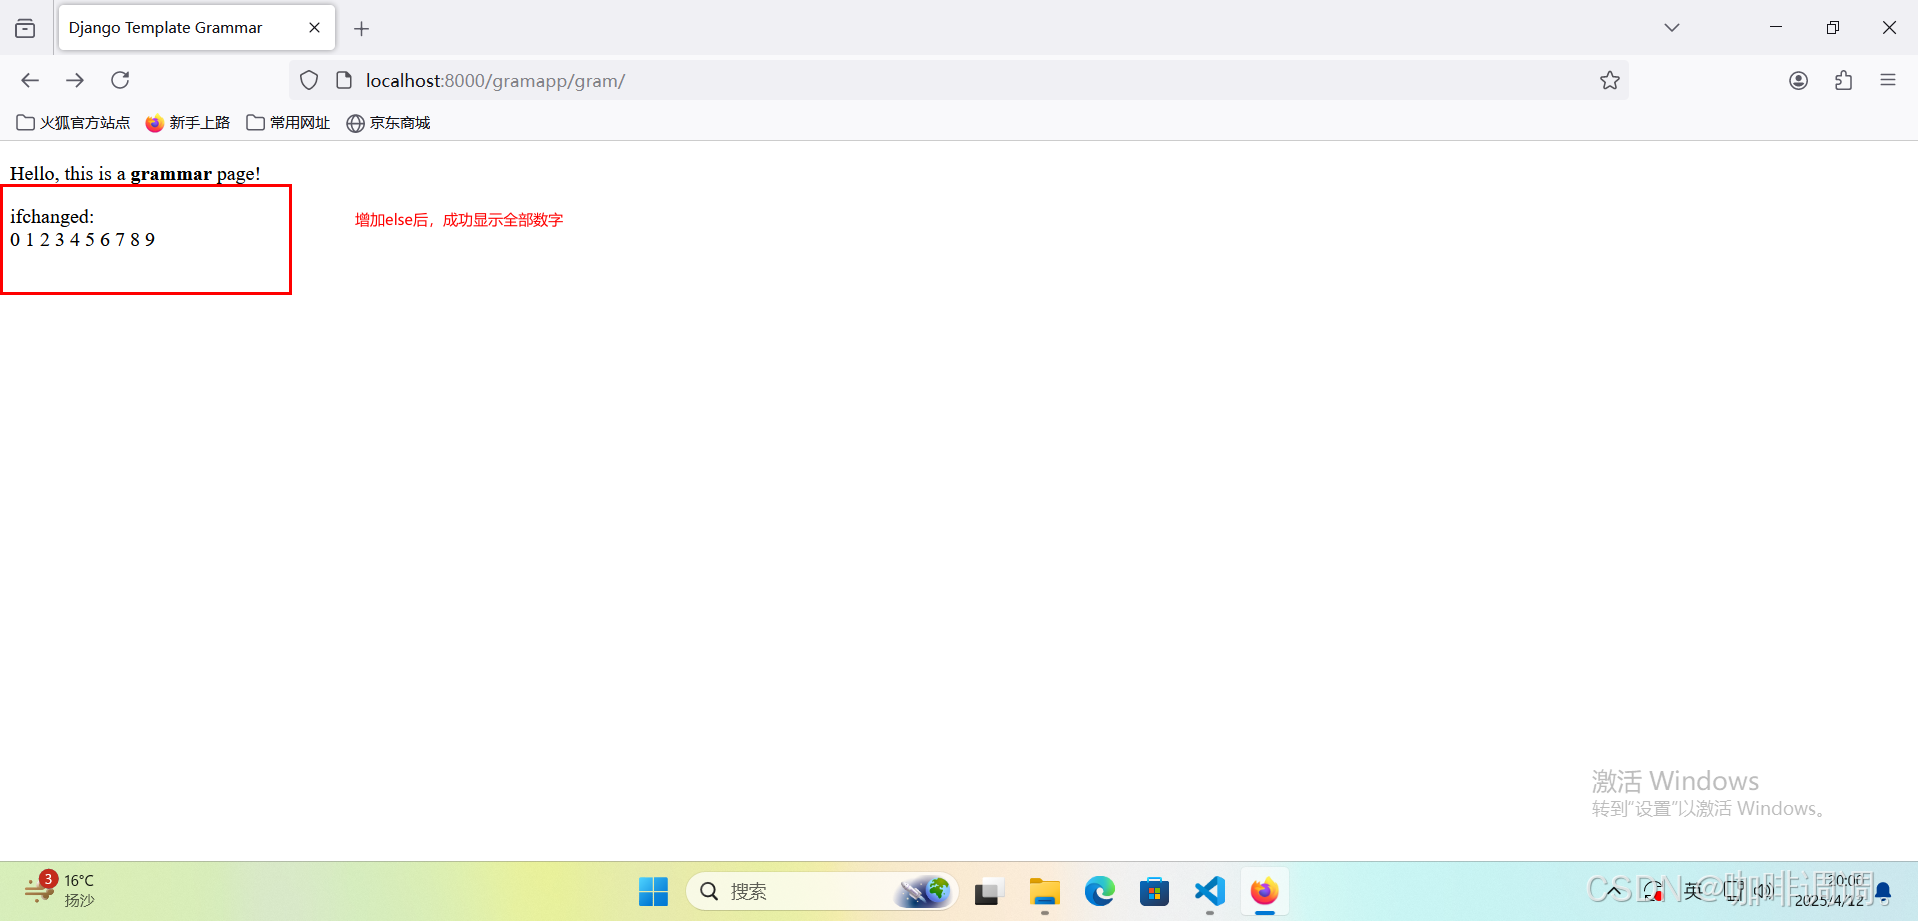
<p class="middle">ifchanged:<br>{% for n in num %}{% ifchanged changed %}{{ n }}{% else %}{{ n }}{% endifchanged %}{% endfor %}
</p></body>
</html>
【代码分析】
在【{% ifchanged-endifchanged %}】标签中增加了{% else %}标签。
同样在输出变量n的值;
5.打开FireFox浏览器访问
【http://localhost:8000/gramapp/gram/】
六、关于重组对象的{% regroup %}标签
1.编辑视图文件
文件路径【TmplSite/gramapp/views.py】
from django.http import HttpResponse
from django.shortcuts import render
from django.template import loader# Create your views here.def index(request):return HttpResponse("Hello, Django! You're at the gramapp index.")def grammar(request):context = {}context['title'] = "Django Template Grammar"context['gram'] = "grammar"context['languages'] = [{'name': 'Python', 'rated': '99%', 'content': 'Prog'},{'name': 'Java', 'rated': '90%', 'content': 'Prog'},{'name': 'JavaScript', 'rated': '98%', 'content': 'Web'},{'name': 'PHP', 'rated': '95%', 'content': 'Web'},{'name': 'Django', 'rated': '96', 'content': 'Web'},]template = loader.get_template('gramapp/grammar.html')return HttpResponse(template.render(context, request))
【代码分析】
在变量context中添加了一个属性languges,并赋值为一个字典类型的数组(关于几组编程语言的内容);
2.编辑HTML模板文件
<!DOCTYPE html>
<html lang="en">
<head><meta charset="UTF-8"><link rel="stylesheet" type="text/css" href="/static/css/mystyle.css"/><title>{{ title }}</title>
</head>
<body><p>Hello, this is a <b>{{ gram }}</b> page!
</p>
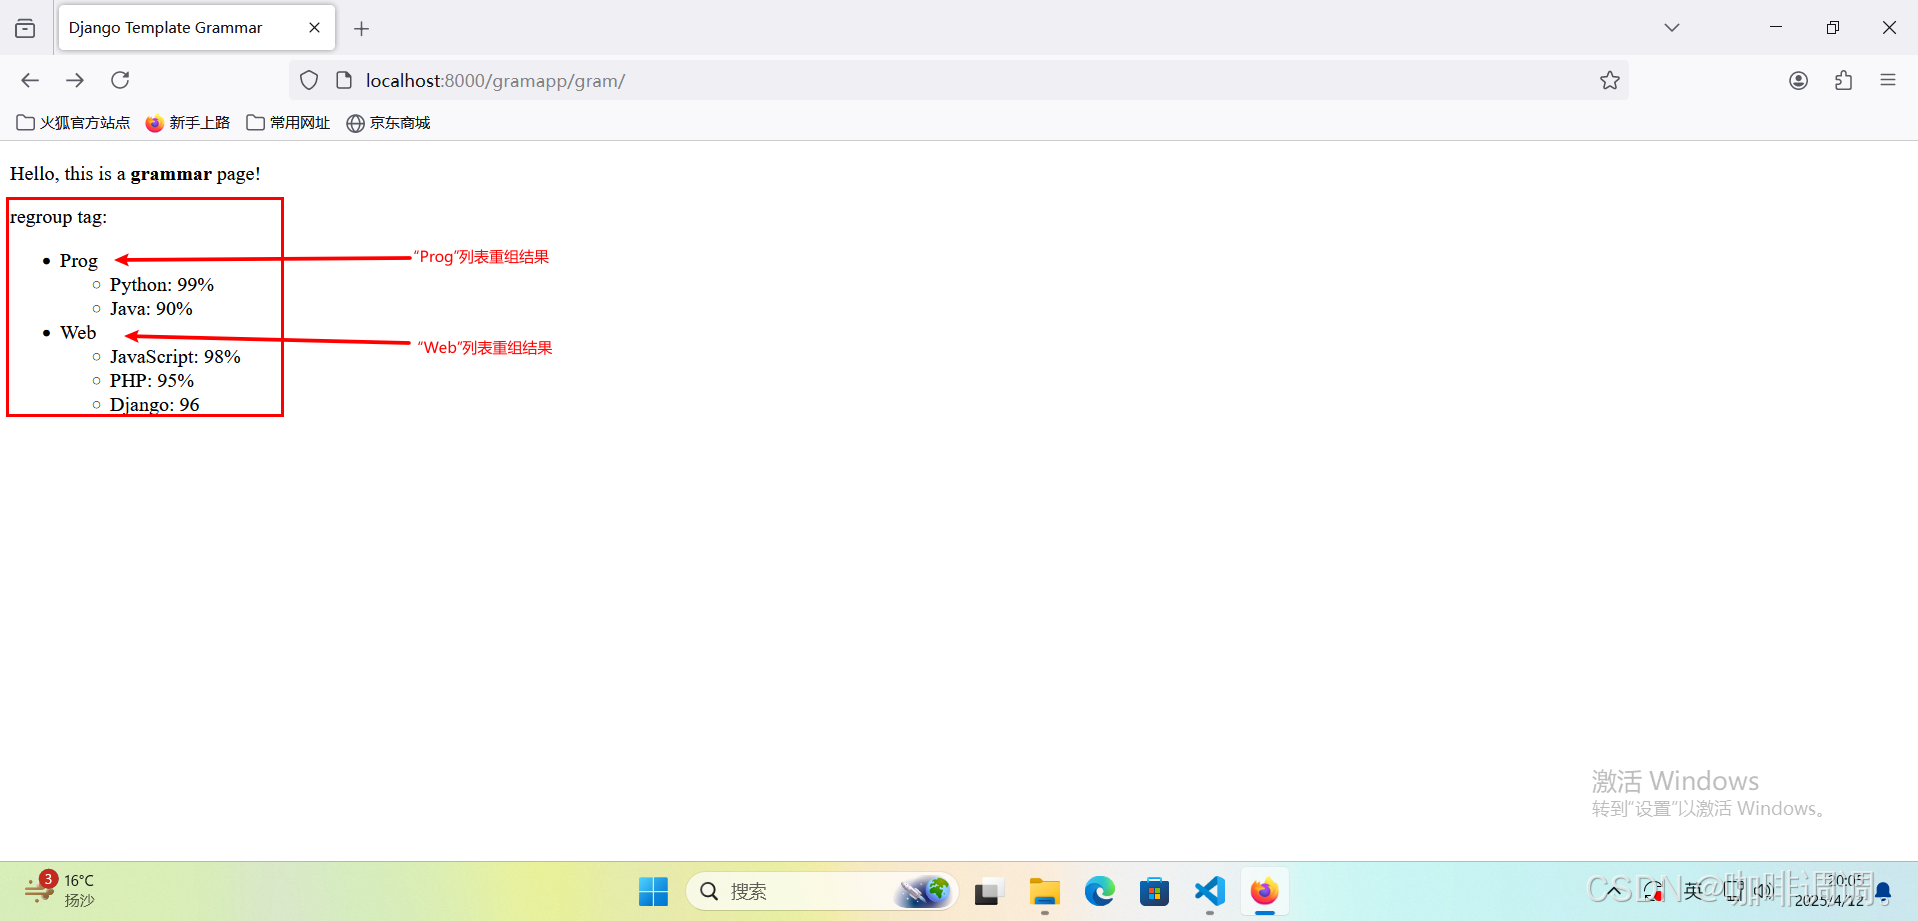
{% regroup languages by content as content_list %}
<p>regroup tag:<br><ul>{% for content in content_list %}<li>{{ content.grouper }}<ul>{% for lang in content.list %}<li>{{ lang.name }}: {{ lang.rated }}</li>{% endfor %}</ul></li>{% endfor %}</ul>
</p></body>
</html>
【代码分析】
通过grouper字段来依据content属性对languages对象列表进行分组;
通过list字段来获取每一项的列表,该列表包括了languages对象中每一项的具体内容;
3.打开FireFox浏览器访问
【http://localhost:8000/gramapp/gram/】
七、关于重置循环对象的{% resetcycle %}标签
1.编辑视图文件
文件路径【TmplSite/gramapp/views.py】
from django.http import HttpResponse
from django.shortcuts import render
from django.template import loader# Create your views here.def index(request):return HttpResponse("Hello, Django! You're at the gramapp index.")def grammar(request):context = {}context['title'] = "Django Template Grammar"context['gram'] = "grammar"context['len'] = (0, 1, 2)context['len2'] = (0, 1, 2, 3)template = loader.get_template('gramapp/grammar.html')return HttpResponse(template.render(context, request))
【代码分析】
在变量context中添加了一个属性len,并赋值为一个元组类型的变量(用于第一层循环计数);
在变量context中添加了一个属性len2,并赋值为另一个元组类型的变量(用于第二层循环计数);
2.编辑HTML模板文件
<!DOCTYPE html>
<html lang="en">
<head><meta charset="UTF-8"><link rel="stylesheet" type="text/css" href="/static/css/mystyle.css"/><title>{{ title }}</title>
</head>
<body><p>Hello, this is a <b>{{ gram }}</b> page!
</p>
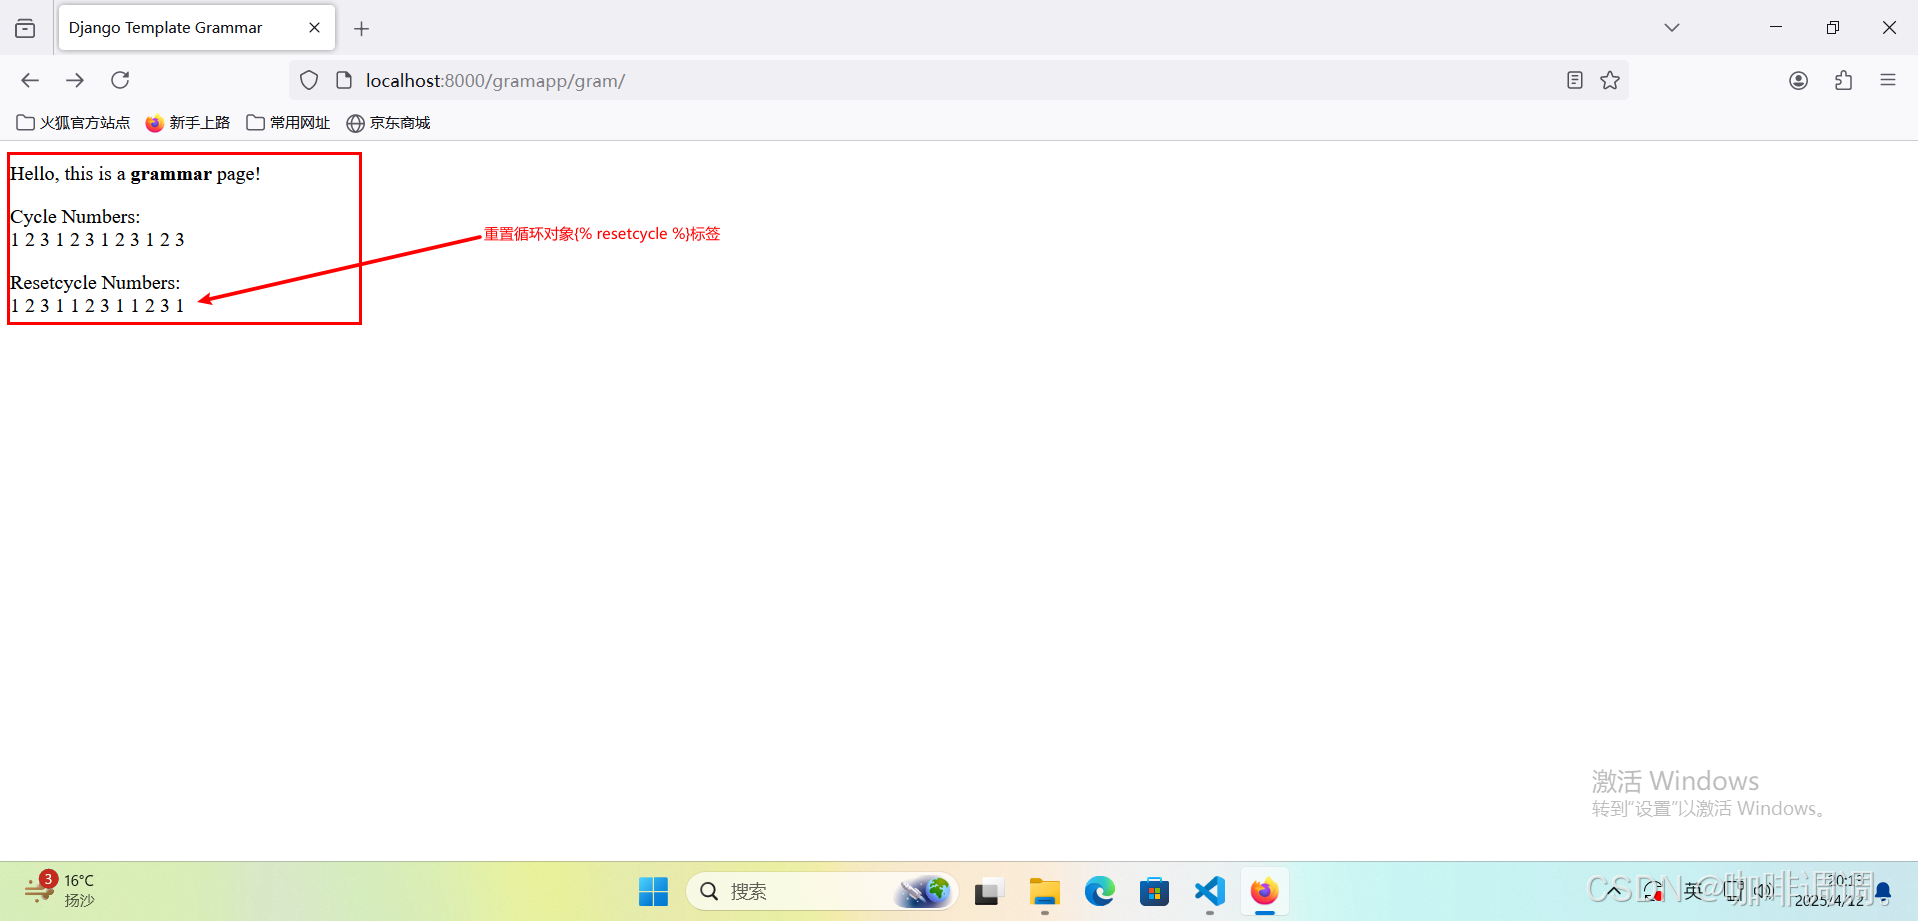
<p>Cycle Numbers:<br>{% for i in len %}{% for j in len2 %}{% cycle '1' '2' '3' %}{% endfor %}{% endfor %}
</p>
<p>Resetcycle Numbers:<br>{% for i in len %}{% for j in len2 %}{% cycle '1' '2' '3' %}{% endfor %}{% resetcycle %}{% endfor %}
</p></body>
</html>
【代码分析】
通过{% cycle %}标签尝试在页面输出一个数字序列;
同样通过{% cycle %}标签尝试在页面输出一个数字序列;
不同之处是在27行中,通过{% resetcycle %}标签重置了第25行代码中的{% cycle %}标签。
3.打开FireFox浏览器访问
【http://localhost:8000/gramapp/gram/】
八、{% url %}链接标签
1.编辑HTML模板文件
<!DOCTYPE html>
<html lang="en">
<head><meta charset="UTF-8"><link rel="stylesheet" type="text/css" href="/static/css/mystyle.css"/><title>{{ title }}</title>
</head>
<body><p>Hello, this is a <b>{{ gram }}</b> page!
</p>
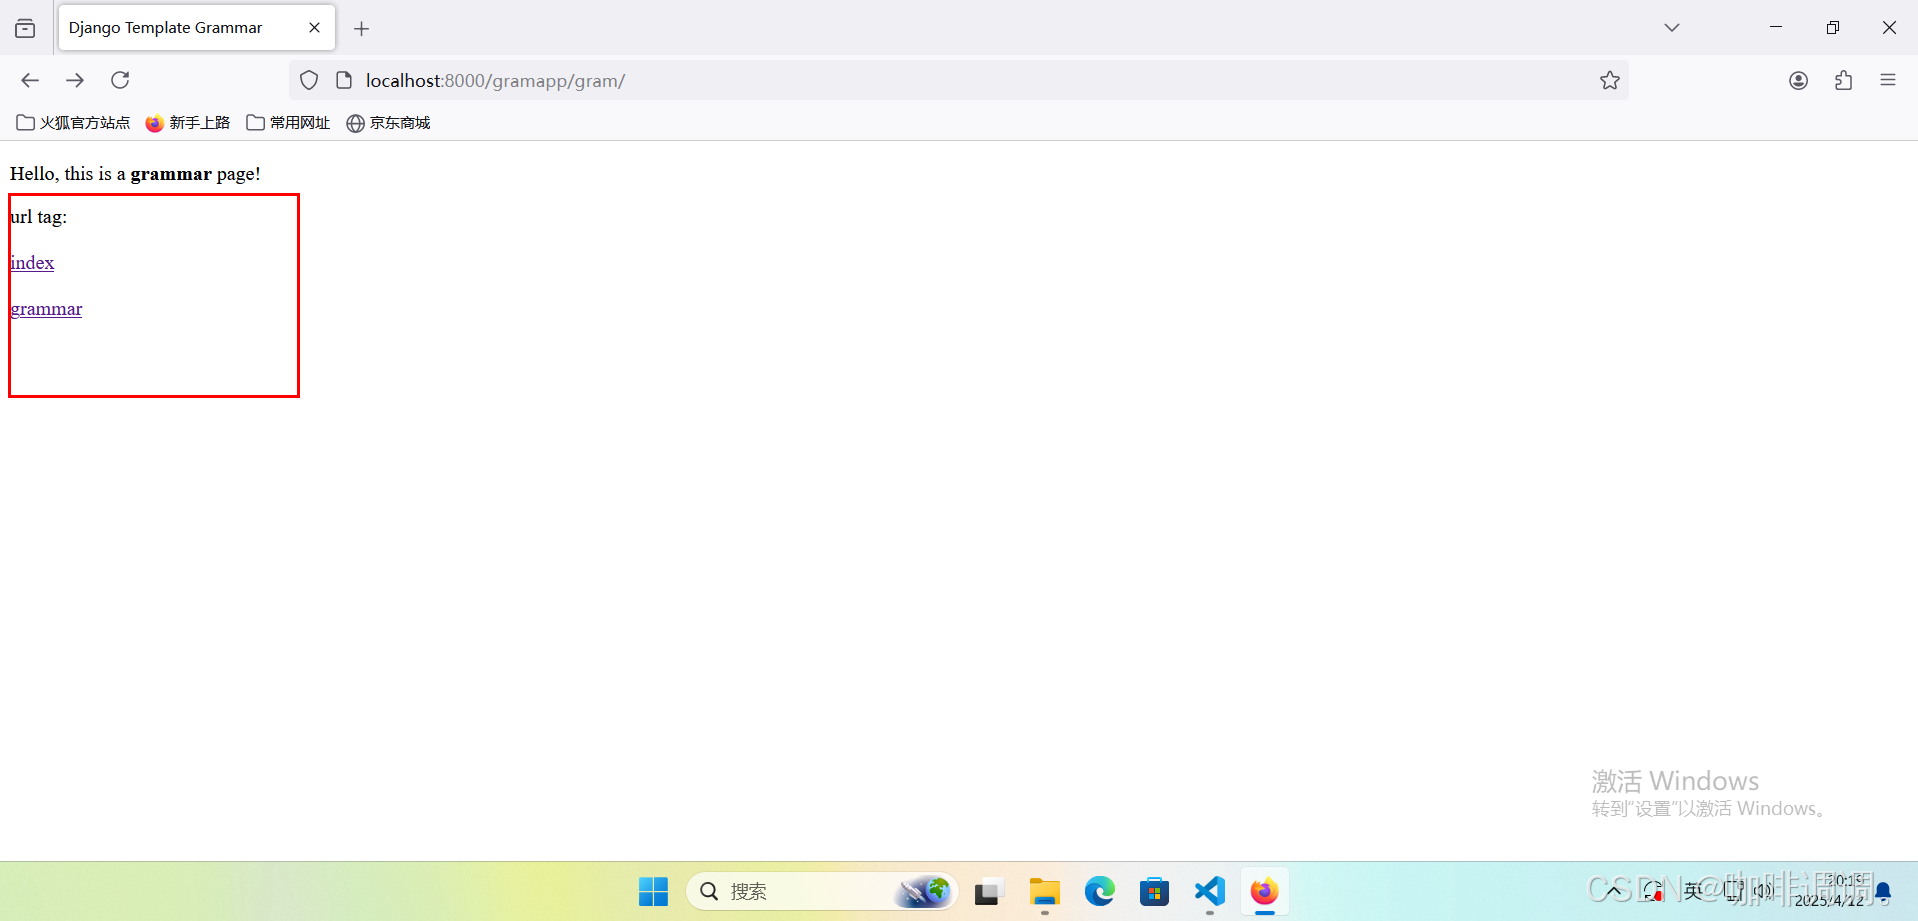
<p>url tag:<br><br><a href={% url 'index' %}>index</a><br><br><a href={% url 'grammar' %}>grammar</a><br><br>
</p></body>
</html>
【代码分析】
通过{% url %}链接标签定义了视图index的超链接地址;
同样通过{% url %}链接标签定义了视图grammar的超链接地址;
3.打开FireFox浏览器访问
【http://localhost:8000/gramapp/gram/】
4.编辑路由文件
文件路径【TmplSite/gramapp/urls.py】
from django.urls import path
from . import viewsurlpatterns = [path('', views.index, name='index'),path('gram/', views.grammar, name='grammar'),path('gram/<gram_id>/', views.grammar_id, name='grammar_id'),
]
【代码分析】
表示路径gram_id对应视图函数grammar_id,其中gram_id表示路径参数;
5.编辑视图文件
文件路径【TmplSite/gramapp/views.py】
from django.http import HttpResponse
from django.shortcuts import render
from django.template import loader# Create your views here.def index(request):return HttpResponse("Hello, Django! You're at the gramapp index.")def grammar(request):context = {}context['title'] = "Django Template Grammar"context['gram'] = "grammar"context['id'] = '123'template = loader.get_template('gramapp/grammar.html')return HttpResponse(template.render(context, request))def grammar_id(request, gram_id):return HttpResponse("Hello, you're at the grammar %s index." % (gram_id))
【代码分析】
定义了一个视图函数grammar_id,并包括一个参数gram_id;
在变量context中添加了一个属性id,并赋值为一个字符串“123”;
6.继续编辑模板文件
<!DOCTYPE html>
<html lang="en">
<head><meta charset="UTF-8"><link rel="stylesheet" type="text/css" href="/static/css/mystyle.css"/><title>{{ title }}</title>
</head>
<body><p>Hello, this is a <b>{{ gram }}</b> page!
</p>
<p>url tag:<br><br><a href={% url 'grammar_id' id %}>grammar_id</a><br><br><a href={% url 'grammar_id' gram_id=id %}>grammar_id(by arg1)</a><br><br>
</p></body>
</html>
【代码分析】
通过{% url %}链接标签定义了视图grammar_id的超链接地址,并使用了id参数;
同样通过{% url %}链接标签定义了视图grammar_id的超链接地址,在使用id参数的方式上借助了关键字参数gram_id
7.打开FireFox浏览器访问
【http://localhost:8000/gramapp/gram/】

九、输出模板标签字符的{% templatetag %}标签
1.编辑HTML模板文件
<!DOCTYPE html>
<html lang="en">
<head><meta charset="UTF-8"><link rel="stylesheet" type="text/css" href="/static/css/mystyle.css"/><title>{{ title }}</title>
</head>
<body><p>Hello, this is a <b>{{ gram }}</b> page!
</p>
<p>templatetag openblock:<br>{% templatetag openblock %} {% url 'grammar' %} {% templatetag closeblock %}<br><br>templatetag openvariable:<br>{% templatetag openvariable %} {{ num }} {% templatetag closevariable %}<br><br>templatetag openbrace:<br>{% templatetag openbrace %} {{ len }} {% templatetag closebrace %}<br><br>
</p>
</body>
</html>
【代码分析】
通过{% templatetag openblock %}标签和{% templatetag closeblock %}标签在页面中输出了语法字符“{% %}”;
通过{% templatetag openvariable %}标签和{% templatetag closevariable %}标签在页面中输出了语法字符“{{ }}”;
通过{% templatetag openbrace %}标签和{% templatetag closebrace %}标签在页面中输出了语法字符“{ }”;
2.打开FireFox浏览器访问
【http://localhost:8000/gramapp/gram/】

十、关于计算比率的{% widthratio %}标签
1.编辑HTML模板文件
<!DOCTYPE html>
<html lang="en">
<head><meta charset="UTF-8"><link rel="stylesheet" type="text/css" href="/static/css/mystyle.css"/><title>{{ title }}</title>
</head>
<body><p>Hello, this is a <b>{{ gram }}</b> page!
</p>
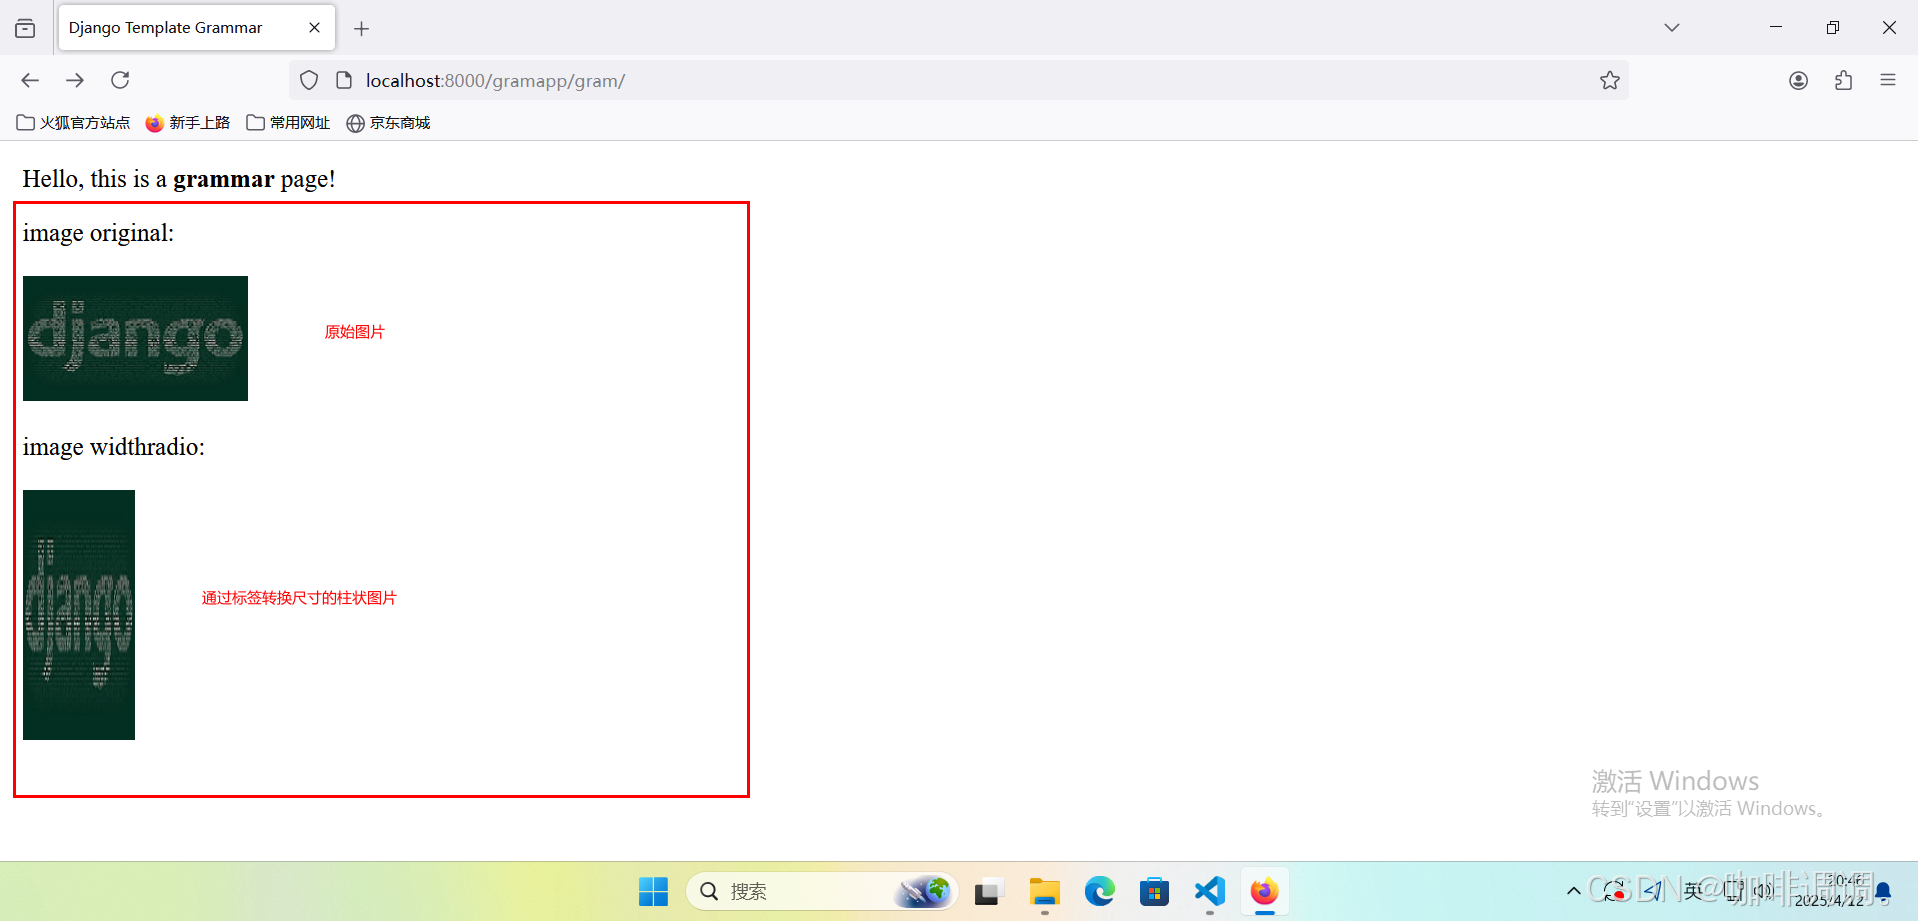
<p>image original:<br><br><img src="/static/images/django-small.png" alt="Django">
</p>
<p>image widthradio:<br><br><img src="/static/images/django-small.png" alt="Django" height="{% widthratio 100 50 100 %}" width="{% widthratio 180 200 100 %}">
</p>
</body>
</html>
【代码分析】
在HTML模板中显示了一幅原始图片(图片路径:“/static/images/django-small.png”);
在HTML模板页面中通过{% widthratio %}标签将该原始图片(图片路径:“/static/images/django-samll.png”)转换为柱状图进行显示;
在图片的height属性中通过{% widthratio %}标签对图片高度尺寸进行了比率换算(100÷50×100=200);
在图片的width属性中通过{% widthratio %}标签对图片宽度尺寸进行了比率换算(180÷200×100=90);
2.定义根目录settings.py文件
STATIC_URL = 'static/'STATICFILES_DIRS = [BASE_DIR / "static",
]
3.打开FireFox浏览器访问
【http://localhost:8000/gramapp/gram/】
十一、关于显示当前日期或时间的{% now %}标签
1.编辑HTML模板文件
<!DOCTYPE html>
<html lang="en">
<head><meta charset="UTF-8"><link rel="stylesheet" type="text/css" href="/static/css/mystyle.css"/><title>{{ title }}</title>
</head>
<body><p>Hello, this is a <b>{{ gram }}</b> page!
</p>
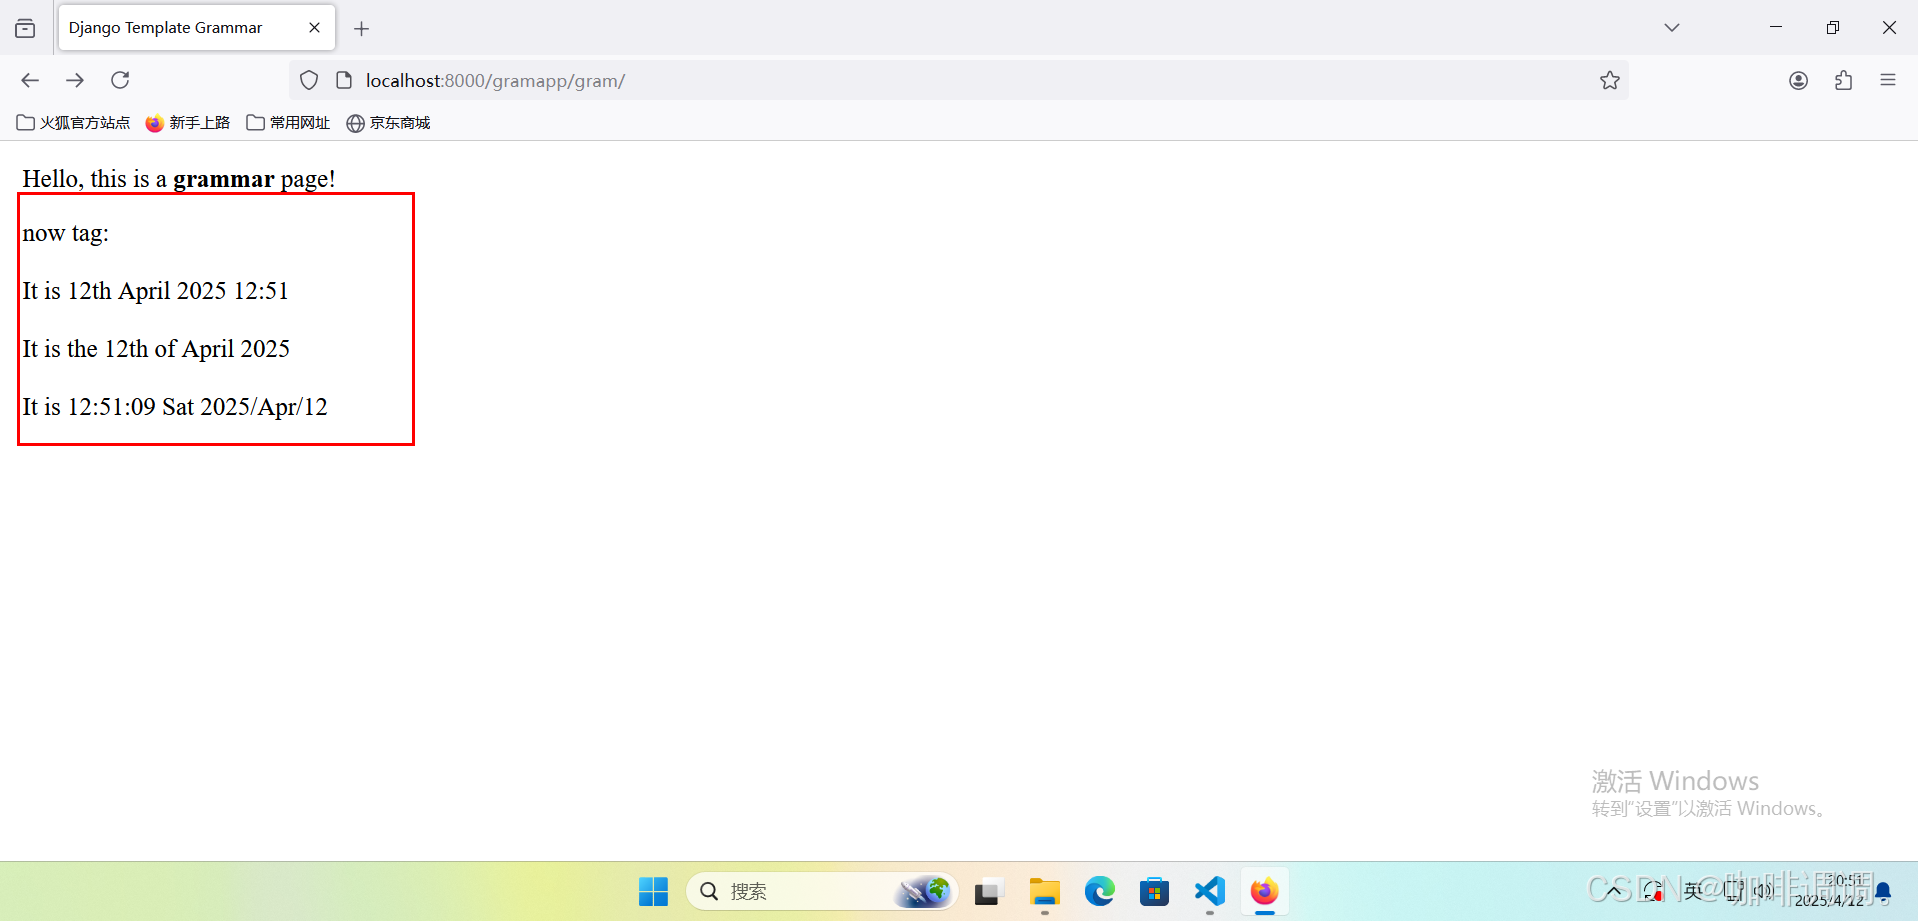
<p>now tag:<br><br>It is {% now "jS F Y H:i" %}<br><br>It is the {% now "jS \o\f F Y" %}<br><br>It is {% now "H:i:s D Y/M/d" %}<br><br>
</p>
</body>
</html>
【代码分析】
在HTML模板中使用{% now %}标签显示了一组时间格式;
3.打开FireFox浏览器访问
【http://localhost:8000/gramapp/gram/】