前置推荐阅读:ShardingSphere介绍-CSDN博客
SHARDINGSPHERE-JDBC
应用场景
Apache ShardingSphere-JDBC 可以通过 Java 和 YAML 这 2 种方式进行配置,开发者可根据场景选择适合的配置方式。
使用限制
目前仅支持 JAVA 语言
前提条件
开发环境需要具备 Java JRE 8 或更高版本。
操作步骤
- 规则配置。
详情请参见用户手册。
- 引入 maven 依赖。
<dependency><groupId>org.apache.shardingsphere</groupId><artifactId>shardingsphere-jdbc</artifactId><version>${latest.release.version}</version>
</dependency>
注意:请将
${latest.release.version}更改为实际的版本号。
- 创建 YAML 配置文件
# JDBC 逻辑库名称。在集群模式中,使用该参数来联通 ShardingSphere-JDBC 与 ShardingSphere-Proxy。
# 默认值:logic_db
databaseName (?):mode:dataSources:rules:
- !FOO_XXX...
- !BAR_XXX...props:key_1: value_1key_2: value_2
- 以
spring boot为例,编辑application.properties。
# 配置 DataSource Driver
spring.datasource.driver-class-name=org.apache.shardingsphere.driver.ShardingSphereDriver
# 指定 YAML 配置文件
spring.datasource.url=jdbc:shardingsphere:classpath:xxx.yaml
ShardingSphere 提供 JDBC 驱动,开发者可以在 Spring Boot 中配置 ShardingSphereDriver 来使用 ShardingSphere。
使用步骤
引入 Maven 依赖
<dependency><groupId>org.apache.shardingsphere</groupId><artifactId>shardingsphere-jdbc</artifactId><version>${shardingsphere.version}</version>
</dependency>
配置 Spring Boot
# 配置 DataSource Driver
spring.datasource.driver-class-name=org.apache.shardingsphere.driver.ShardingSphereDriver
# 指定 YAML 配置文件
spring.datasource.url=jdbc:shardingsphere:classpath:xxx.yaml
spring.datasource.url 中的 YAML 配置文件当前支持通过多种方式获取,具体可参考 已知实现 。
使用数据源
直接使用该数据源;或者将 ShardingSphereDataSource 配置在 JPA、Hibernate、MyBatis 等 ORM 框架中配合使用。
针对 Spring Boot OSS 3 的处理
Spring Boot OSS 3 对 Jakarta EE 和 Java 17 进行了 “大爆炸” 升级,涉及大量复杂情况。
ShardingSphere 的 XA 分布式事务尚未在 Spring Boot OSS 3 上就绪,此限制同样适用于其他基于 Jakarta EE 9+ 的 Web Framework,如 Quarkus 3,Micronaut Framework 4 和 Helidon 3。
用户仅需要配置如下。
<project><dependencies><dependency><groupId>org.apache.shardingsphere</groupId><artifactId>shardingsphere-jdbc</artifactId><version>${shardingsphere.version}</version></dependency></dependencies>
</project>
针对低版本的 Spring Boot OSS 2 的特殊处理
ShardingSphere 的所有特性均可在 Spring Boot OSS 2 上使用,但低版本的 Spring Boot OSS 可能需要手动指定 SnakeYAML 的版本为 2.2 。 这在 Maven 的 pom.xml 体现为如下内容。
<project><dependencies><dependency><groupId>org.apache.shardingsphere</groupId><artifactId>shardingsphere-jdbc</artifactId><version>${shardingsphere.version}</version></dependency><dependency><groupId>org.yaml</groupId><artifactId>snakeyaml</artifactId><version>2.2</version></dependency></dependencies>
</project>
如果用户是通过 https://start.spring.io/ 创建了 Spring Boot 项目,则可通过如下内容来简化配置。
<project><properties><snakeyaml.version>2.2</snakeyaml.version></properties><dependencies><dependency><groupId>org.apache.shardingsphere</groupId><artifactId>shardingsphere-jdbc</artifactId><version>${shardingsphere.version}</version></dependency></dependencies>
</project>SHARDINGSPHERE-PROXY
应用场景

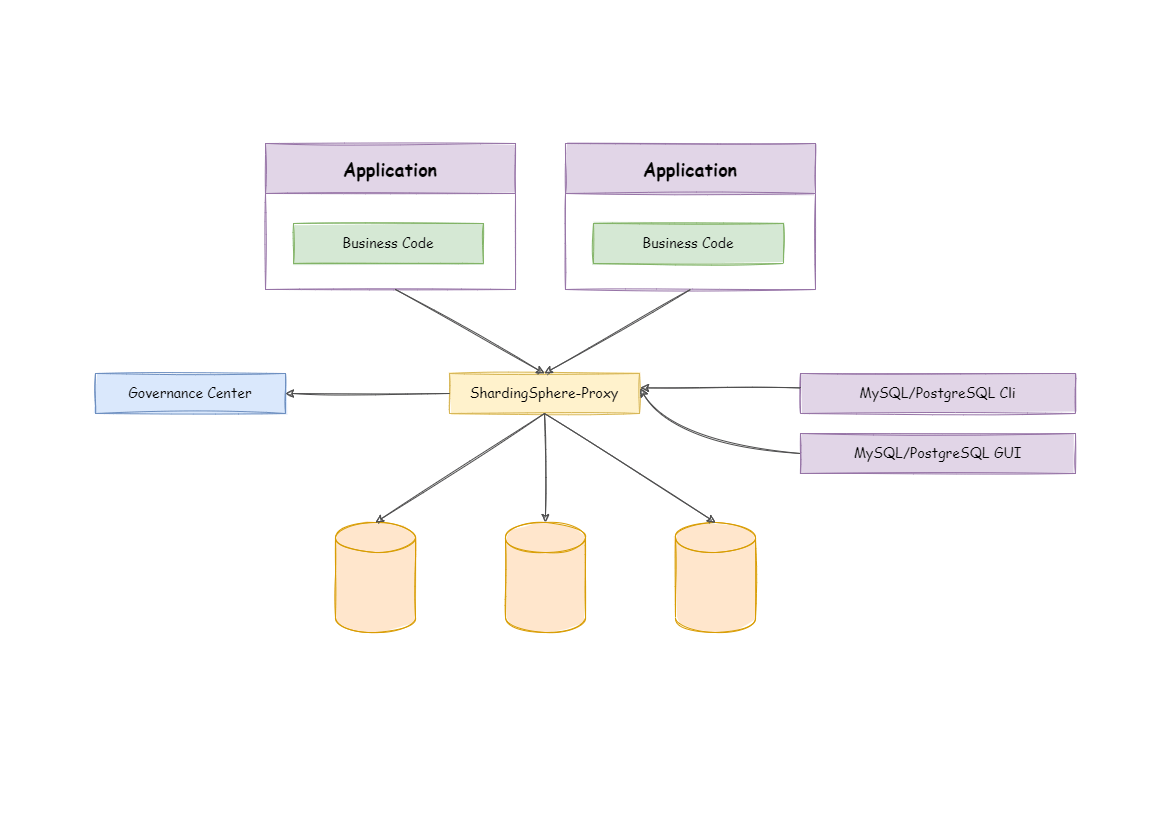
ShardingSphere-Proxy 的定位为透明化的数据库代理,理论上支持任何使用 MySQL、PostgreSQL、openGauss 协议的客户端操作数据,对异构语言、运维场景更友好。
使用限制
ShardingSphere-Proxy 对系统库/表(如 information_schema、pg_catalog)支持有限,通过部分图形化数据库客户端连接 Proxy 时,可能客户端或 Proxy 会有错误提示。可以使用命令行客户端(mysql、psql、gsql 等)连接 Proxy 验证功能。
前提条件
使用 Docker 启动 ShardingSphere-Proxy 无须额外依赖。 使用二进制分发包启动 Proxy,需要环境具备 Java JRE 8 或更高版本。
操作步骤
- 获取 ShardingSphere-Proxy
目前 ShardingSphere-Proxy 可以通过以下方式:
- 二进制发布包
- Docker
- Helm
- 规则配置
编辑 %SHARDINGSPHERE_PROXY_HOME%/conf/global.yaml。
编辑 %SHARDINGSPHERE_PROXY_HOME%/conf/database-xxx.yaml。
%SHARDINGSPHERE_PROXY_HOME% 为 Proxy 解压后的路径,例:
/opt/shardingsphere-proxy-bin/
详情请参见 配置手册。
- 引入依赖
如果后端连接 PostgreSQL 或 openGauss 数据库,不需要引入额外依赖。
如果后端连接 MySQL 数据库,请下载 mysql-connector-java-5.1.49.jar 或者 mysql-connector-java-8.0.11.jar,并将其放入 %SHARDINGSPHERE_PROXY_HOME%/ext-lib 目录。
- 启动服务
- 使用默认配置项
sh %SHARDINGSPHERE_PROXY_HOME%/bin/start.sh
默认启动端口为 3307,默认配置文件目录为:%SHARDINGSPHERE_PROXY_HOME%/conf/。
- 自定义端口和配置文件目录
sh %SHARDINGSPHERE_PROXY_HOME%/bin/start.sh ${proxy_port} ${proxy_conf_directory}
- 强制启动
sh %SHARDINGSPHERE_PROXY_HOME%/bin/start.sh -f
使用 -f 参数强制启动 Proxy,该参数会忽略启动期间异常的数据源,强行启动 Proxy,用户可以在 Proxy 启动完成后,通过 DistSQL 移除异常数据源。
- 使用 ShardingSphere-Proxy
执行 MySQL / PostgreSQL / openGauss 的客户端命令直接操作 ShardingSphere-Proxy 即可。
使用 MySQL 客户端连接 ShardingSphere-Proxy:
mysql -h${proxy_host} -P${proxy_port} -u${proxy_username} -p${proxy_password}
使用 PostgreSQL 客户端连接 ShardingSphere-Proxy:
psql -h ${proxy_host} -p ${proxy_port} -U ${proxy_username}
使用 openGauss 客户端连接 ShardingSphere-Proxy:
gsql -r -h ${proxy_host} -p ${proxy_port} -U ${proxy_username} -W ${proxy_password}


