项目实现源码:
前端源码
后端源码
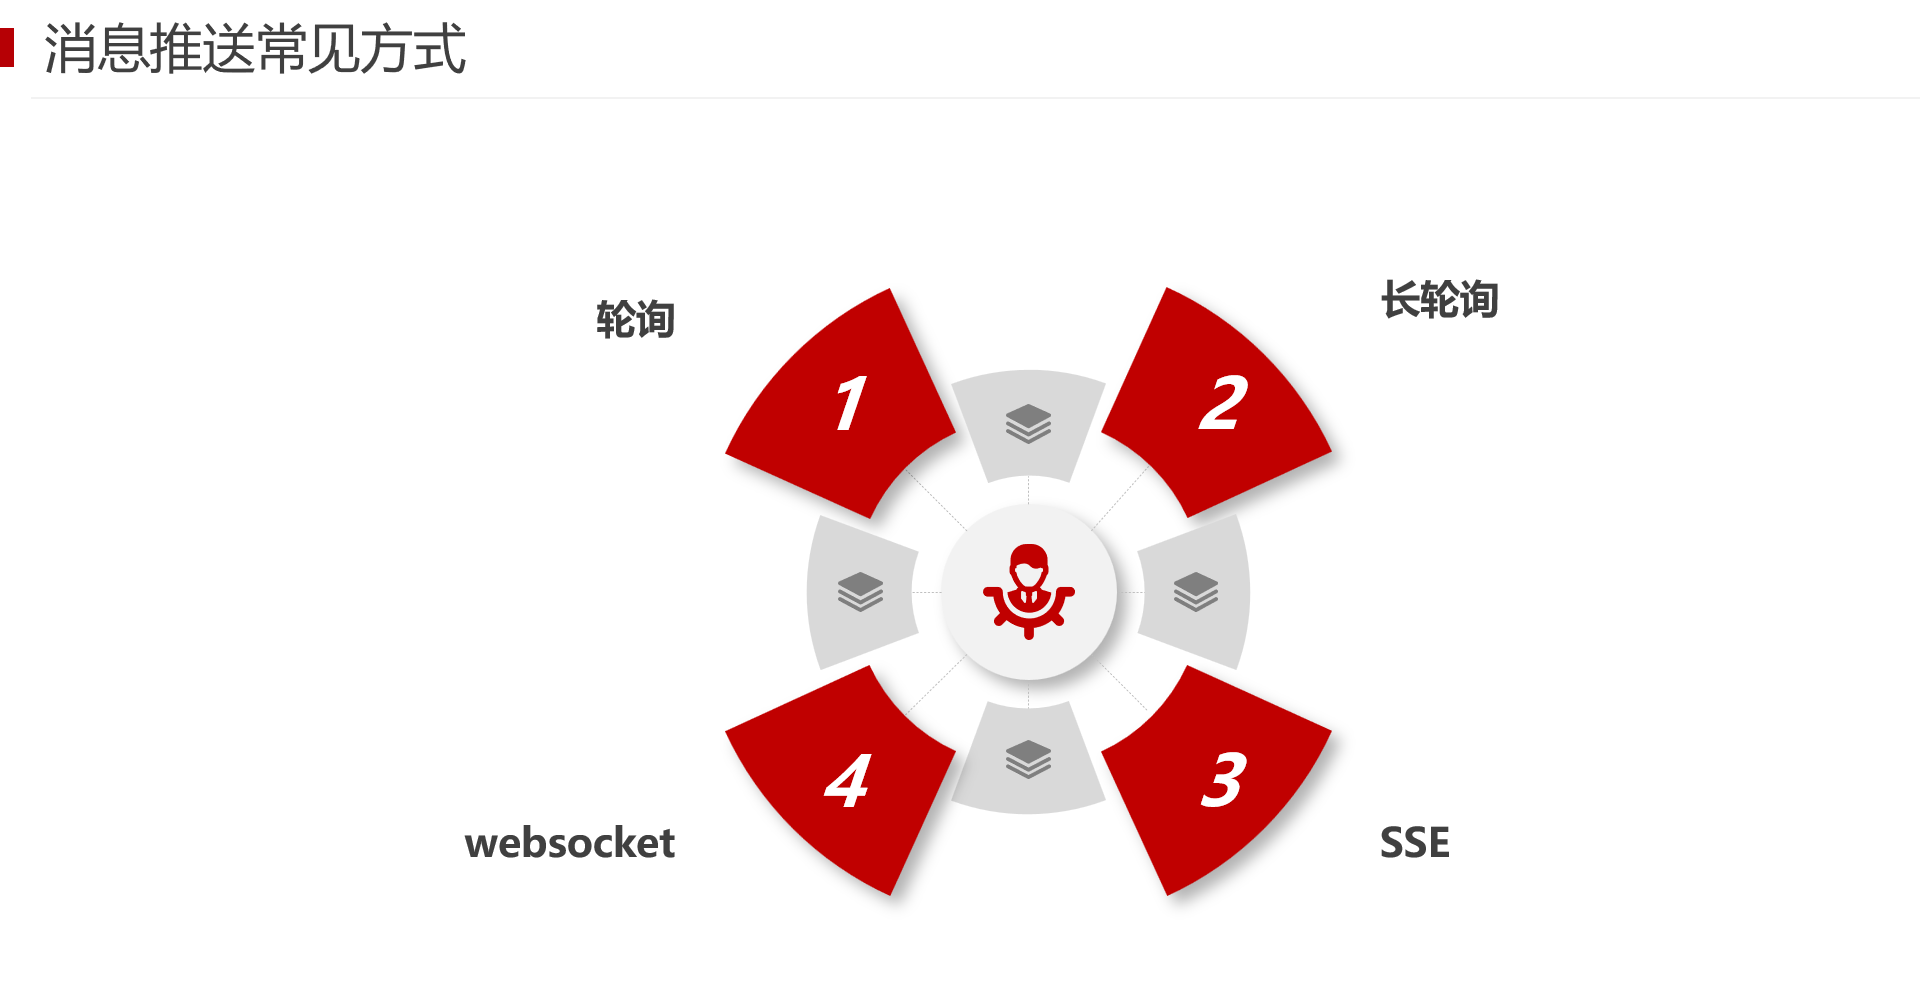
1.常见的消息推送方式
1.1 轮询
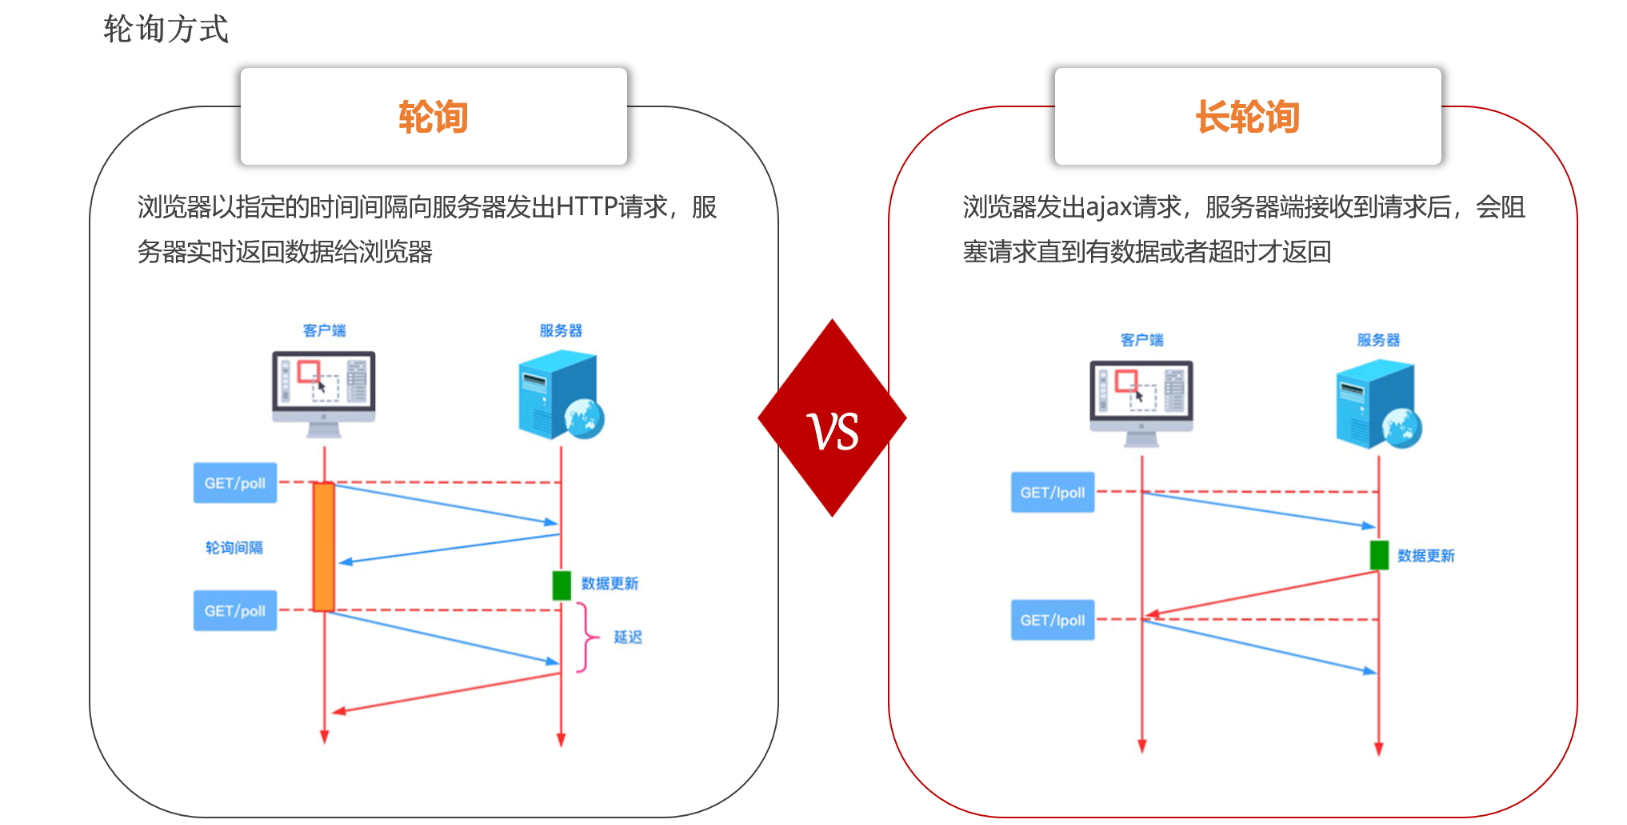
1.1.1 轮询的概念
客户端以固定的事件间隔(例如每秒或几分钟)向服务器发送HTTP请求,服务器收到请求后,处理请求并返回数据给客户端
轮询具体实现https://blog.csdn.net/m0_48333563/article/details/125968144
1.1.2 轮询的优点
- 实现简单:轮询是一种相对简单的获取都武器更新的方法,易于理解和实现
- 兼容性:由于轮询基于HYTTP请求和响应,因此他兼容几乎所有的网络服务和客户端
1.1.3 轮询的缺点
- 数据更新不及时:客户端必须等待下一次轮询间隔才能接收到新数据,这可能导致数据更新不及时
- 资源浪费:频繁的轮询可能会浪费服务器和客户端的资源,油漆是在没有新数据的情况下,大部分请求都是无效的。
1.2 长轮询
1.2.1长轮询的概念
长轮询是一种改进的轮询技术,客户端向服务器发送HTTP请求。服务器接收到请求后,会阻塞请求,直到有新数据达到指定的超时时间才会返回结果
- 如果有新数据,服务器会立即返回结果并关闭连接
- 如果没有新数据,服务器会在超时后关闭连接
- 客户端收到响应或连接超时后,会再发送新的请求
1.2.2 长轮询的优点
- 实时性提升:长轮询可以更快的接受到服务器的更新,因为他减少了客户端在两次请求之间的等待时长
- 减少了无效请求:与定时轮询相比,长轮询减少了在没有数据更新时无效请求的次数,因为服务器仅在数据准备好时才发送响应。
1.2.3 长轮询的缺点
- 资源占用:虽然轮询减少了请求次数,但他可能会长时间占用服务器资源,因为服务器需要保持连接打开直到新数据出现或超时。
- 兼容性和复杂度:长轮询的实现比简单的轮询复杂,需要服务器编写额外的逻辑
@RestController
@RequestMapping("/longpolling")
public class LongPollingController {private static final ConcurrentHashMap<String, WebSocketSession> sessions = new ConcurrentHashMap<>();// 假设这是模拟的数据源private static final List<String> messages = new CopyOnWriteArrayList<>();@PostMapping("/subscribe")public Callable<String> subscribe(@RequestParam String clientId) {return () -> {// 模拟等待新数据synchronized (messages) {while (messages.isEmpty()) {try {messages.wait();} catch (InterruptedException e) {Thread.currentThread().interrupt();return null;}}String message = messages.remove(0);return message;}};}// 模拟数据推送public static void pushMessage(String message) {synchronized (messages) {messages.add(message);messages.notifyAll();}}// 注意:这里的示例为了简化并未真正使用WebSocketSession,实际中可能需要WebSocket来管理连接
}
1.3 WebSocket
1.4 SSE
SSE:服务器发送事件,主要用于服务器向客户端推送实时更新(不需要客户端主动请求)
- SSE会在客户端和服务器之间打开一个单项通道
- 服务器返回的不再是一次性的数据包,而是text/event-stream类型的数据流信息
- 服务器有数据发生改变时会将数据以流的形式传输给客户端
SSE仅支持从服务器到客户端单项通信,客户端无法通过SSE发送到服务器
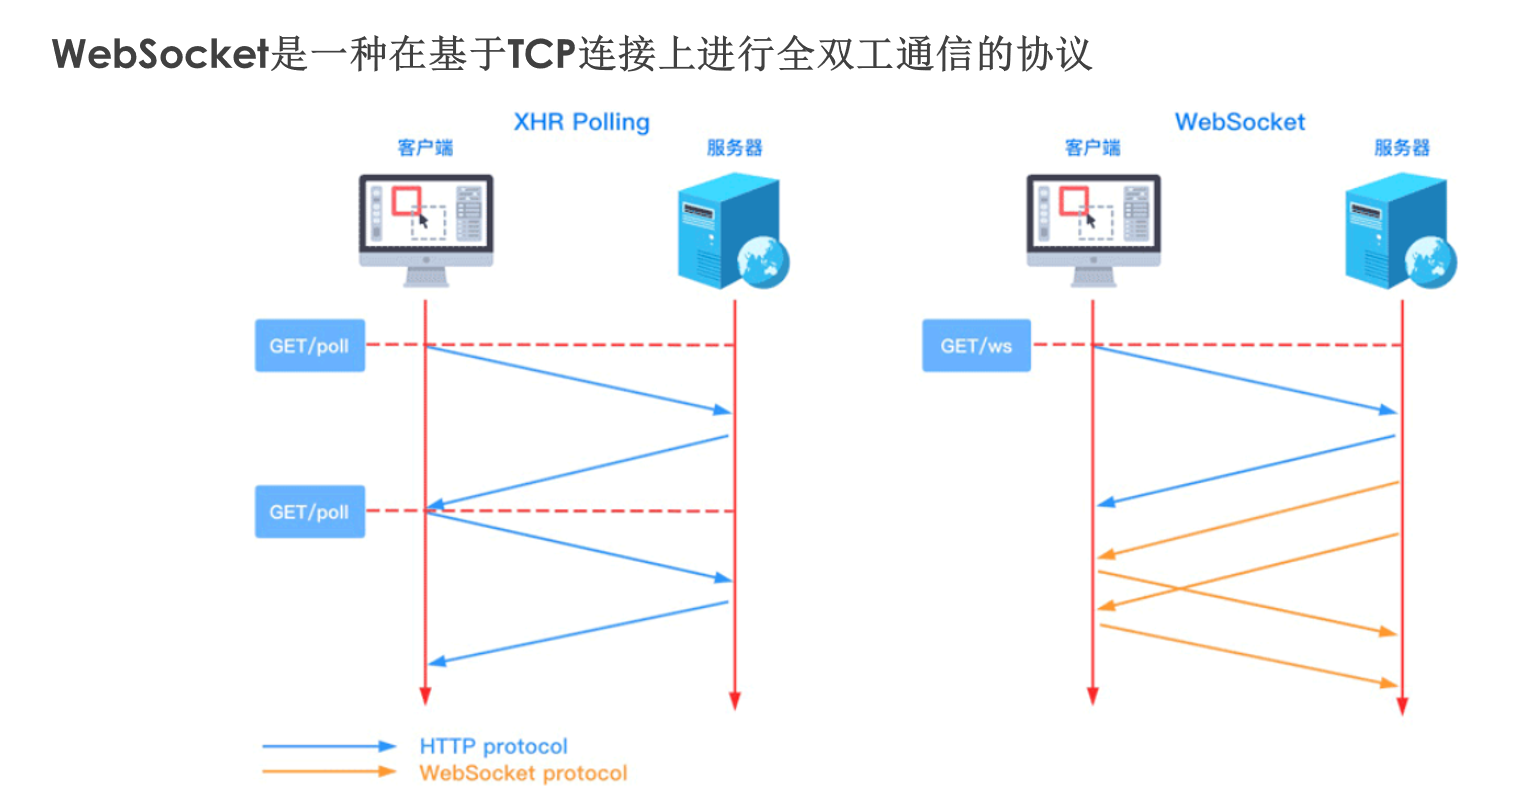
2.什么是WebSocket
2.1 全双工通信和半双工的概念
全双工:允许数据在两个方向上同时传输
半双工:允许数据在两个方向上传输,但是同一时间段只允许一个方向传输
2.2 WebScoket的概念
WebSocket 是一种基于 TCP 的网络通信协议,允许在客户端和服务器建立全双工的通信通道。这意味着客户端和服务器可以在任何时候互相发送消息,不需要像传统的 HTTP 请求那样等待响应。WebSocket 非常适合于需要实时更新数据的应用场景,如在线游戏、实时聊天、实时数据推送等
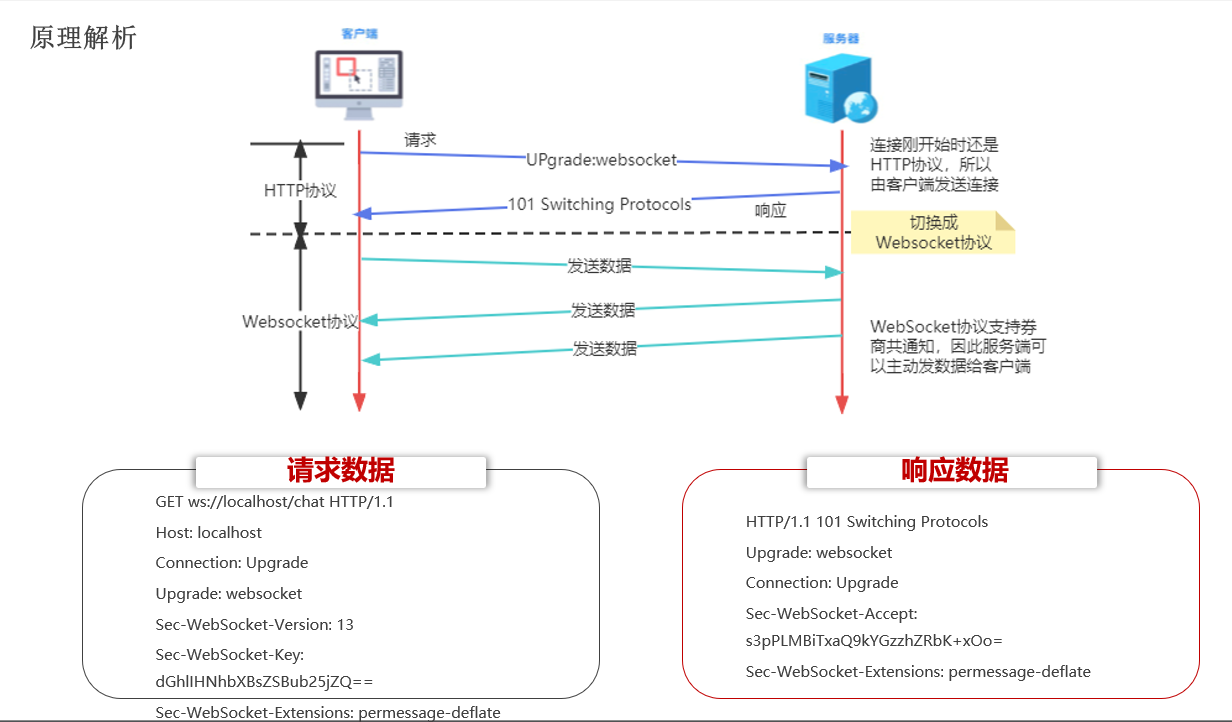
2.3WebSocket的原理
WebSocket 协议会在客户端和服务器之间建立一条持久的连接通道,连接建立后,双方可以在任意时间通过这个通道发送数据,每次请求无需重新建立连接
WebSocket 的数据传输是双向的,这意味着服务器可以主动向客户端推送数据,而不仅仅是响应客户端的请求
WebScoket连接建立的步骤:
1.客户端发起握手请求:客户端通过HTTP请求发起WebScoket握手请求
2.服务器响应握手请求:服务器收到握手请求后,如果同意升级协议,就会返回一个HTTP 101状态码,表示协议切换成功
3.连接建立:握手成功,客户端和服务器之间的连接切换成WebSockt协议,之后双方通过此连接进行双向通信。
3.浏览器中与WebSocket相关的API
3.1websocket对象创建
let ws = new WebSocket(URL);
3.2 websocket对象相关事件

3.3 websocket对象提供的方法

3.4具体代码实现:
3.4.1 前端
<script>let ws = new WebScoket("ws://localhost/chat");ws.onopen = function() {};ws.onmessage = function(evt) {// 通过evt.data 可以获取服务器发送的数据}
</script>
4.服务器API
Tomcat的7.0.5版本开始支持WebSocket,并实现了Java WebSocket规范。
Java WebSocket应用由一系列的Endpoint组成。Endpoint是一个java对象,代表WebSocket链接的一端,对于服务器,我们可以视为处理具体的WebSocket消息的接口。
我们可以通过两种方式定义Endpoint:
第一种是编程式,继承javax.websocket.Endpoint并实现其方法
第二种是注解式,定义一个POJO,并添加@ServerEndpoint
Endpoint实例在WebSocket握手时创建,并在客户端与服务器连接过程中有效,在最后关闭连接时结束。在Endpoint接口中明确定义与其生命周期县官的方法,规范实现者确保生命周期的各个阶段调用实例相关的方法。生命周期如下:

@ServerEndpoint("/chat")
@Component
public class ChatEndpoint{@OnOpen// 连接建立时被调用public void onOpen(Session session, EndpointConfig config){}@OnMessage// 接收到客户端发送的数据时被调用public void onMessage(String message) {}@OnClose// 连接关闭时被调用public void onClose(Session session) {}
}
5.需求分析
5.1通过websocket实现在线聊天室
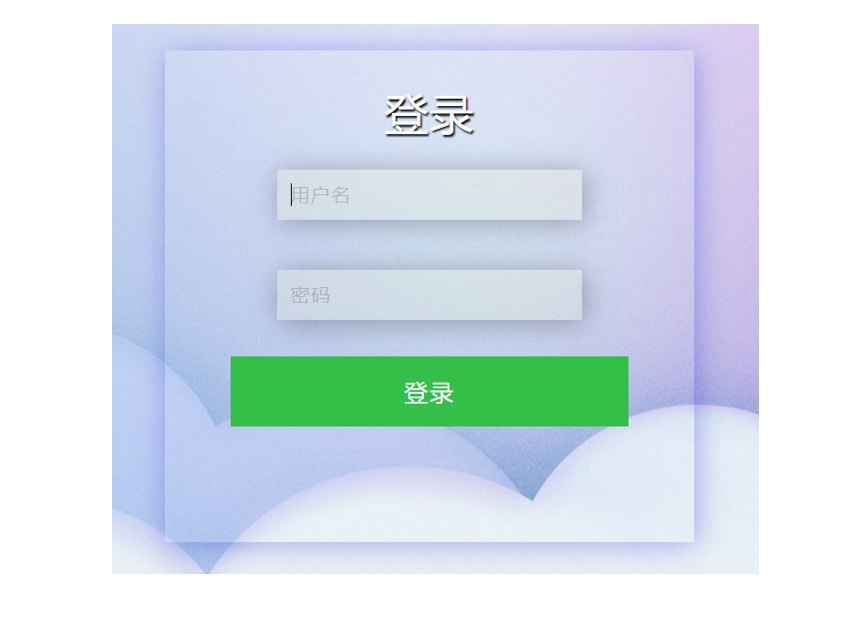
登陆页面:
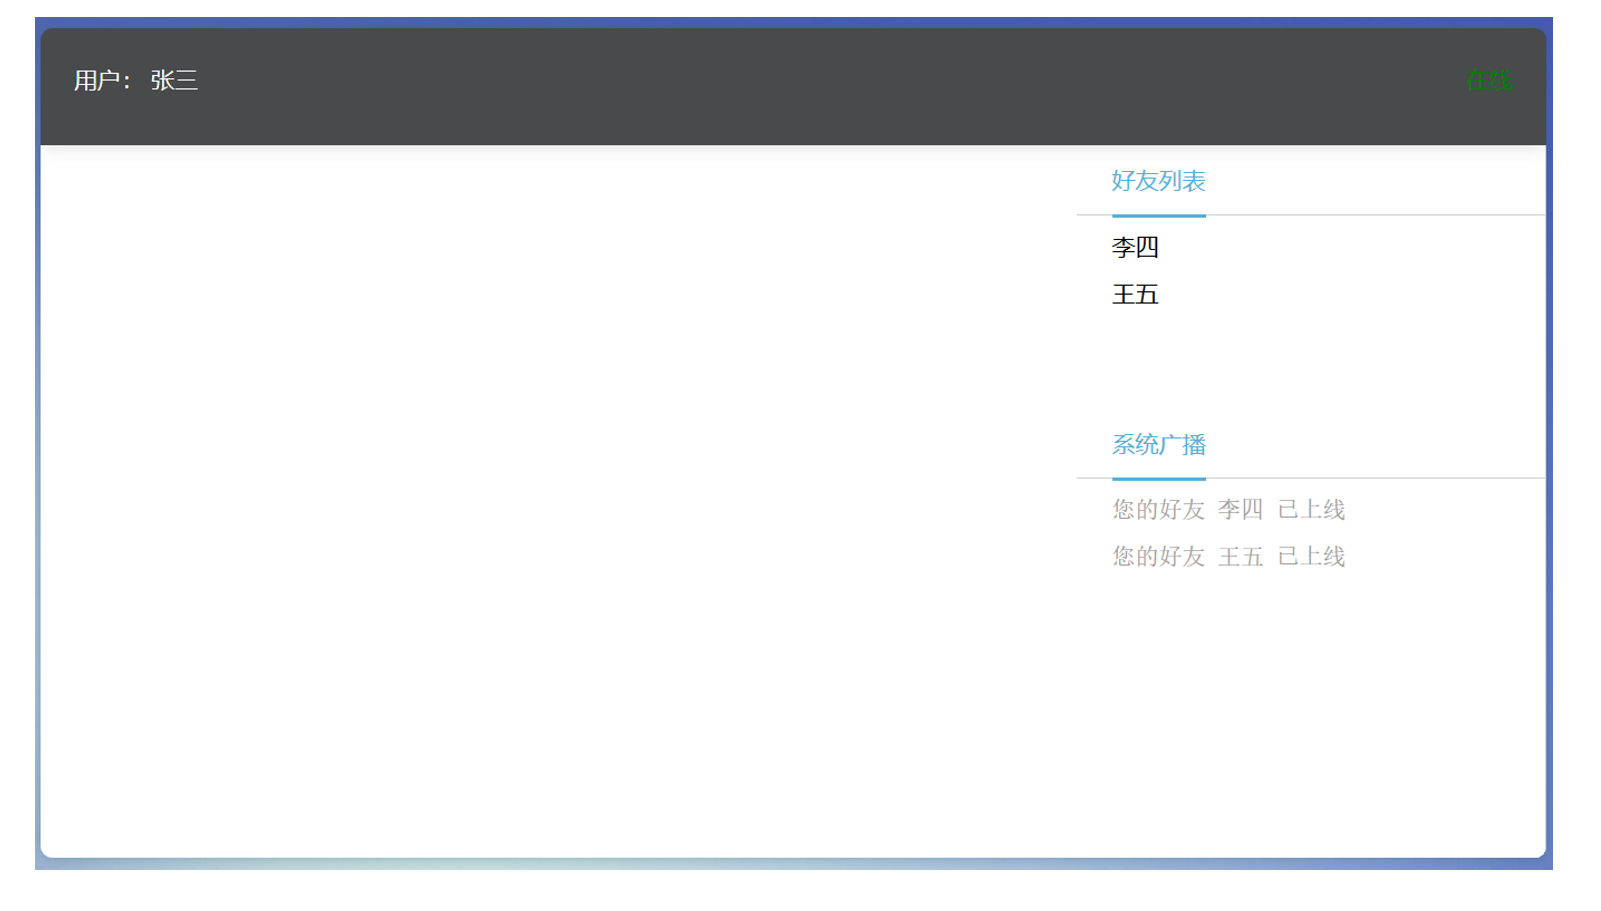
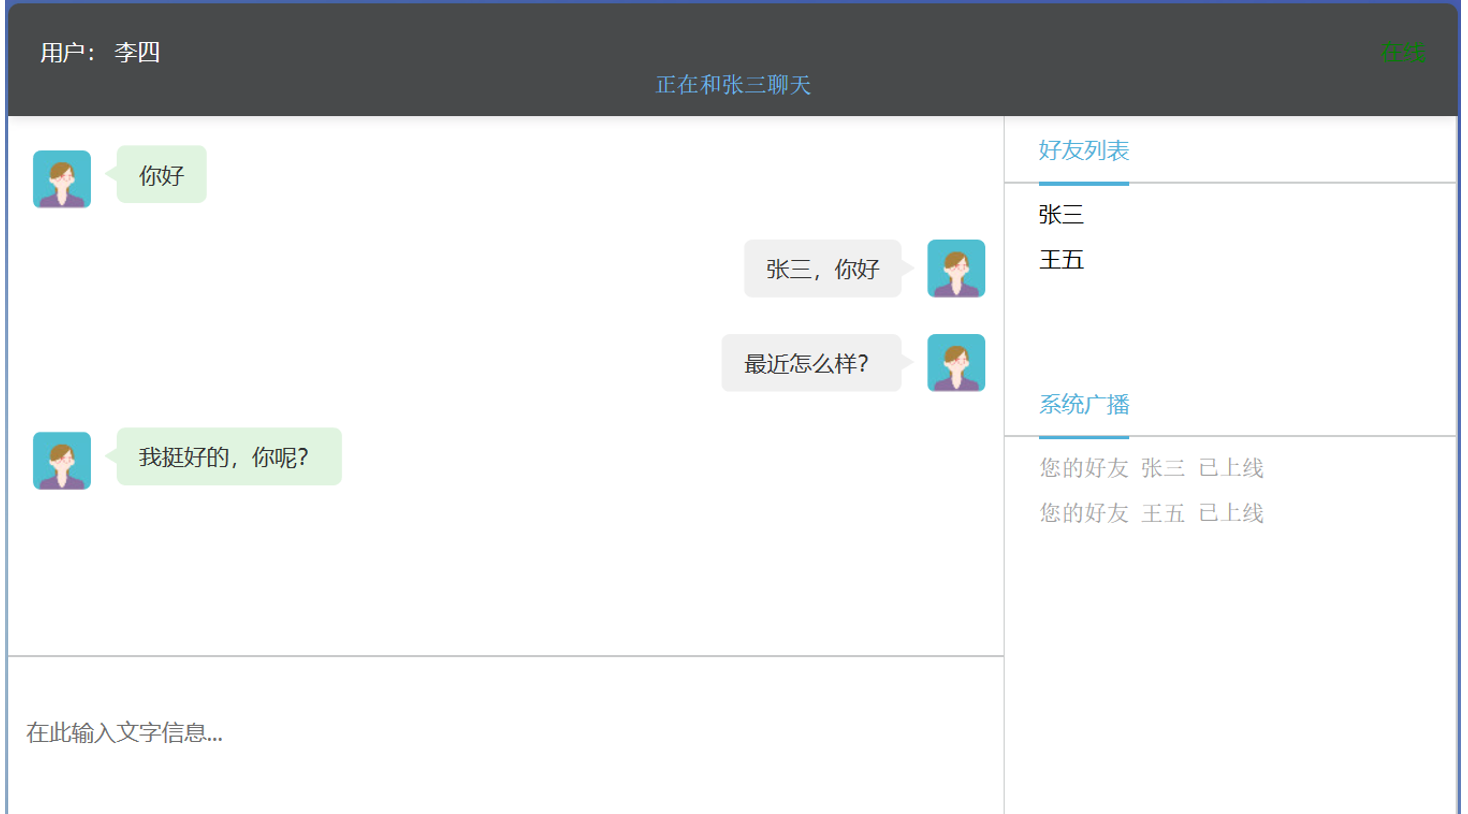
聊天页面:
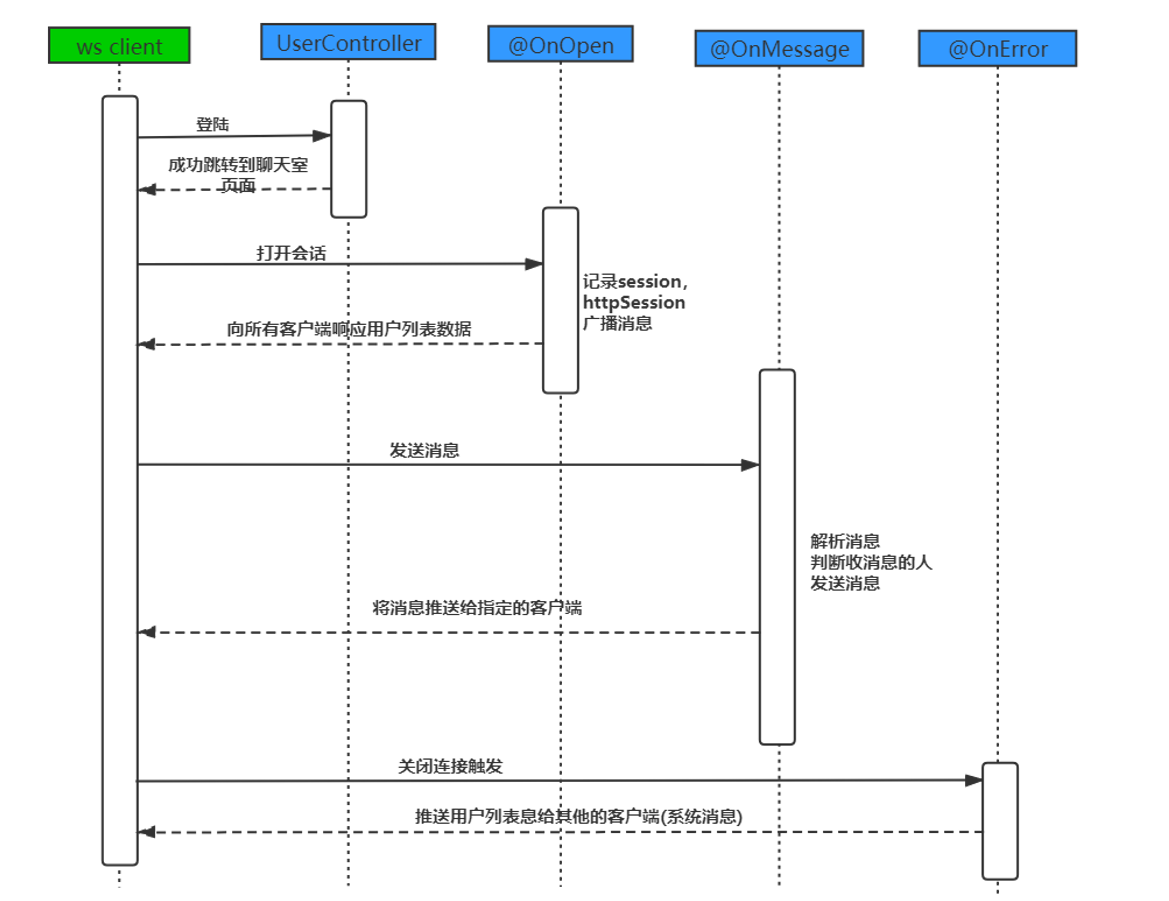
5.2 流程分析
5.3消息格式:
客户端->服务器
{"toName":"张三","message":"你好"
}
服务器->客户端
①系统消息格式:
{"system":true,"fromName":null,"message":["李四","王五"]
}
②推送给某一个用户的消息格式:
{"system":false,"fromName":"张三","message":"你好"
}
6.搭建websocket服务端
6.1 后端环境
- SpringBoot: 2.6.7
- JDK: 1.8
6.2 准备工作(导入Maven依赖)
WebSocket:
<dependency><groupId>org.springframework.boot</groupId><artifactId>spring-boot-starter-websocket</artifactId>
</dependency>
Web:
<dependency><groupId>org.springframework.boot</groupId><artifactId>spring-boot-starter-web</artifactId>
</dependency>
fastjson2:
<dependency><groupId>com.alibaba.fastjson2</groupId><artifactId>fastjson2</artifactId><version>2.0.50</version>
</dependency>
6.3 编写配置类,扫描添加有@ServerEndpoint注解的 Bean
@Configuration
public class WebSocketConfig {@Beanpublic ServerEndpointExporter serverEndpointExporter() {return new ServerEndpointExporter();}
}
6.4 编写配置类,用于获取HttpSession对象
public class GetHttpSessionConfig extends ServerEndpointConfig.Configurator {@Overridepublic void modifyHandshake(ServerEndpointConfig serverEndpointConfig, HandshakeRequest request, HandshakeResponse response) {HttpSession httpSession = (HttpSession) request.getHttpSession();// 将 httpSession 对象存到 ServerEndpointConfig 对象中serverEndpointConfig.getUserProperties().put(HttpSession.class.getName(), httpSession);}}
6.4在@ServerEndPoint注解中指定配置类
import com.alibaba.fastjson2.JSON;
import jakarta.servlet.http.HttpSession;
import jakarta.websocket.*;
import jakarta.websocket.server.ServerEndpoint;
import org.springframework.stereotype.Component;import java.io.IOException;
import java.util.Map;
import java.util.Set;
import java.util.concurrent.ConcurrentHashMap;@ServerEndpoint(value = "/chat", configurator = GetHttpSessionConfig.class)
@Component
public class ChatEndpoint {// 保存在线的用户,key为用户名,value为 Session 对象private static final Map<String, Session> onlineUsers = new ConcurrentHashMap<>();private HttpSession httpSession;/*** 建立websocket连接后,被调用** @param session Session*/@OnOpenpublic void onOpen(Session session, EndpointConfig config) {this.httpSession = (HttpSession) config.getUserProperties().get(HttpSession.class.getName());String user = (String) this.httpSession.getAttribute("currentUser");if (user != null) {onlineUsers.put(user, session);}// 通知所有用户,当前用户上线了String message = MessageUtils.getMessage(true, null, getFriends());broadcastAllUsers(message);}private Set<String> getFriends() {return onlineUsers.keySet();}private void broadcastAllUsers(String message) {try {Set<Map.Entry<String, Session>> entries = onlineUsers.entrySet();for (Map.Entry<String, Session> entry : entries) {// 获取到所有用户对应的 session 对象Session session = entry.getValue();// 使用 getBasicRemote() 方法发送同步消息session.getBasicRemote().sendText(message);}} catch (Exception exception) {exception.printStackTrace();}}/*** 浏览器发送消息到服务端时该方法会被调用,也就是私聊* 张三  -->  李四** @param message String*/@OnMessagepublic void onMessage(String message) {try {// 将消息推送给指定的用户Message msg = JSON.parseObject(message, Message.class);// 获取消息接收方的用户名String toName = msg.getToName();String tempMessage = msg.getMessage();// 获取消息接收方用户对象的 session 对象Session session = onlineUsers.get(toName);String currentUser = (String) this.httpSession.getAttribute("currentUser");String messageToSend = MessageUtils.getMessage(false, currentUser, tempMessage);session.getBasicRemote().sendText(messageToSend);} catch (Exception exception) {exception.printStackTrace();}}/*** 断开 websocket 连接时被调用** @param session Session*/@OnClosepublic void onClose(Session session) throws IOException {// 1.从 onlineUsers 中删除当前用户的 session 对象,表示当前用户已下线String user = (String) this.httpSession.getAttribute("currentUser");if (user != null) {Session remove = onlineUsers.remove(user);if (remove != null) {remove.close();}session.close();}// 2.通知其他用户,当前用户已下线// 注意:不是发送类似于 xxx 已下线的消息,而是向在线用户重新发送一次当前在线的所有用户String message = MessageUtils.getMessage(true, null, getFriends());broadcastAllUsers(message);}}
7.搭建WebSocket客户端
前端使用的技术:Vue3+Axois+Elementplus
7.1创建一个axios实例
import axios from 'axios'const request = axios.create({baseURL: '/api',timeout: 60000,headers: {'Content-Type': 'application/json;charset=UTF-8'}
})request.interceptors.request.use()request.interceptors.response.use(response => {if (response.data) {return response.data}return response
}, (error) => {return Promise.reject(error)
})export default request
7.2 编写代理规则
vite.config.js
import {fileURLToPath, URL} from 'node:url'import {defineConfig} from 'vite'
import vue from '@vitejs/plugin-vue'// https://vitejs.dev/config/
export default defineConfig({plugins: [vue()],resolve: {alias: {'@': fileURLToPath(new URL('./src', import.meta.url))}},server: {proxy: {'/api': {target: 'http://localhost:7024',changeOrigin: true,rewrite: (path) => {return path.replace('/api', '')}}}}
})
7.2创建WebSocket对象
webSocket.value = new WebSocket('ws://localhost:7024/chat')
7.3为WebSocket对象绑定事件
webSocket.value.onopen = onOpen// 接收到服务端推送的消息后触发
webSocket.value.onmessage = onMessagewebSocket.value.onclose = onClose


)


