1、官方文档
Cinder Installation Guide![]() https://docs.openstack.org/cinder/yoga/install/
https://docs.openstack.org/cinder/yoga/install/
2、概述
Cinder 是 OpenStack 中的块存储服务,负责为虚拟机提供持久化存储。Cinder 的工作方式依赖于不同的存储驱动(如 NAS、SAN、iSCSI、Ceph 等)。其 API 和调度服务通常运行在控制节点上,而卷服务可以根据配置运行在控制节点、计算节点或独立的存储节点上。存储的具体方式和位置取决于所使用的存储驱动和架构配置。
Cinder 的主要功能是为虚拟机提供持久化存储,并支持卷管理、卷快照和卷备份等功能。它的工作流程包括:
-
用户通过 cinder-api 发送请求。
-
请求通过消息队列传递给 cinder-volume,由其进行处理。
-
cinder-scheduler 确定创建卷的最佳存储节点。
-
cinder-backup 负责将卷进行备份以提供数据保护。
这些服务通过消息队列进行紧密的协作,确保数据在整个存储管理过程中的一致性和可靠性。
3、安装环境
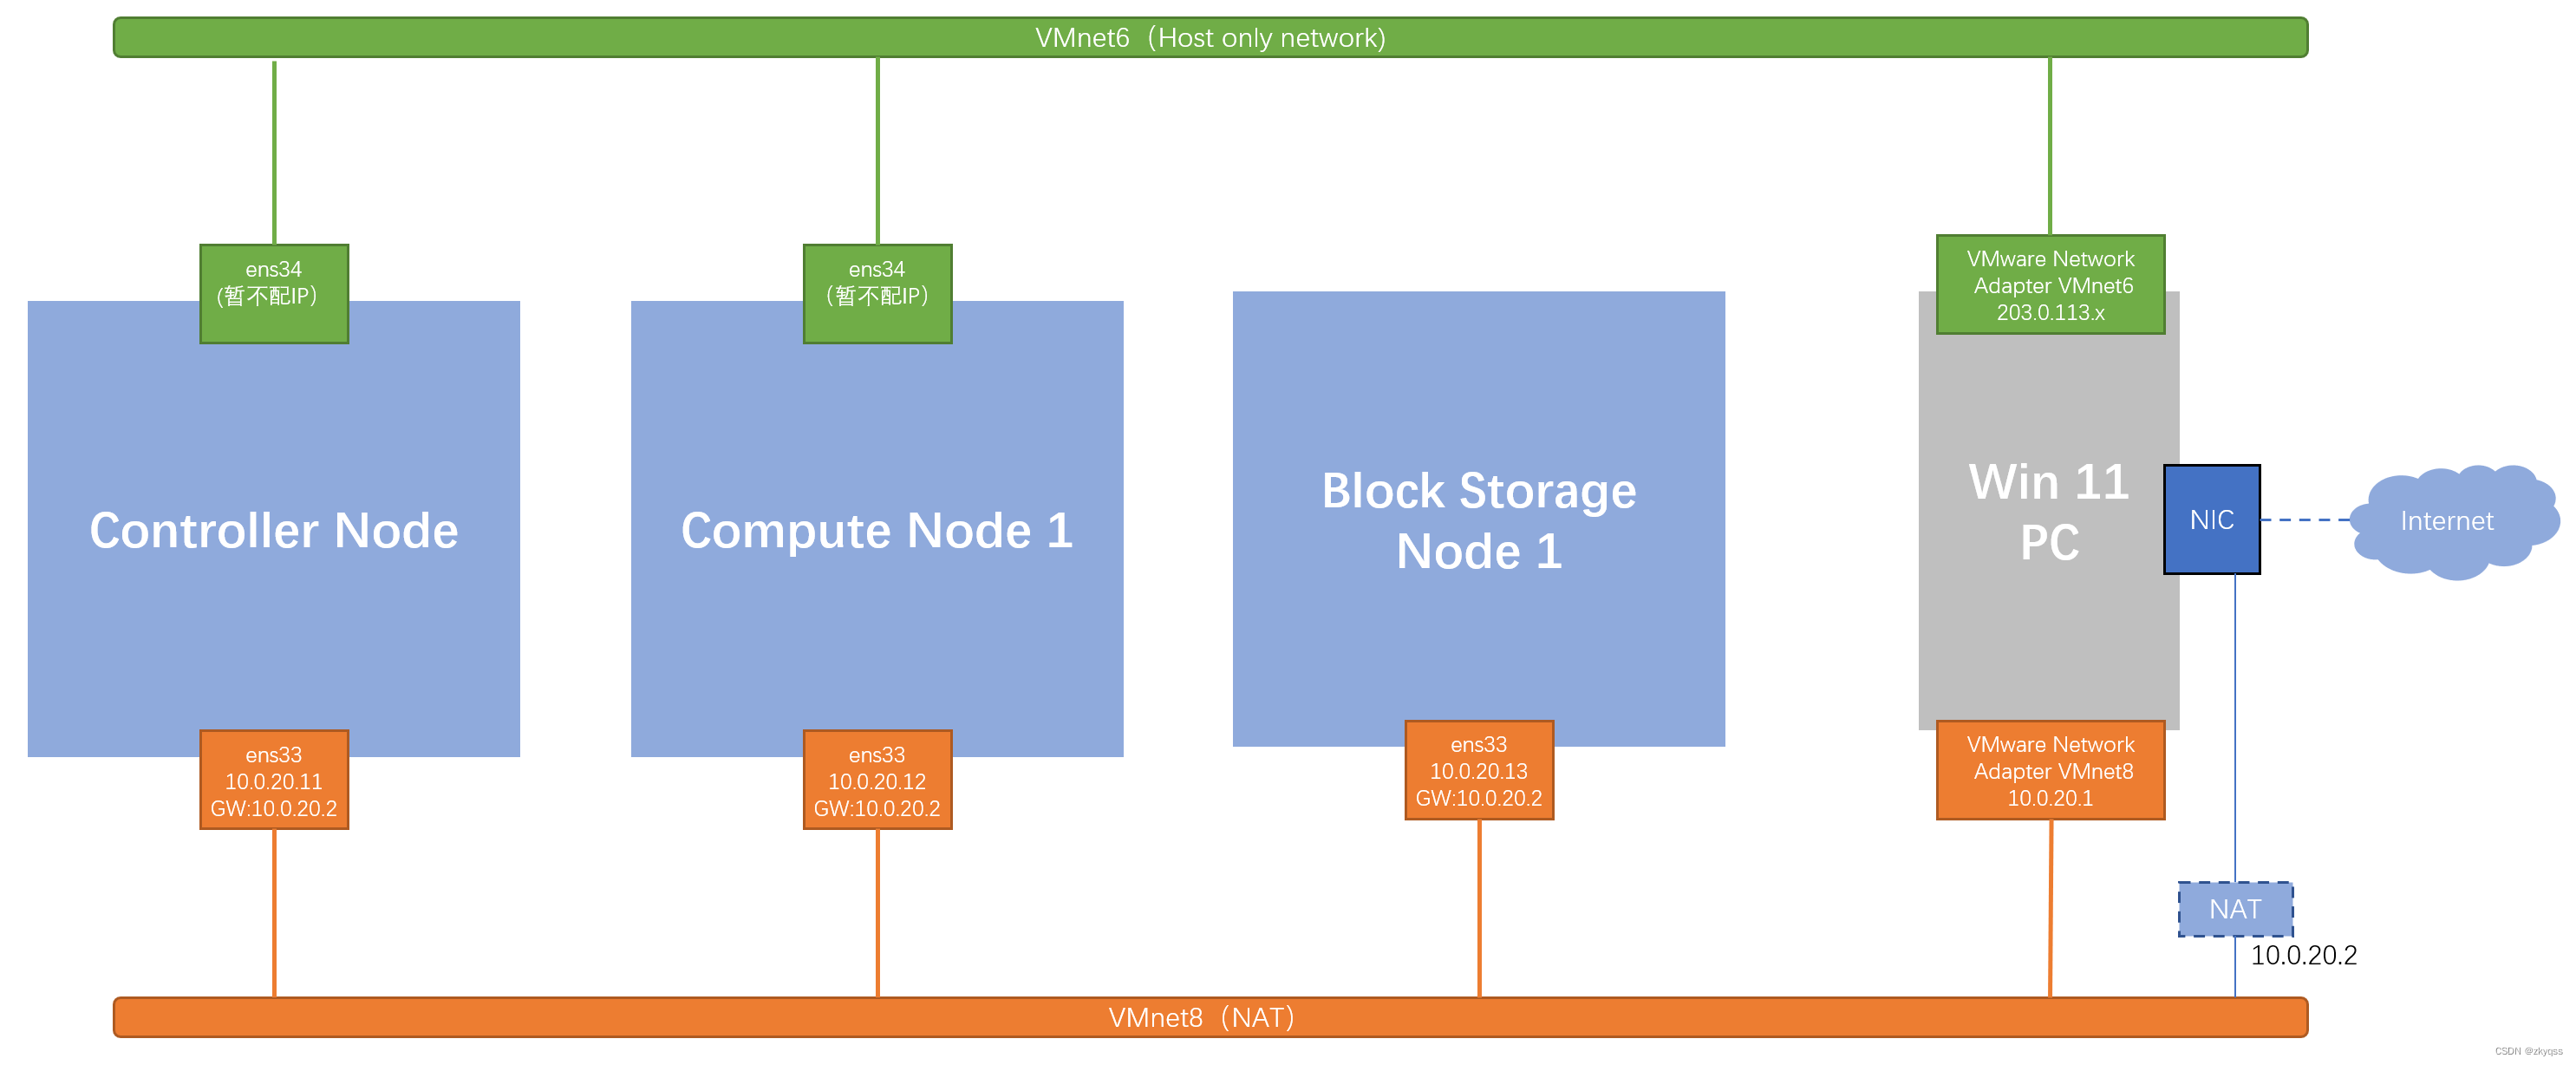
参考《OpenStack Yoga版安装笔记(二)环境安装》,进行存储节点环境准备:
1、安装常用软件
ubcode@os-3:~$ sudo apt update
ubcode@os-3:~$ sudo apt install iputils-ping -y
ubcode@os-3:~$ sudo apt install vim -y2、设置root密码
ubcode@os-3:~$ sudo passwd root
[sudo] password for ubcode:
New password:
Retype new password:
passwd: password updated successfully
ubcode@os-3:~$ ubcode@os-3:~$ sudo vi /etc/ssh/sshd_config
#PermitRootLogin prohibit-password
PermitRootLogin yes
ubcode@os-3:~$ sudo /etc/init.d/ssh stop
Stopping ssh (via systemctl): ssh.service.
ubcode@os-3:~$
ubcode@os-3:~$ sudo /etc/init.d/ssh start
Starting ssh (via systemctl): ssh.service.
ubcode@os-3:~$ sudo service ssh restart3、网络接口配置
root@os-3:~# cat /etc/netplan/00-installer-config.yaml
# This is the network config written by 'subiquity'
network:ethernets:ens33:addresses:- 10.0.20.13/24nameservers:addresses:- 10.0.20.2search: []routes:- to: defaultvia: 10.0.20.2version: 2
root@os-3:~# 4、设置hostname
root@os-3:~# hostnamectl set-hostname block1
root@os-3:~# reboot5、设置hosts文件
root@block1:~# cat /etc/hosts
127.0.0.1 localhost
# 127.0.1.1 os-3# The following lines are desirable for IPv6 capable hosts
::1     ip6-localhost ip6-loopback
fe00::0 ip6-localnet
ff00::0 ip6-mcastprefix
ff02::1 ip6-allnodes
ff02::2 ip6-allrouters10.0.20.11 controller
10.0.20.12 compute1
10.0.20.13 block1
root@block1:~# 6、controller节点、compute1节点更新hosts文件root@controller:~# cat /etc/hosts
127.0.0.1 localhost
# 127.0.1.1 os-1# The following lines are desirable for IPv6 capable hosts
::1     ip6-localhost ip6-loopback
fe00::0 ip6-localnet
ff00::0 ip6-mcastprefix
ff02::1 ip6-allnodes
ff02::2 ip6-allrouters10.0.20.11 controller
10.0.20.12 compute1
10.0.20.13 block1root@compute1:~# cat /etc/hosts
127.0.0.1 localhost
# 127.0.1.1 os-2# The following lines are desirable for IPv6 capable hosts
::1     ip6-localhost ip6-loopback
fe00::0 ip6-localnet
ff00::0 ip6-mcastprefix
ff02::1 ip6-allnodes
ff02::2 ip6-allrouters10.0.20.11 controller
10.0.20.12 compute1
10.0.20.13 block17、NTP设置
root@block1:~# cat /etc/chrony/chrony.conf
...
# pool ntp.ubuntu.com        iburst maxsources 4
# pool 0.ubuntu.pool.ntp.org iburst maxsources 1
# pool 1.ubuntu.pool.ntp.org iburst maxsources 1
# pool 2.ubuntu.pool.ntp.org iburst maxsources 2
server controller iburst
4、Cinder安装
参考Yoga版本Cinder安装:Cinder Installation Guide for Ubuntu
本节描述了如何安装和配置 Block Storage 服务的存储节点。为了简化配置,本示例仅参考了一个存储节点,并假设该节点上有一个空的本地块存储设备。这里使用的是 /dev/sdb,你可以根据实际情况替换为你节点上的其他设备。
该服务通过 LVM 驱动程序在该设备上创建逻辑卷,并通过 iSCSI 协议将它们提供给虚拟机实例。
4.1 Install and configure controller node
4.1.1 Prerequisites
1、Create the database
root@controller:~# mysql
Welcome to the MariaDB monitor.  Commands end with ; or \g.
Your MariaDB connection id is 98
Server version: 10.6.21-MariaDB-0ubuntu0.22.04.2 Ubuntu 22.04Copyright (c) 2000, 2018, Oracle, MariaDB Corporation Ab and others.Type 'help;' or '\h' for help. Type '\c' to clear the current input statement.MariaDB [(none)]> CREATE DATABASE cinder;
Query OK, 1 row affected (0.000 sec)MariaDB [(none)]> GRANT ALL PRIVILEGES ON cinder.* TO 'cinder'@'localhost' \->   IDENTIFIED BY 'openstack';
Query OK, 0 rows affected (0.001 sec)MariaDB [(none)]> GRANT ALL PRIVILEGES ON cinder.* TO 'cinder'@'%' \->   IDENTIFIED BY 'openstack';
Query OK, 0 rows affected (0.000 sec)MariaDB [(none)]> quit
Bye
root@controller:~#
2、Configure User and Endpoints
root@controller:~# source admin-openrc
root@controller ~(admin/amdin)# openstack domain list
+----------------------------------+---------+---------+--------------------+
| ID                               | Name    | Enabled | Description        |
+----------------------------------+---------+---------+--------------------+
| default                          | Default | True    | The default domain |
| f2a209f9e83040c9a619ca05c41e952b | example | True    | An Example Domain  |
+----------------------------------+---------+---------+--------------------+
root@controller ~(admin/amdin)# openstack user create --domain default --password-prompt cinder
User Password:
Repeat User Password:
+---------------------+----------------------------------+
| Field               | Value                            |
+---------------------+----------------------------------+
| domain_id           | default                          |
| enabled             | True                             |
| id                  | c6949af348c8465aaa4a32a76d27297f |
| name                | cinder                           |
| options             | {}                               |
| password_expires_at | None                             |
+---------------------+----------------------------------+
root@controller ~(admin/amdin)# openstack role add --project service --user cinder admin
root@controller ~(admin/amdin)# openstack service create --name cinderv3 \
>   --description "OpenStack Block Storage" volumev3
+-------------+----------------------------------+
| Field       | Value                            |
+-------------+----------------------------------+
| description | OpenStack Block Storage          |
| enabled     | True                             |
| id          | be6850f84bf940199589fd2a9ad65e63 |
| name        | cinderv3                         |
| type        | volumev3                         |
+-------------+----------------------------------+
root@controller ~(admin/amdin)# openstack endpoint create --region RegionOne \
>   volumev3 public http://controller:8776/v3/%\(project_id\)s
+--------------+------------------------------------------+
| Field        | Value                                    |
+--------------+------------------------------------------+
| enabled      | True                                     |
| id           | 27cd3afb21814629a01db63b815603f9         |
| interface    | public                                   |
| region       | RegionOne                                |
| region_id    | RegionOne                                |
| service_id   | be6850f84bf940199589fd2a9ad65e63         |
| service_name | cinderv3                                 |
| service_type | volumev3                                 |
| url          | http://controller:8776/v3/%(project_id)s |
+--------------+------------------------------------------+
root@controller ~(admin/amdin)# openstack endpoint create --region RegionOne \
>   volumev3 internal http://controller:8776/v3/%\(project_id\)s
+--------------+------------------------------------------+
| Field        | Value                                    |
+--------------+------------------------------------------+
| enabled      | True                                     |
| id           | 81cdfd1e2da94ed28579bec6db9b81c7         |
| interface    | internal                                 |
| region       | RegionOne                                |
| region_id    | RegionOne                                |
| service_id   | be6850f84bf940199589fd2a9ad65e63         |
| service_name | cinderv3                                 |
| service_type | volumev3                                 |
| url          | http://controller:8776/v3/%(project_id)s |
+--------------+------------------------------------------+
root@controller ~(admin/amdin)# openstack endpoint create --region RegionOne \
>   volumev3 admin http://controller:8776/v3/%\(project_id\)s
+--------------+------------------------------------------+
| Field        | Value                                    |
+--------------+------------------------------------------+
| enabled      | True                                     |
| id           | 502c7df2710e427d8e9c595bdb2e476c         |
| interface    | admin                                    |
| region       | RegionOne                                |
| region_id    | RegionOne                                |
| service_id   | be6850f84bf940199589fd2a9ad65e63         |
| service_name | cinderv3                                 |
| service_type | volumev3                                 |
| url          | http://controller:8776/v3/%(project_id)s |
+--------------+------------------------------------------+
root@controller ~(admin/amdin)#
4.1.2 Install and configure components
1、安装软件包
root@controller:~# apt install cinder-api cinder-scheduler2、Edit the /etc/cinder/cinder.conf file
root@controller:~# vi /etc/cinder/cinder.conf
...[database]
# connection = sqlite:var/lib/cinder/cinder.sqlite
connection = mysql+pymysql://cinder:openstack@controller/cinder
...
[DEFAULT]
transport_url = rabbit://openstack:openstack@controller
...
[DEFAULT]
auth_strategy = keystone[keystone_authtoken]
www_authenticate_uri = http://controller:5000
auth_url = http://controller:5000
memcached_servers = controller:11211
auth_type = password
project_domain_name = default
user_domain_name = default
project_name = service
username = cinder
password = openstack
...
[DEFAULT]
my_ip = 10.0.20.11
...
[oslo_concurrency]
lock_path = /var/lib/cinder/tmp
3、Populate the Block Storage database:
root@controller:~# su -s /bin/sh -c "cinder-manage db sync" cinder
/usr/lib/python3/dist-packages/cinder/db/sqlalchemy/models.py:152: SAWarning: implicitly coercing SELECT object to scalar subquery; please use the .scalar_subquery() method to produce a scalar subquery.last_heartbeat = column_property(
/usr/lib/python3/dist-packages/cinder/db/sqlalchemy/models.py:160: SAWarning: implicitly coercing SELECT object to scalar subquery; please use the .scalar_subquery() method to produce a scalar subquery.num_hosts = column_property(
/usr/lib/python3/dist-packages/cinder/db/sqlalchemy/models.py:169: SAWarning: implicitly coercing SELECT object to scalar subquery; please use the .scalar_subquery() method to produce a scalar subquery.num_down_hosts = column_property(
2025-04-12 22:15:59.362 6069 INFO cinder.db.migration [-] Applying migration(s)
2025-04-12 22:15:59.364 6069 INFO alembic.runtime.migration [-] Context impl MySQLImpl.
2025-04-12 22:15:59.364 6069 INFO alembic.runtime.migration [-] Will assume non-transactional DDL.
2025-04-12 22:15:59.376 6069 INFO alembic.runtime.migration [-] Running upgrade  -> 921e1a36b076, Initial migration.
2025-04-12 22:15:59.831 6069 INFO cinder.db.migration [-] Migration(s) applied
root@controller:~#
4.1.3 Configure Compute to use Block Storage
1、Edit the /etc/nova/nova.conf file and add the following to it:
root@controller:~# vi /etc/nova/nova.conf
[cinder]
os_region_name = RegionOne
4.1.4 Finalize installation
1、Restart the Compute API service:
root@controller:~# service nova-api restart2、Restart the Block Storage services:
root@controller:~# service cinder-scheduler restart
root@controller:~# service apache2 restart
4.2 Install and configure a storage node
4.2.1 Prerequisites
1、Install the supporting utility packages:
root@block1:~# apt install lvm2 thin-provisioning-tools精简配置 (Thin Provisioning): 在创建新的磁盘或卷时,并不立即分配所有物理存储空间。相反,系统只在实际写入数据时分配必要的物理存储空间。这种方式可以有效避免预分配大量未使用的空间,从而提高存储效率。
* 存储节点增加一块硬盘
1、目前只有一块20G的硬盘/dev/sda:
root@block1:~# ls /dev/sd*
/dev/sda  /dev/sda1  /dev/sda2  /dev/sda3
root@block1:~# lsblk
NAME                      MAJ:MIN RM  SIZE RO TYPE MOUNTPOINTS
sda                         8:0    0   20G  0 disk
├─sda1                      8:1    0    1M  0 part
├─sda2                      8:2    0  1.8G  0 part /boot
└─sda3                      8:3    0 18.2G  0 part └─ubuntu--vg-ubuntu--lv 253:0    0   10G  0 lvm  /
sr0                        11:0    1    2G  0 rom
root@block1:~# 2、关机,增加一块硬盘,然后开机,能看到新增的硬盘/dev/sdb
root@block1:~# ls /dev/sd*
/dev/sda  /dev/sda1  /dev/sda2  /dev/sda3  /dev/sdb
root@block1:~#
root@block1:~# lsblk
NAME                      MAJ:MIN RM  SIZE RO TYPE MOUNTPOINTS
sda                         8:0    0   20G  0 disk
├─sda1                      8:1    0    1M  0 part
├─sda2                      8:2    0  1.8G  0 part /boot
└─sda3                      8:3    0 18.2G  0 part └─ubuntu--vg-ubuntu--lv 253:0    0   10G  0 lvm  /
sdb                         8:16   0   20G  0 disk
sr0                        11:0    1    2G  0 rom
root@block1:~#
2、Create the LVM physical volume /dev/sdb:
root@block1:~# pvcreate /dev/sdbPhysical volume "/dev/sdb" successfully created.
root@block1:~#
3、Create the LVM volume group cinder-volumes:
root@block1:~# vgcreate cinder-volumes /dev/sdbVolume group "cinder-volumes" successfully created
root@block1:~# root@block1:~# pvsPV         VG             Fmt  Attr PSize   PFree  /dev/sda3  ubuntu-vg      lvm2 a--   18.22g   8.22g/dev/sdb   cinder-volumes lvm2 a--  <20.00g <20.00g
root@block1:~# vgsVG             #PV #LV #SN Attr   VSize   VFree  cinder-volumes   1   0   0 wz--n- <20.00g <20.00gubuntu-vg        1   1   0 wz--n-  18.22g   8.22g
root@block1:~# lvsLV        VG        Attr       LSize  Pool Origin Data%  Meta%  Move Log Cpy%Sync Convertubuntu-lv ubuntu-vg -wi-ao---- 10.00g
root@block1:~#
4、配置逻辑卷管理器(LVM),使其仅扫描包含 “cinder-volumes” 卷组的设备。另外,如果操作系统盘也使用了LVM,需要允许扫描这个磁盘:
root@block1:~# vi /etc/lvm/lvm.conf
devices {# Configuration option devices/filter....filter = [ "a/sda/", "a/sdb/", "r/.*/"]
"a/sda/":允许(accept)扫描
/dev/sda及其所有子设备(如/dev/sda1,/dev/sda2等)。这里的/dev/sda/使用了正则表达式/sda/,表示匹配所有与/dev/sda相关的设备。"a/sdb/":允许(accept)扫描
/dev/sdb及其所有子设备(如/dev/sdb1,/dev/sdb2等)。"r/.*/":拒绝(reject)所有其他设备。这里的正则表达式
/.*/匹配任何设备,因此r/.*/表示拒绝所有不在前面列表中的设备。
4.2.2 Install and configure components
1、Install the packages:
root@block1:~# apt install cinder-volume tgt
cinder-volume:这是 OpenStack Cinder 服务的一部分,负责提供块存储服务。该组件负责管理存储设备,并通过 iSCSI 或其他协议将存储卷提供给 OpenStack 实例。
tgt:这是 iSCSI 目标守护进程,它允许系统通过 iSCSI 协议向客户端(例如虚拟机或实例)提供存储卷。Cinder 使用 tgt 来暴露其管理的存储卷。
2、Edit the /etc/cinder/cinder.conf file
root@block1:~# vi /etc/cinder/cinder.conf[database]
# connection = sqlite:var/lib/cinder/cinder.sqlite
connection = mysql+pymysql://cinder:openstack@controller/cinder
...
[DEFAULT]
transport_url = rabbit://openstack:openstack@controller
...
[DEFAULT]
auth_strategy = keystone[keystone_authtoken]
www_authenticate_uri = http://controller:5000
auth_url = http://controller:5000
memcached_servers = controller:11211
auth_type = password
project_domain_name = default
user_domain_name = default
project_name = service
username = cinder
password = openstack
...
[DEFAULT]
my_ip = 10.0.20.13
...
[lvm]
volume_driver = cinder.volume.drivers.lvm.LVMVolumeDriver
volume_group = cinder-volumes
target_protocol = iscsi
target_helper = tgtadm
...
[DEFAULT]
enabled_backends = lvm
...
[DEFAULT]
glance_api_servers = http://controller:9292
...
[oslo_concurrency]
lock_path = /var/lib/cinder/tmp
4.2.3 Finalize installation
1、Restart the Block Storage volume service including its dependencies:
root@block1:~# service tgt restart
root@block1:~# service cinder-volume restart
4.3 Verify Cinder operation
Verify operation of the Block Storage service.
1、Source the admin credentials to gain access to admin-only CLI commands:
root@osclient:~# source admin-openrc
root@osclient ~(admin/amdin)# cat admin-openrc
export OS_PROJECT_DOMAIN_NAME=Default
export OS_USER_DOMAIN_NAME=Default
export OS_PROJECT_NAME=admin
export OS_USERNAME=admin
export OS_PASSWORD=openstack
export OS_AUTH_URL=http://controller:5000/v3
export OS_IDENTITY_API_VERSION=3
export OS_IMAGE_API_VERSION=2
export PS1='\u@\h \W(admin/amdin)\$ '
root@osclient ~(admin/amdin)#
2、List service components to verify successful launch of each process:
root@osclient ~(admin/amdin)# openstack volume service list
+------------------+------------+------+---------+-------+----------------------------+
| Binary           | Host       | Zone | Status  | State | Updated At                 |
+------------------+------------+------+---------+-------+----------------------------+
| cinder-scheduler | controller | nova | enabled | up    | 2025-04-13T00:58:16.000000 |
| cinder-volume    | block1@lvm | nova | enabled | up    | 2025-04-13T00:58:11.000000 |
+------------------+------------+------+---------+-------+----------------------------+root@osclient ~(admin/amdin)# openstack service list
+----------------------------------+-----------+-----------+
| ID                               | Name      | Type      |
+----------------------------------+-----------+-----------+
| 1b8f162ebcf848ee8bd69bc6b36a8dff | nova      | compute   |
| 3df6f54ee6174d93bcabce96a06789d1 | neutron   | network   |
| 639145725f804482a50d4740b0c79c43 | placement | placement |
| 75fe01049ec648b69e48d200971bf601 | keystone  | identity  |
| be6850f84bf940199589fd2a9ad65e63 | cinderv3  | volumev3  |
| d6a3dadf92e542289c5ebd37e3553cdd | glance    | image     |
+----------------------------------+-----------+-----------+
3、查看Cinder状态:
root@block1:~# service cinder-volume status
● cinder-volume.service - OpenStack Cinder VolumeLoaded: loaded (/lib/systemd/system/cinder-volume.service; enabled; vendor preset: enabled)Drop-In: /usr/lib/systemd/system/cinder-volume.service.d└─cinder-volume.service.confActive: active (running) since Sun 2025-04-13 00:56:52 UTC; 14min agoDocs: man:cinder-volume(1)Main PID: 5245 (cinder-volume)Tasks: 2 (limit: 4514)Memory: 138.5MCPU: 30.002sCGroup: /system.slice/cinder-volume.service├─5245 /usr/bin/python3 /usr/bin/cinder-volume --config-file=/etc/cinder/cinder.conf --log-file=/var/log/cinder/cinder-volume.log└─5251 /usr/bin/python3 /usr/bin/cinder-volume --config-file=/etc/cinder/cinder.conf --log-file=/var/log/cinder/cinder-volume.logApr 13 01:10:16 block1 sudo[5527]: pam_unix(sudo:session): session closed for user root
Apr 13 01:10:16 block1 sudo[5530]:   cinder : PWD=/var/lib/cinder ; USER=root ; COMMAND=/usr/bin/cinder-rootwrap /etc/cinder/rootwrap.conf env LC_ALL=C lvs --noheadings --unit=g -o vg_name,name,size --nosuffix --readonly cinder-volu
mes
Apr 13 01:10:16 block1 sudo[5530]: pam_unix(sudo:session): session opened for user root(uid=0) by (uid=64061)
Apr 13 01:10:17 block1 sudo[5530]: pam_unix(sudo:session): session closed for user root
Apr 13 01:10:17 block1 sudo[5533]:   cinder : PWD=/var/lib/cinder ; USER=root ; COMMAND=/usr/bin/cinder-rootwrap /etc/cinder/rootwrap.conf env LC_ALL=C lvs --noheadings --unit=g -o size,data_percent --separator : --nosuffix /dev/cin
der-volumes/cinder-volumes-pool
Apr 13 01:10:17 block1 sudo[5533]: pam_unix(sudo:session): session opened for user root(uid=0) by (uid=64061)
Apr 13 01:10:17 block1 sudo[5533]: pam_unix(sudo:session): session closed for user root
Apr 13 01:10:17 block1 sudo[5536]:   cinder : PWD=/var/lib/cinder ; USER=root ; COMMAND=/usr/bin/cinder-rootwrap /etc/cinder/rootwrap.conf env LC_ALL=C lvs --noheadings --unit=g -o vg_name,name,size --nosuffix --readonly cinder-volu
mes
Apr 13 01:10:17 block1 sudo[5536]: pam_unix(sudo:session): session opened for user root(uid=0) by (uid=64061)
Apr 13 01:10:17 block1 sudo[5536]: pam_unix(sudo:session): session closed for user root
4、查看Cinder Log:
root@block1:~# tail -f /var/log/cinder/cinder-volume.log
2025-04-13 00:56:53.996 5251 INFO cinder.volume.manager [req-28f797ef-774f-490b-bf50-ed740ebb3dfb - - - - -] Starting volume driver LVMVolumeDriver (3.0.0)
2025-04-13 00:56:54.618 5251 INFO cinder.brick.local_dev.lvm [req-28f797ef-774f-490b-bf50-ed740ebb3dfb - - - - -] Logical Volume not found when querying LVM info. (vg_name=cinder-volumes, lv_name=cinder-volumes-pool
2025-04-13 00:56:57.362 5251 INFO cinder.volume.drivers.lvm [req-28f797ef-774f-490b-bf50-ed740ebb3dfb - - - - -] Enabling LVM thin provisioning by default because a thin pool exists.
2025-04-13 00:56:58.965 5251 INFO cinder.volume.driver [req-28f797ef-774f-490b-bf50-ed740ebb3dfb - - - - -] Driver hasn't implemented _init_vendor_properties()
2025-04-13 00:56:59.005 5251 INFO cinder.keymgr.migration [req-80f8eff1-50e5-4107-9920-b146e10ee354 - - - - -] Not migrating encryption keys because the ConfKeyManager's fixed_key is not in use.
2025-04-13 00:57:00.281 5251 INFO cinder.volume.manager [req-28f797ef-774f-490b-bf50-ed740ebb3dfb - - - - -] Driver initialization completed successfully.
2025-04-13 00:57:00.288 5251 INFO cinder.manager [req-28f797ef-774f-490b-bf50-ed740ebb3dfb - - - - -] Initiating service 2 cleanup
2025-04-13 00:57:00.293 5251 INFO cinder.manager [req-28f797ef-774f-490b-bf50-ed740ebb3dfb - - - - -] Service 2 cleanup completed.
2025-04-13 00:57:00.334 5251 INFO cinder.volume.manager [req-28f797ef-774f-490b-bf50-ed740ebb3dfb - - - - -] Initializing RPC dependent components of volume driver LVMVolumeDriver (3.0.0)
2025-04-13 00:57:01.659 5251 INFO cinder.volume.manager [req-28f797ef-774f-490b-bf50-ed740ebb3dfb - - - - -] Driver post RPC initialization completed successfully.
5、查看磁盘分区情况:
root@block1:~# lsblk
NAME                                          MAJ:MIN RM  SIZE RO TYPE MOUNTPOINTS
sda                                             8:0    0   20G  0 disk
├─sda1                                          8:1    0    1M  0 part
├─sda2                                          8:2    0  1.8G  0 part /boot
└─sda3                                          8:3    0 18.2G  0 part └─ubuntu--vg-ubuntu--lv                     253:0    0   10G  0 lvm  /
sdb                                             8:16   0   20G  0 disk
├─cinder--volumes-cinder--volumes--pool_tmeta 253:1    0   20M  0 lvm
│ └─cinder--volumes-cinder--volumes--pool     253:3    0   19G  0 lvm
└─cinder--volumes-cinder--volumes--pool_tdata 253:2    0   19G  0 lvm  └─cinder--volumes-cinder--volumes--pool     253:3    0   19G  0 lvm
sr0                                            11:0    1    2G  0 rom
root@block1:~# pvsPV         VG             Fmt  Attr PSize   PFree  /dev/sda3  ubuntu-vg      lvm2 a--   18.22g   8.22g/dev/sdb   cinder-volumes lvm2 a--  <20.00g 980.00m
root@block1:~# vgsVG             #PV #LV #SN Attr   VSize   VFree  cinder-volumes   1   1   0 wz--n- <20.00g 980.00mubuntu-vg        1   1   0 wz--n-  18.22g   8.22g
root@block1:~# lvsLV                  VG             Attr       LSize  Pool Origin Data%  Meta%  Move Log Cpy%Sync Convertcinder-volumes-pool cinder-volumes twi-a-tz-- 19.00g             0.00   10.55                           ubuntu-lv           ubuntu-vg      -wi-ao---- 10.00g
从lsblk命令输出可以看到,
/dev/sdb设备已经被用作 Cinder 的 LVM 存储池,并且已经分配了两个 LVM 逻辑卷:
cinder-volumes-cinder-volumes-pool_tmeta:
它的大小为 20M,通常用于存储元数据(metadata)。
这个逻辑卷通常用于存储有关卷的元数据,比如卷的大小、状态等信息。
cinder-volumes-cinder-volumes-pool_tdata:
它的大小为 19G,存储的是实际的块存储数据。
这是你将用来提供给实例的块存储数据卷。
解释:
cinder-volumes-cinder-volumes-pool是实际的存储池,它在tmeta和tdata逻辑卷上划分。
tmeta存储元数据。
tdata存储数据。这些逻辑卷都属于
cinder-volumes卷组,并且是通过 LVM 配置的,用于为 OpenStack 的 Cinder 服务提供存储卷。


