1. 安装 Vuex
-
Vue 2 或 Vue 3 项目:
npm install vuex@4 # Vuex 4 兼容 Vue 2 和 Vue 3
2. 创建 Store
-
新建
store/index.js:import { createStore } from 'vuex'; import createPersistedState from 'vuex-persistedstate'; // 持久化插件// 定义子模块(示例:用户模块) const userModule = {namespaced: true, // 开启命名空间state: {username: 'defaultUser',age: 18},mutations: {setUsername(state, newUsername) {state.username = newUsername;},incrementAge(state) {state.age++;}},actions: {updateUsername({ commit }, newUsername) {commit('setUsername', newUsername);}},getters: {getUserAge: (state) => state.age} };// 主 Store const store = createStore({state: {count: 0,loginStatus: '用户已经登录'},mutations: {increment(state, num) {state.count++;console.log(num);},decrement(state, num) {state.count--;console.log(num);}},actions: {incrementAsync({ commit }, num) {setTimeout(() => commit('increment', num), 1000);}},getters: {doubleCount: (state) => state.count * 2},modules: {user: userModule // 注册模块},plugins: [// 状态持久化配置(依赖 vuex-persistedstate)createPersistedState({// 可选配置,指定存储方式,默认为 localStoragestorage: window.localStorage, // 1.空数组表示持久化全部 state(包括模块)// paths: [] // 2.持久化指定模块的 Statepaths: ['count', // 主模块的 count'user.username' // user 模块的 username]})] });export default store;
3. 挂载到 Vue 应用
在 main.js 中引入 Store:
import { createApp } from 'vue';
import App from './App.vue';
import store from './store';const app = createApp(App);
app.use(store); // 挂载 Vuex
app.mount('#app');
4. 组件中使用 Vuex
4.1 Vue 2 选项式 API
<template><div><!-- 显示主模块的 state 和 getter --><p>Count: {{ count }}</p><p>Double Count: {{ doubleCount }}</p><!-- 触发主模块的 mutations 和 actions --><button @click="increment(3)">Increment</button><button @click="decrement(4)">Decrement</button><button @click="incrementAsync(5)">Async Increment</button><!-- 显示子模块的 state --><p>Username: {{ user.username }}</p><!-- 触发子模块的 action --><button @click="updateUsername('newUser')">Update Name</button></div>
</template>
<script>
import { mapState, mapGetters, mapMutations, mapActions } from 'vuex';export default {computed: {// 映射主模块的 state 和 getter...mapState(['count', 'user']),...mapGetters(['doubleCount'])},methods: {// 映射主模块的 mutations 和 actions...mapMutations(['increment', 'decrement']),...mapActions(['incrementAsync']),// 映射子模块的 action(需指定命名空间)...mapActions('user', ['updateUsername'])}
};
</script>
4.1.1 辅助函数的作用
| 辅助函数 | 作用 | 示例代码 |
|---|---|---|
mapState | 将 state 映射为计算属性 | ...mapState(['count', 'user']) |
mapGetters | 将 getters 映射为计算属性 | ...mapGetters(['doubleCount']) |
mapMutations | 将 mutations 映射为方法 | ...mapMutations(['increment']) |
mapActions | 将 actions 映射为方法 | ...mapActions(['incrementAsync']) |
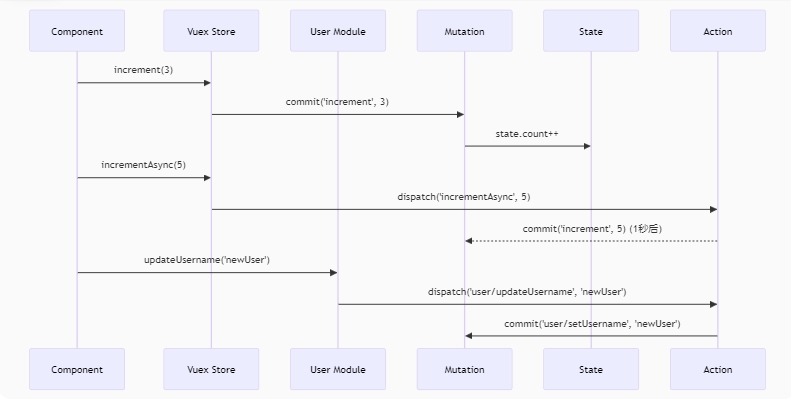
4.1.2 数据流向示意图
4.1.3 常见问题解答
1. 为什么 mapState(['user']) 能直接访问子模块的状态?
-
因为
user是主模块通过modules: { user: userModule }注册的子模块名称。 -
store.state.user指向子模块的 state 对象,因此mapState(['user'])等效于:computed: {user() {return this.$store.state.user; // 子模块的 state} }
2. 如何传递多个参数?
-
使用对象或数组包装:
<button @click="updateUser({ name: 'John', age: 25 })">Update</button>methods: {...mapActions('user', ['updateUser']) }
3. 为什么严格模式下直接修改 state 会报错?
-
Vuex 要求所有状态变更必须通过
mutations。 -
错误示例:
this.$store.state.count = 10; // 报错!
-
正确方式:
this.$store.commit('increment');
4.2 Vue 3 组合式 API
<template><div><p>Count: {{ count }}</p><p>Double Count: {{ doubleCount }}</p><button @click="increment(3)">Increment</button><button @click="decrement(4)">Decrement</button><button @click="incrementAsync(5)">Async Increment</button><!-- 模块调用 --><p>User Age: {{ userAge }}</p><button @click="updateUsername('newUser')">Update Name</button><button @click="incrementUserAge">+ Age</button></div>
</template><script setup>
import { computed } from 'vue';
import { useStore } from 'vuex';const store = useStore();// 主 State 和 Getters
const count = computed(() => store.state.count);
const doubleCount = computed(() => store.getters.doubleCount);// 主 Mutations 和 Actions
const increment = (num) => store.commit('increment', num);
const decrement = (num) => store.commit('decrement', num);
const incrementAsync = (num) => store.dispatch('incrementAsync', num);// 模块操作
const userAge = computed(() => store.state.user.age);
const updateUsername = (newName) => store.dispatch('user/updateUsername', newName);
const incrementUserAge = () => store.commit('user/incrementAge');
</script>
5. 持久化配置
-
安装插件:
npm install vuex-persistedstate
-
在 Store 中配置(见步骤 2 的
plugins部分)。 -
为什么要配置持久化?
页面刷新状态保持:在单页面应用(SPA)里,页面刷新时,Vue 实例会重新初始化,这 会 让 Pinia 或 Vuex 存储的状态被重置为初始值。若进行持久化配置,状态就能保存到本地存储(如 localStorage、sessionStorage)或者其他存储介质中,在页面刷新后重新加载这些状态,确保应用状态的连续性。
多页面或多标签页间的状态共享:当应用有多个页面或者在多个标签页中打开时,持久化配置能保证不同页面或标签页间可以共享状态。例如,用户在一个标签页里修改了某个设置,其他标签页也能同步更新这个设置。
用户体验优化:持久化配置可以避免用户在操作过程中因为页面刷新等原因丢失已输入的数据或者设置,从而提升用户体验。 -
未进行持久化配置可能导致的问题
状态丢失:页面刷新、关闭或重新打开时,Pinia 或 Vuex 中的状态会恢复到初始值。例如,在一个购物车应用中,用户添加了商品到购物车,刷新页面后购物车就会清空,这显然会给用户带来不好的体验。
数据不一致:在多页面或多标签页应用中,不同页面或标签页的状态可能会不一致。比如,用户在一个标签页中修改了某个设置,但在另一个标签页中该设置还是旧值。
重复操作:用户需要重新进行之前的操作来恢复状态。例如,在一个表单填写页面,用户填写了部分信息后刷新页面,这些信息就会丢失,用户不得不重新填写。
6. 模块化实践
-
按功能拆分模块:如
user.js,cart.js。 -
命名空间:始终启用
namespaced: true。 -
目录结构:
src/store/index.jsmodules/user.jscart.jsplugins/persistedstate.js
7. 严格模式(开发环境启用)
const store = createStore({strict: process.env.NODE_ENV !== 'production' // 生产环境关闭
});
)


