原因:
线上程序同时支持人大金仓和mysql,且支持根据环境动态选择 java JCE 的实现方式
前期已完成
springboot 从mysql 迁移人大金仓 -kingbase :https://blog.csdn.net/qq_26408545/article/details/137777602?spm=1001.2014.3001.5502
1 原理
idea 可选择不同的环境组合

实际开发
1)数据库依赖不区分环境,都放在pom 内的依赖内
2)加密机 采用第二种 实现方式来实现环境的切换实际使用也推荐只使用第二种方式
2 准备
父级定义依赖的版本
<?xml version="1.0" encoding="UTF-8"?>
<project xmlns="http://maven.apache.org/POM/4.0.0"xmlns:xsi="http://www.w3.org/2001/XMLSchema-instance"xsi:schemaLocation="http://maven.apache.org/POM/4.0.0 http://maven.apache.org/xsd/maven-4.0.0.xsd">......<properties><mysql.conector.version>8.0.27</mysql.conector.version><kingbase8.version>8.6.0</kingbase8.version></properties><dependencyManagement><!-- mysql 驱动 --><dependency><groupId>mysql</groupId><artifactId>mysql-connector-java</artifactId><version>${mysql.conector.version}</version></dependency><!-- 人大金仓 --><dependency><groupId>cn.com.kingbase</groupId><artifactId>kingbase8</artifactId><version>${kingbase8.version}</version></dependency></dependencyManagement>......</project>
方式一:使用profiles + properties(环境变量)
根据使用的配置文件(例如 profiles)动态修改子模块的数据库依赖,可以通过定义不同的 profile 来实现。
1)父模块的 pom.xml
<project xmlns="http://maven.apache.org/POM/4.0.0"xmlns:xsi="http://www.w3.org/2001/XMLSchema-instance"xsi:schemaLocation="http://maven.apache.org/POM/4.0.0 http://maven.apache.org/maven-v4_0_0.xsd"><modelVersion>4.0.0</modelVersion><groupId>com.example</groupId><artifactId>parent-project</artifactId><version>1.0-SNAPSHOT</version><packaging>pom</packaging><profiles><profile><id>mysql</id><properties><db.dependency.groupId>mysql</db.dependency.groupId><db.dependency.artifactId>mysql-connector-java</db.dependency.artifactId><db.dependency.version>8.0.30</db.dependency.version></properties></profile><profile><id>postgresql</id><properties><db.dependency.groupId>org.postgresql</db.dependency.groupId><db.dependency.artifactId>postgresql</db.dependency.artifactId><db.dependency.version>42.3.1</db.dependency.version></properties></profile></profiles>
</project>
2) 子模块的 pom.xml
<project xmlns="http://maven.apache.org/POM/4.0.0"xmlns:xsi="http://www.w3.org/2001/XMLSchema-instance"xsi:schemaLocation="http://maven.apache.org/POM/4.0.0 http://maven.apache.org/maven-v4_0_0.xsd"><modelVersion>4.0.0</modelVersion><parent><groupId>com.example</groupId><artifactId>parent-project</artifactId><version>1.0-SNAPSHOT</version></parent><artifactId>child-module</artifactId><dependencies><dependency><groupId>${db.dependency.groupId}</groupId><artifactId>${db.dependency.artifactId}</artifactId><version>${db.dependency.version}</version></dependency></dependencies>
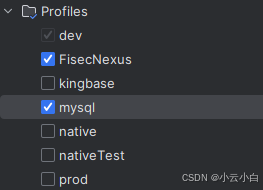
</project>3) 配置idea的实现
然后 idea 右上角勾选不同的数据库,实现动态切换数据的依赖实现
方式二
子模块的 pom.xml 文件可以根据不同的环境使用不同的实现。可以通过在子模块中定义不同的 profiles 来实现这一点。每个 profile 可以包含特定的依赖、插件配置或其他构建配置,当激活某个 profile 时,它会覆盖或添加相应的配置
1)子模块的 pom.xml
<project xmlns="http://maven.apache.org/POM/4.0.0"xmlns:xsi="http://www.w3.org/2001/XMLSchema-instance"xsi:schemaLocation="http://maven.apache.org/POM/4.0.0 http://maven.apache.org/maven-v4_0_0.xsd"><modelVersion>4.0.0</modelVersion><parent><groupId>com.example</groupId><artifactId>parent-project</artifactId><version>1.0-SNAPSHOT</version></parent><artifactId>child-module</artifactId><dependencies><!-- 默认依赖 --><dependency><groupId>com.example</groupId><artifactId>default-implementation</artifactId><version>1.0-SNAPSHOT</version></dependency></dependencies><profiles><profile><id>dev</id><dependencies><dependency><groupId>com.example</groupId><artifactId>dev-implementation</artifactId><version>1.0-SNAPSHOT</version></dependency></dependencies><build><plugins><plugin><groupId>org.apache.maven.plugins</groupId><artifactId>maven-compiler-plugin</artifactId><configuration><source>1.8</source><target>1.8</target></configuration></plugin></plugins></build></profile><profile><id>prod</id><dependencies><dependency><groupId>com.example</groupId><artifactId>prod-implementation</artifactId><version>1.0-SNAPSHOT</version></dependency></dependencies><build><plugins><plugin><groupId>org.apache.maven.plugins</groupId><artifactId>maven-compiler-plugin</artifactId><configuration><source>1.8</source><target>1.8</target></configuration></plugin></plugins></build></profile></profiles>
</project>
2) 配置idea的实现
然后 idea 右上角勾选不懂的接口实现,实现java 调用 不同JCE的接口实现


)
)