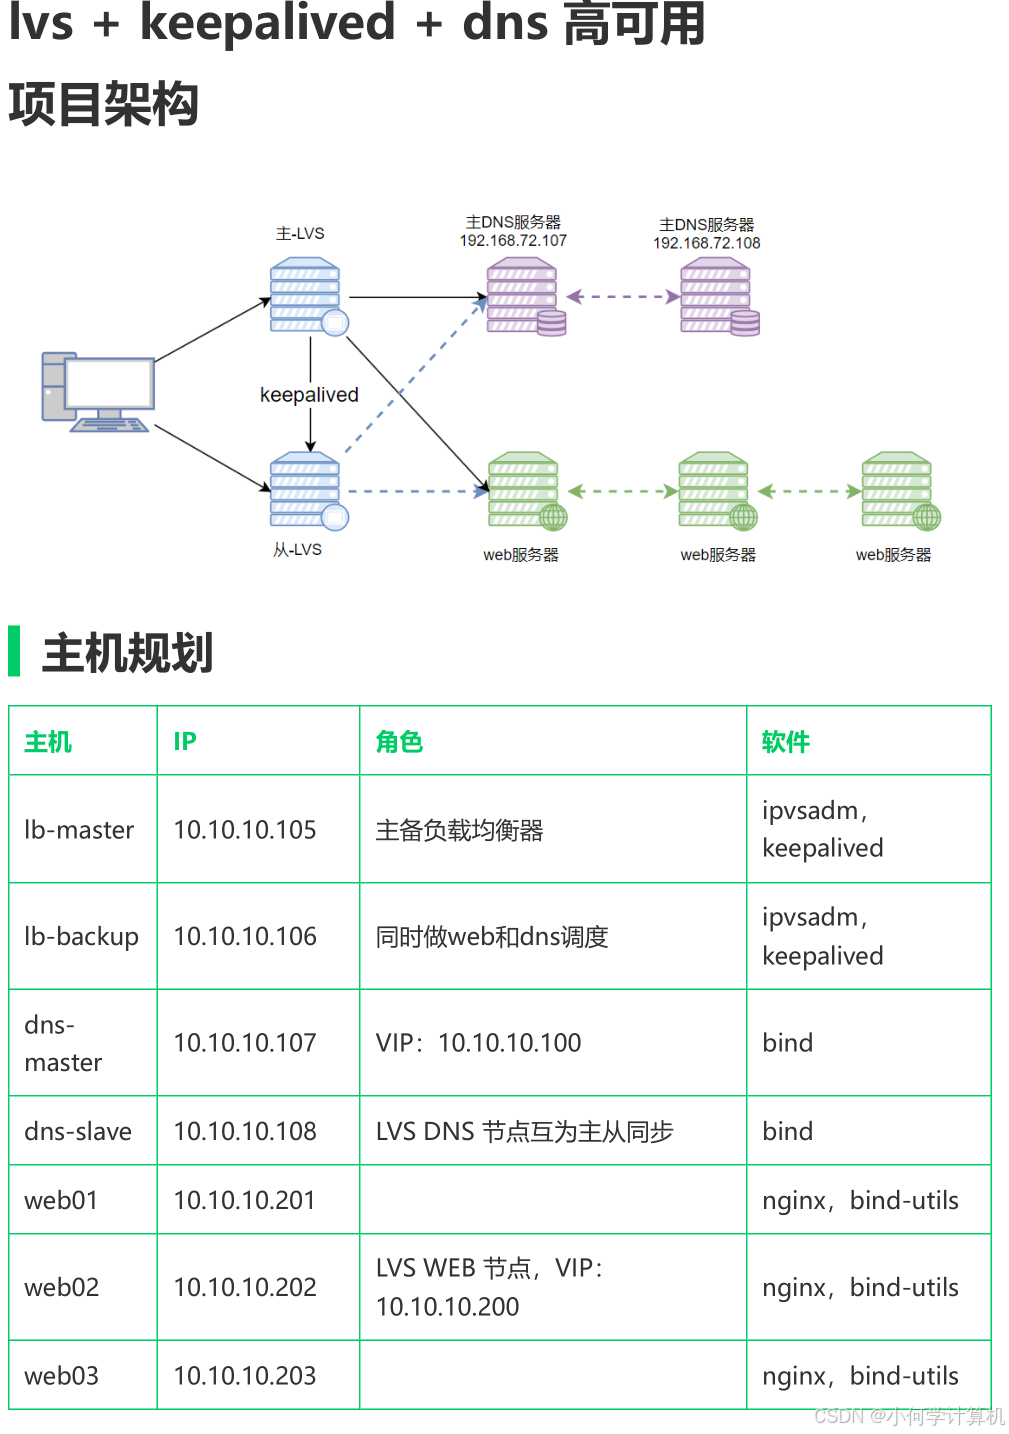
1.配置dns相关服务
1.1修改ip地址主机名
dns-master:
hostnamectl hostname lvs-master
nmcli c modify ens160 ipv4.method manual ipv4.addresses 10.10.10.107/24 ipv4.gateway 10.10.10.2 ipv4.dns 223.5.5.5 connection.autoconnect yes
nmcli c up ens160
dns-salve:
hostnamectl hostname lvs-slave
nmcli c modify ens160 ipv4.method manual ipv4.addresses 10.10.10.108/24 ipv4.gateway 10.10.10.2 ipv4.dns 223.5.5.5 connection.autoconnect yes
nmcli c up ens160
1.2配置仓库,下载bind服务
vim /etc/yum.repos.d/yum.repo
[BaseOS]
name=BaseOS
baseurl=/mnt/BaseOS
gpgcheck=0
[AppStream]
name=AppStream
baseurl=/mnt/AppStream
gpgcheck=0
挂载
mount /dev/sr0 /mnt
下载
dnf install bind -y
关闭防火墙和selinux服务
systemctl stop firewalld
setenforce 0
1.3配置dns相关文件
dns-master:
vim /etc/named.conf
options {listen-on port 53 { 10.10.10.107;10.10.10.200; };directory 	"/var/named";
};zone "example.com" IN {type master;file "example.com";
};
vim /var/named/example.com
$TTL    1D
@       IN      SOA  @   amdin.example.com. (0 1D 1H 2H 2D)IN      NS      ns1IN      NS      ns2
ns1     IN      A       10.10.10.107
ns2     IN      A       10.10.10.108
www     IN      A       10.10.10.200
启动服务并测试:
systemctl start named
dig -t A www.example.com @10.10.10.107
dig -t ns example.com @10.10.10.107
[root@dns-master ~]# dig -t ns example.com @10.10.10.107
; <<>> DiG 9.16.23-RH <<>> -t ns example.com @10.10.10.107 ;; global
options: +cmd ;; Got answer: ;; ->>HEADER<<- opcode: QUERY, status:
NOERROR, id: 14914 ;; flags: qr aa rd ra; QUERY: 1, ANSWER: 2,
AUTHORITY: 0, ADDITIONAL: 3;; OPT PSEUDOSECTION: ; EDNS: version: 0, flags:; udp: 1232 ; COOKIE:
f8f87f0c77258da70100000067fa038f37c0baa6b48666c1 (good) ;; QUESTION
SECTION: ;example.com. IN NS;; ANSWER SECTION: example.com. 86400 IN NS ns1.example.com.
example.com. 86400 IN NS ns2.example.com.;; ADDITIONAL SECTION: ns1.example.com. 86400 IN A 10.10.10.107
ns2.example.com. 86400 IN A 10.10.10.108;; Query time: 0 msec ;; SERVER: 10.10.10.107#53(10.10.10.107) ;;
WHEN: Sat Apr 12 14:09:19 CST 2025 ;; MSG SIZE rcvd: 136
[root@dns-master ~]# dig -t A www.example.com @10.10.10.107; <<>> DiG 9.16.23-RH <<>> -t A www.example.com @10.10.10.107 ;;
global options: +cmd ;; Got answer: ;; ->>HEADER<<- opcode: QUERY,
status: NOERROR, id: 41021 ;; flags: qr aa rd ra; QUERY: 1, ANSWER: 1,
AUTHORITY: 0, ADDITIONAL: 1;; OPT PSEUDOSECTION: ; EDNS: version: 0, flags:; udp: 1232 ; COOKIE:
915f2990163d16460100000067fa03b5ec98879ed99ed361 (good) ;; QUESTION
SECTION: ;www.example.com. IN A;; ANSWER SECTION: www.example.com. 86400 IN A 10.10.10.200
;; Query time: 0 msec ;; SERVER: 10.10.10.107#53(10.10.10.107) ;;
WHEN: Sat Apr 12 14:09:57 CST 2025 ;; MSG SIZE rcvd: 88
dns-slave:
vim /etc/named.conf
options {listen-on port 53 { 10.10.10.108 ;10.10.10.200 ; };directory 	"/var/named";
};zone "example.com" IN {type slave;file "slaves/example.com";masters {10.10.10.107 ;};
};
2.配置web相关服务
2.1修改ip地址和主机名
web01:
hostnamectl hostname web01
nmcli c modify ens160 ipv4.method manual ipv4.addresses 10.10.10.201/24 ipv4.gateway 10.10.10.2 ipv4.dns "10.10.10.107 10.10.10.108" connection.autoconnect yes
nmcli c up ens160
web02:
hostnamectl hostname web02
nmcli c modify ens160 ipv4.method manual ipv4.addresses 10.10.10.202/24 ipv4.gateway 10.10.10.2 ipv4.dns "10.10.10.107 10.10.10.108" connection.autoconnect yes
nmcli c up ens160
web03:
hostnamectl hostname web03
nmcli c modify ens160 ipv4.method manual ipv4.addresses 10.10.10.203/24 ipv4.gateway 10.10.10.2 ipv4.dns "10.10.10.107 10.10.10.108" connection.autoconnect yes
nmcli c up ens160
2.2配置仓库,下载nginx服务
vim /etc/yum.repos.d/yum.repo
[BaseOS]
name=BaseOS
baseurl=/mnt/BaseOS
gpgcheck=0
[AppStream]
name=AppStream
baseurl=/mnt/AppStream
gpgcheck=0
挂载
mount /dev/sr0 /mnt
下载
dnf install nginx -y
关闭防火墙和selinux服务
systemctl stop firewalld
setenforce 0
1.3配置dns相关文件
web01:
vim /etc/nginx/conf.d/web.conf
server{server_name www.example.com;listen 80;root /usr/share/nginx/html/index.html;
}
echo $(hostname) - $(hostname -I) > /usr/share/nginx/html/index.html
web02:
vim /etc/nginx/conf.d/web.conf
server{server_name www.example.com;listen 80;root /usr/share/nginx/html/index.html;
}
echo $(hostname) - $(hostname -I) > /usr/share/nginx/html/index.html
web03:
vim /etc/nginx/conf.d/web.conf
server{server_name www.example.com;listen 80;root /usr/share/nginx/html/index.html;
}
echo $(hostname) - $(hostname -I) > /usr/share/nginx/html/index.html
修改dns
nmcli c modify ens160 ipv4.dns 10.10.10.100
开启和测试nginx服务
systemctl start nginx
curl localhost
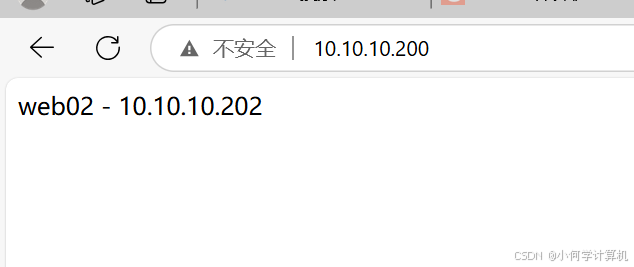
[root@web01 ~]# curl localhost web01 - 10.10.10.201 [root@web02 ~]#
curl localhost web01 - 10.10.10.202 [root@web03 ~]# curl localhost
web01 - 10.10.10.203
3.配置lvs相关服务
3.1修改ip地址和主机名
lb-master:
hostnamectl hostname lb-master
nmcli c modify ens160 ipv4.method manual ipv4.addresses 10.10.10.105/24 ipv4.gateway 10.10.10.2 ipv4.dns 223.5.5.5 connection.autoconnect yes
nmcli c up ens160
lb-salve:
hostnamectl hostname lb-salve
nmcli c modify ens160 ipv4.method manual ipv4.addresses 10.10.10.106/24 ipv4.gateway 10.10.10.2 ipv4.dns 223.5.5.5 connection.autoconnect yes
nmcli c up ens160
3.2配置仓库,下载keepalived ipvsadm服务
vim /etc/yum.repos.d/yum.repo
[BaseOS]
name=BaseOS
baseurl=/mnt/BaseOS
gpgcheck=0
[AppStream]
name=AppStream
baseurl=/mnt/AppStream
gpgcheck=0
挂载
mount /dev/sr0 /mnt
下载
dnf install keepalived ipvsadm -y
关闭防火墙和selinux服务
systemctl stop firewalld
setenforce 0
3.3配置keepalived相关文件
lb-master:
vim /etc/keeailved;keepalived.conf
! Configuration File for keepalivedglobal_defs {router_id LVS_MASTER
}vrrp_instance VI_1 {state MASTERinterface ens160virtual_router_id 51priority 100advert_int 1authentication {auth_type PASSauth_pass 1111}virtual_ipaddress {10.10.10.100}
}vrrp_instance VI_2 {state BACKUPinterface ens160virtual_router_id 50priority 80advert_int 1authentication {auth_type PASSauth_pass 1111}virtual_ipaddress {10.10.10.200}
}
virtual_server 10.10.10.100 53 {delay_loop 6lb_algo rrlb_kind NATpersistence_timeout 10protocol UDPreal_server 10.10.10.107 53 {weight 1MISC_CHECK {connect_timeout 3misc_path "/etc/keepalived/checkdns.sh -h 10.10.10.107 txt.example.com"}}real_server 10.10.10.108 53 {weight 1MISC_CHECK {connect_timeout 3misc_path "/etc/keepalived/checkdns.sh -h 10.10.10.108 txt.example.com"}}
}virtual_server 10.10.10.200 80 {delay_loop 6lb_algo wrrlb_kind DRpersistence_timeout 10protocol TCPreal_server 10.10.10.201 80 {weight 3TCP_CHECK {connect_timeout 3retry 3delay_before_retry 3}}real_server 10.10.10.202 80 {weight 1TCP_CHECK {connect_timeout 3retry 3delay_before_retry 3}}real_server 10.10.10.203 80 {weight 1TCP_CHECK {connect_timeout 3retry 3delay_before_retry 3}}
}
lb-slave:
vim  /etc/keepalived/keepalived.conf
! Configuration File for keepalivedglobal_defs {router_id LVS_BACKUP
}vrrp_instance VI_1 {state BACKUPinterface ens160virtual_router_id 51priority 80advert_int 1authentication {auth_type PASSauth_pass 1111}virtual_ipaddress {10.10.10.100}
}vrrp_instance VI_2 {state MASTERinterface ens160virtual_router_id 50priority 100advert_int 1authentication {auth_type PASSauth_pass 1111}virtual_ipaddress {10.10.10.200}
}
virtual_server 10.10.10.100 53 {delay_loop 6lb_algo rrlb_kind NATpersistence_timeout 10protocol UDPreal_server 10.10.10.107 53 {weight 1MISC_CHECK {connect_timeout 3misc_path "/etc/keepalived/checkdns.sh -h 10.10.10.107 txt.example.com"}}real_server 10.10.10.108 53 {weight 1MISC_CHECK {connect_timeout 3misc_path "/etc/keepalived/checkdns.sh -h 10.10.10.108 txt.example.com"}}
}virtual_server 10.10.10.200 80 {delay_loop 6lb_algo wrrlb_kind DRpersistence_timeout 10protocol TCPreal_server 10.10.10.201 80 {weight 3TCP_CHECK {connect_timeout 3retry 3delay_before_retry 3}}real_server 10.10.10.202 80 {weight 1TCP_CHECK {connect_timeout 3retry 3delay_before_retry 3}}real_server 10.10.10.203 80 {weight 1TCP_CHECK {connect_timeout 3retry 3delay_before_retry 3}}
}
3.4编写执行的脚本
vim /etc/keepalived/checkdns.sh
#!/bin/bash
[ $# -le 2 ] && { echo "usage: $0 -h <ip>"; exit 2; }
domain=$3
while getopts "h:" OPT; docase $OPT inh)host=$OPTARG;;*)echo "usage: $0 -h <ip>" && exit 1;;esac
done
dig @${host} txt ${domain} +time=1 | grep "\<AaBbCcDdEeFf\>" >
/dev/null
exit $?
chmod a+x /etc/keepalived/checkdns.sh
3.5启动服务
systemctl start keepalived ipvsadm
查看lvs规则
ipvsadm -ln
4.修改web的dns增加ip
nmcli c modify ens160 ipv4.dns 10.10.10.100
nmcli c modify ens160 up
ifconfig lo:0 10.10.10.200 netmask 255.255.255.255
route add -host 10.10.10.200 dev lo:0
5.增加dns路由
ifconfig lo:0 10.10.10.100 netmask 255.255.255.255
route add -host 10.10.10.100 dev lo:0
6.测试