引言
在智能驾驶系统、交通分析和安全监控等领域,场景识别是一项核心技术。传统的场景识别方法主要依赖人工标注,不仅耗时耗力,还容易受主观因素影响。随着技术的发展,算法驱动的场景识别方法逐渐兴起,通过结合规则引擎与机器学习技术,实现了更高效、更客观的场景自动识别。本文将深入探讨这种结合方式,特别是在车辆交互场景识别中的应用。
传统场景识别与算法驱动场景识别
传统场景识别方法
传统的场景识别主要依赖人工标注,专业人员根据预定义的标准,对收集到的数据进行分类和标记。这种方法存在多个显著缺点:
- 耗费大量人力和时间资源
- 标注质量依赖专业人员的经验和主观判断
- 难以处理海量数据
- 难以及时响应动态变化的场景
算法驱动的场景识别方法
算法驱动的场景识别方法结合了规则引擎与机器学习技术,形成了一种自动化的识别系统。规则引擎基于预定义的条件对数据进行筛选和分类,而机器学习技术则能从大量数据中自动学习模式和特征。这种方法的核心在于将明确的专家知识(规则)与数据驱动的学习能力(机器学习)结合起来,实现更高效、更准确的场景识别。
规则引擎在场景识别中的应用
规则引擎概述
规则引擎是一种能够将业务决策逻辑与应用程序代码分离的技术,通过定义一系列规则来处理复杂的判断逻辑。其中Rete算法是一种高效的模式匹配算法,广泛用于规则引擎中。Rete算法通过构建一个网络结构来避免重复计算,提高性能。在这个网络中,节点表示规则的条件部分,事实(数据)通过这个网络传播。
Rete算法的关键特性包括增量更新(只更新受影响的部分网络)和节点共享(多个规则共享相同条件时只构建一次共享子网络)。常见的节点类型包括根节点、单输入节点、双输入节点和终端节点,分别用于处理不同类型的条件和逻辑。
主流规则引擎比较
目前主流的规则引擎包括Drools(Java)、Easy Rules(Java)、Nools(Node.js)以及Python领域的CLIPSpy等。本文将重点关注Drools和CLIPSpy这两种成熟且功能丰富的规则引擎。
Drools (Java)是一个成熟且功能丰富的业务规则管理系统(BRMS),提供了声明式规则定义、复杂规则评估、时间规则、决策表支持等丰富功能。Drools基于ReteOO算法(Rete算法的面向对象增强版),广泛应用于金融、医疗、电商、物流等行业。
CLIPSpy (Python)是成熟的CLIPS专家系统的Python绑定,源自NASA开发的CLIPS,以其鲁棒性和多功能性而闻名。CLIPSpy实现了Rete算法,支持规则语言与Python集成,广泛应用于专家系统和AI应用开发。CLIPSpy具有以下特点:
- 源自NASA技术:CLIPS最初由NASA开发,被认为是人工智能领域的先进技术,并在大学课程中用于教授AI基础知识
- Lisp风格语法:提供了类似Lisp的语法结构,表达能力强
- Python集成:允许在CLIPS规则中嵌入Python代码,从而非常容易扩展
- 成熟稳定:经过多年发展,功能完善,性能稳定
- 优秀文档:提供了详细的文档支持,降低学习难度
规则引擎在场景识别中的优势
在场景识别中,规则引擎具有以下优势:
- 明确的逻辑表达:能够清晰地表达专家知识和领域规则
- 可解释性强:规则的触发和执行过程透明可追踪
- 灵活性高:规则可以根据需求动态调整和优化
- 高效处理复杂条件:通过模式匹配算法高效处理多条件组合判断
机器学习在场景识别中的应用
机器学习技术能够从大量数据中自动学习模式和规律,在场景识别中主要应用以下技术:
聚类算法
聚类算法根据数据的相似性将其分为不同的组,常用于发现数据中的潜在类别或模式。在场景识别中,常用聚类算法包括:
- K-means聚类:基于距离度量将数据分为K个簇
- DBSCAN:基于密度的聚类算法,能够识别任意形状的簇
- 层次聚类:通过构建树状的聚类结构来组织数据
异常检测
异常检测算法用于识别与正常模式显著不同的数据点。在场景识别中,常用以下方法:
- 基于统计的方法:使用统计量检测偏离正常分布的数据
- 基于邻近度的方法:检测与大多数数据点相去甚远的点
- 隔离森林:通过随机分区识别容易被隔离的异常点
- 单类SVM:将数据映射到高维空间,找出异常点
监督学习模型
监督学习通过标记数据训练模型,用于对新数据进行分类或回归预测:
- 决策树和随机森林:基于特征的树状决策模型
- 支持向量机(SVM):寻找最优分类超平面的算法
- 深度学习模型:如卷积神经网络(CNN)用于图像场景识别
规则引擎与机器学习的结合
规则引擎与机器学习各有优势,结合使用可以取长补短,实现更强大的场景识别系统。
结合方式
- 串行结合:
- 规则作为预处理:先用规则引擎筛选出潜在的场景,再用机器学习模型进行精细分类
- 规则作为后处理:先用机器学习模型识别基本场景,再用规则引擎应用业务约束和专家知识
- 并行结合:
- 同时使用规则引擎和机器学习处理相同的数据,然后融合结果
- 可以采用投票、加权平均等方式进行结果融合
- 嵌套结合:
- 规则中嵌入机器学习:规则条件中引用机器学习模型的输出
- 机器学习中嵌入规则:将规则引擎的输出作为机器学习模型的特征
结合优势
- 提高识别准确性:结合专家知识和数据驱动的学习能力
- 增强系统可解释性:机器学习模型提供预测,规则引擎提供解释
- 处理复杂场景:应对各种复杂的、多变的场景
- 减少标注需求:通过规则自动生成部分标签,减轻人工标注负担
案例研究:车辆交互场景识别
应用场景
在智能驾驶和交通安全分析中,识别潜在的危险或特殊交互场景至关重要。这些场景包括:
- 紧急制动场景
- 车辆切入场景
- 近距离跟车场景
- 车辆交叉汇入场景
- 车道变换冲突场景
关键参数
车辆交互场景识别主要基于以下关键参数:
- 车辆加速度:反映车辆动力学状态变化
- 相对距离:车辆间的空间位置关系
- 相对速度:车辆间的速度差异
- 时间距(Time Headway):前后车之间的时间间隔
- TTC(Time-to-Collision):预估碰撞时间,是评估风险的重要指标
实现方式
结合CLIPSpy规则引擎与Python机器学习的车辆交互场景识别系统实现方式如下:
- 规则引擎部分:
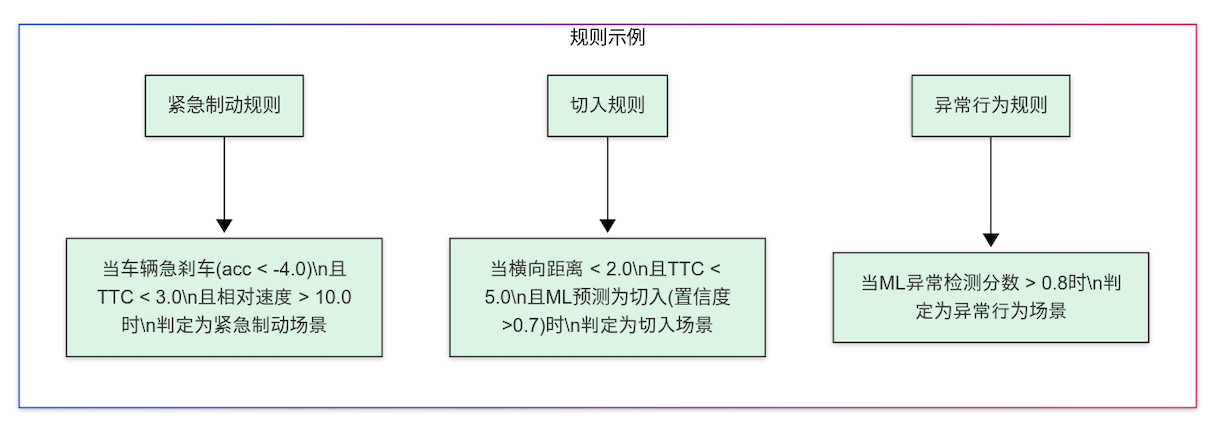
- 使用CLIPSpy定义场景识别规则,如"当TTC < 3秒且相对速度 > 10km/h时,判定为潜在紧急场景"
- 利用CLIPSpy的规则语言表达复杂逻辑,处理多条件组合
- 根据道路类型、天气条件等上下文信息调整规则阈值
- 机器学习部分:
- 使用Python科学计算库(如scikit-learn)实现聚类和异常检测
- 基于历史标记数据训练分类模型,预测场景类型及风险等级
- 使用深度学习框架(如PyTorch)处理复杂特征提取
- 结合策略:
- 规则引擎识别明确的场景和风险,机器学习处理模糊边界和未知场景
- 规则引擎的输出作为机器学习模型的特征输入
- 机器学习模型的结果用于动态调整规则参数
代码示例:CLIPSpy规则引擎与机器学习结合的场景识别系统
1. CLIPSpy规则定义
import clips# 创建CLIPS环境
clips_env = clips.Environment()# 定义模板(相当于Java中的类)
vehicle_template = """
(deftemplate vehicle(slot id (type STRING))(slot speed (type FLOAT))(slot acceleration (type FLOAT)))
"""interaction_template = """
(deftemplate interaction(slot vehicle-id (type STRING))(slot relative-distance (type FLOAT))(slot relative-speed (type FLOAT))(slot ttc (type FLOAT))(slot lateral-distance (type FLOAT)))
"""ml_prediction_template = """
(deftemplate ml-prediction(slot vehicle-id (type STRING))(slot scene-type (type STRING))(slot confidence (type FLOAT))(slot is-anomaly (type SYMBOL) (allowed-values TRUE FALSE))(slot anomaly-score (type FLOAT)))
"""scene_template = """
(deftemplate scene(slot type (type STRING))(slot vehicle-id (type STRING))(slot confidence (type FLOAT))(slot evidence (type STRING)))
"""# 定义规则
emergency_braking_rule = """
(defrule emergency-braking-scene(vehicle (id ?id) (acceleration ?acc&:(< ?acc -4.0)))(interaction (vehicle-id ?id) (ttc ?ttc&:(< ?ttc 3.0)) (relative-speed ?rs&:(> ?rs 10.0)))=>(assert (scene (type "EMERGENCY_BRAKING") (vehicle-id ?id)(confidence 0.9)(evidence (str-cat "Hard braking with TTC=" ?ttc ", RelSpeed=" ?rs)))))
"""cut_in_rule = """
(defrule cut-in-scene(interaction (vehicle-id ?id) (lateral-distance ?ld&:(< ?ld 2.0))(ttc ?ttc&:(< ?ttc 5.0)))(ml-prediction (vehicle-id ?id) (scene-type "CUT_IN")(confidence ?conf&:(> ?conf 0.7)))=>(assert (scene (type "CUT_IN")(vehicle-id ?id)(confidence 0.85)(evidence (str-cat "Cut-in detected with ML confidence=" ?conf)))))
"""anomaly_rule = """
(defrule anomaly-scene(vehicle (id ?id))(ml-prediction (vehicle-id ?id)(is-anomaly TRUE)(anomaly-score ?score&:(> ?score 0.8)))=>(assert (scene (type "ANOMALY_BEHAVIOR")(vehicle-id ?id)(confidence ?score)(evidence (str-cat "Anomaly detected by ML with score=" ?score)))))
"""# 加载模板和规则到环境
clips_env.build(vehicle_template)
clips_env.build(interaction_template)
clips_env.build(ml_prediction_template)
clips_env.build(scene_template)
clips_env.build(emergency_braking_rule)
clips_env.build(cut_in_rule)
clips_env.build(anomaly_rule)
2. 机器学习模型集成
import numpy as np
import pandas as pd
from sklearn.cluster import DBSCAN
from sklearn.ensemble import IsolationForest
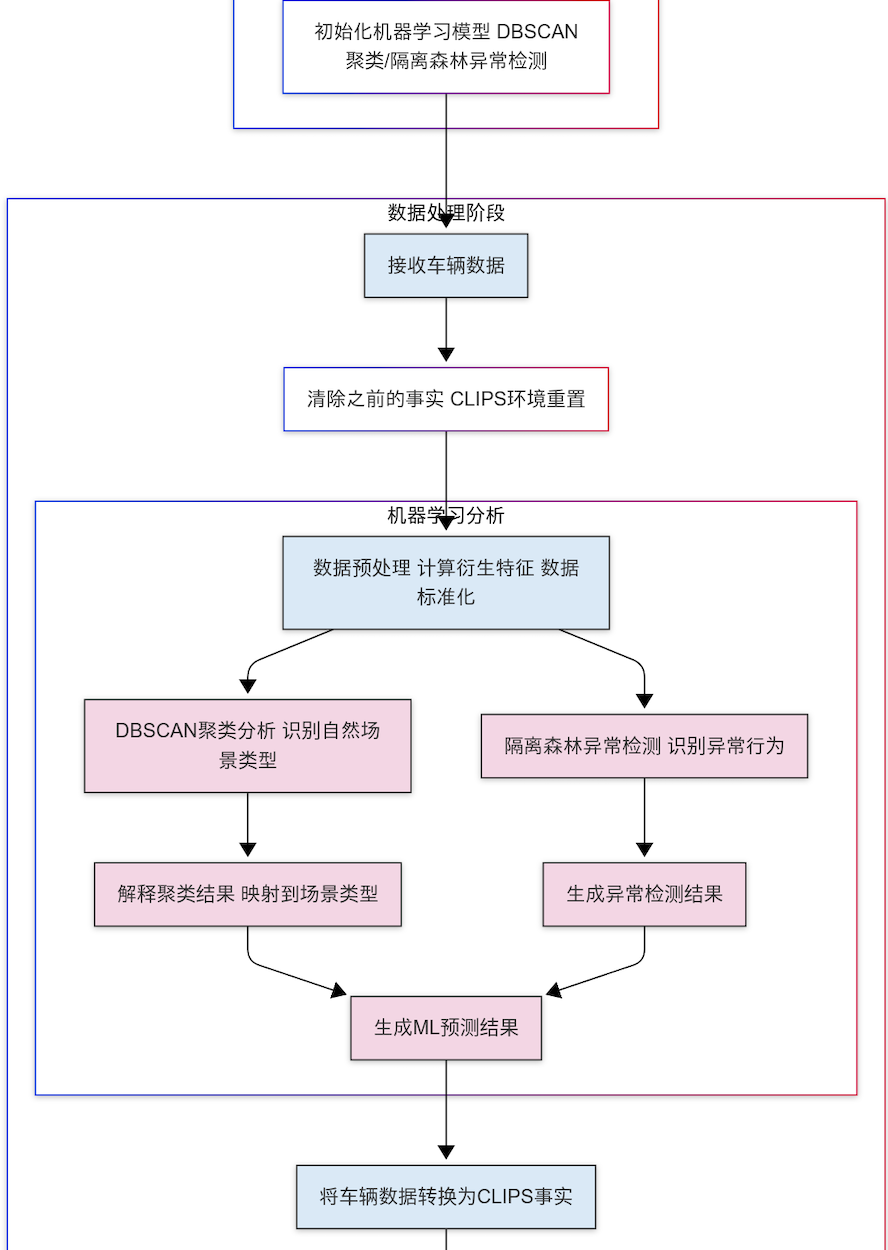
from sklearn.preprocessing import StandardScalerclass VehicleSceneDetection:def __init__(self):# 初始化机器学习模型# 1. 聚类模型 - 识别自然形成的场景类型self.clustering_model = DBSCAN(eps=0.5, min_samples=5)# 2. 异常检测模型 - 识别异常行为self.anomaly_model = IsolationForest(contamination=0.05, random_state=42)# 3. 数据标准化self.scaler = StandardScaler()# 存储历史数据self.historical_data = []def preprocess_data(self, data):"""预处理数据"""# 转换为DataFramedf = pd.DataFrame(data)# 计算特征if len(df) > 0:df['ttc_inverse'] = np.where(df['ttc'] > 0, 1.0 / df['ttc'], 10.0) # TTC倒数,TTC为0时设为较大值df['risk_factor'] = df['relativeSpeed'] * df['ttc_inverse'] # 风险因子# 标准化数值特征features = ['acceleration', 'relativeDistance', 'relativeSpeed', 'ttc', 'ttc_inverse', 'risk_factor']df_scaled = pd.DataFrame(self.scaler.fit_transform(df[features]), columns=features)return df_scaled, dfreturn None, dfdef detect_clusters(self, features_scaled):"""使用聚类识别场景类型"""if features_scaled is None or len(features_scaled) == 0:return []# 应用DBSCAN聚类clusters = self.clustering_model.fit_predict(features_scaled)# 分析每个簇的特性cluster_results = []for cluster_id in set(clusters):if cluster_id == -1:continue # 跳过噪声点cluster_points = features_scaled[clusters == cluster_id]# 计算簇的中心和特性centroid = cluster_points.mean().to_dict()# 根据特性判断可能的场景类型scene_type = self.interpret_cluster(centroid)cluster_results.append({'cluster_id': cluster_id,'scene_type': scene_type,'confidence': 0.8, # 可以基于簇的紧密度等指标计算置信度'centroid': centroid})return cluster_resultsdef interpret_cluster(self, centroid):"""解释聚类结果,映射到场景类型"""# 基于簇的特征推断场景类型if centroid['ttc_inverse'] > 0.5 and centroid['risk_factor'] > 0.7:return "EMERGENCY_SCENARIO"elif centroid['ttc'] < 0.3 and abs(centroid['acceleration']) > 0.5:return "HARD_BRAKING"elif centroid['relativeDistance'] < 0.2:return "CLOSE_FOLLOWING"elif centroid['relativeSpeed'] > 0.7:return "APPROACHING_FAST"else:return "NORMAL_DRIVING"def detect_anomalies(self, features_scaled, original_data):"""使用异常检测识别异常行为"""if features_scaled is None or len(features_scaled) == 0:return []# 应用隔离森林进行异常检测anomaly_scores = self.anomaly_model.fit_predict(features_scaled)# 转换分数(隔离森林中,-1表示异常,1表示正常)# 转换为0-1范围内的异常分数,1表示最异常normalized_scores = (1 - (anomaly_scores + 1) / 2)anomaly_results = []for i, score in enumerate(normalized_scores):if score > 0.6: # 异常阈值vehicle_id = original_data.iloc[i]['vehicleId']anomaly_results.append({'vehicle_id': vehicle_id,'is_anomaly': True,'anomaly_score': score,'features': original_data.iloc[i].to_dict()})return anomaly_resultsdef process_vehicle_data(self, vehicle_data):"""处理车辆数据,返回场景识别结果"""# 添加到历史数据self.historical_data.extend(vehicle_data)# 仅保留最近的数据if len(self.historical_data) > 10000:self.historical_data = self.historical_data[-10000:]# 预处理数据features_scaled, original_data = self.preprocess_data(vehicle_data)# 检测聚类cluster_results = self.detect_clusters(features_scaled)# 检测异常anomaly_results = self.detect_anomalies(features_scaled, original_data)# 准备机器学习预测结果ml_predictions = []# 添加聚类结果for result in cluster_results:ml_predictions.append({'vehicle_id': '', # 在实际应用中应关联到特定车辆'scene_type': result['scene_type'],'confidence': result['confidence'],'is_anomaly': False,'anomaly_score': 0.0})# 添加异常检测结果for result in anomaly_results:ml_predictions.append({'vehicle_id': result['vehicle_id'],'scene_type': 'ANOMALY','confidence': 0.5, # 场景类型置信度设为中等'is_anomaly': True,'anomaly_score': result['anomaly_score']})return ml_predictions3. 主程序:集成CLIPSpy和机器学习
import clips
import json
import numpy as np
import pandas as pdclass SceneRecognitionSystem:def __init__(self):# 初始化CLIPS环境self.clips_env = clips.Environment()# 加载规则(实际应用中可从文件加载)self.load_clips_rules()# 初始化机器学习模型self.ml_detector = VehicleSceneDetection()# 存储检测到的场景self.detected_scenes = []def load_clips_rules(self):"""加载CLIPS规则和模板"""# 在实际应用中,这些定义可以从文件加载templates_and_rules = ["""(deftemplate vehicle(slot id (type STRING))(slot speed (type FLOAT))(slot acceleration (type FLOAT)))""","""(deftemplate interaction(slot vehicle-id (type STRING))(slot relative-distance (type FLOAT))(slot relative-speed (type FLOAT))(slot ttc (type FLOAT))(slot lateral-distance (type FLOAT)))""","""(deftemplate ml-prediction(slot vehicle-id (type STRING))(slot scene-type (type STRING))(slot confidence (type FLOAT))(slot is-anomaly (type SYMBOL) (allowed-values TRUE FALSE))(slot anomaly-score (type FLOAT)))""","""(deftemplate scene(slot type (type STRING))(slot vehicle-id (type STRING))(slot confidence (type FLOAT))(slot evidence (type STRING)))""","""(defrule emergency-braking-scene(vehicle (id ?id) (acceleration ?acc&:(< ?acc -4.0)))(interaction (vehicle-id ?id) (ttc ?ttc&:(< ?ttc 3.0)) (relative-speed ?rs&:(> ?rs 10.0)))=>(assert (scene (type "EMERGENCY_BRAKING") (vehicle-id ?id)(confidence 0.9)(evidence (str-cat "Hard braking with TTC=" ?ttc ", RelSpeed=" ?rs)))))""","""(defrule cut-in-scene(interaction (vehicle-id ?id) (lateral-distance ?ld&:(< ?ld 2.0))(ttc ?ttc&:(< ?ttc 5.0)))(ml-prediction (vehicle-id ?id) (scene-type "CUT_IN")(confidence ?conf&:(> ?conf 0.7)))=>(assert (scene (type "CUT_IN")(vehicle-id ?id)(confidence 0.85)(evidence (str-cat "Cut-in detected with ML confidence=" ?conf)))))""","""(defrule anomaly-scene(vehicle (id ?id))(ml-prediction (vehicle-id ?id)(is-anomaly TRUE)(anomaly-score ?score&:(> ?score 0.8)))=>(assert (scene (type "ANOMALY_BEHAVIOR")(vehicle-id ?id)(confidence ?score)(evidence (str-cat "Anomaly detected by ML with score=" ?score)))))"""]# 加载模板和规则for item in templates_and_rules:self.clips_env.build(item)def process_vehicle_data(self, vehicle_data_list):"""处理车辆数据,返回场景识别结果"""# 清除之前的事实self.clips_env.reset()self.detected_scenes = []# 处理数据生成机器学习预测ml_predictions = self.ml_detector.process_vehicle_data(vehicle_data_list)# 将车辆数据和机器学习预测转换为CLIPS事实for data in vehicle_data_list:# 创建车辆事实vehicle_fact = self.clips_env.assert_string(f'(vehicle (id "{data["vehicleId"]}") 'f'(speed {data["speed"]}) 'f'(acceleration {data["acceleration"]}))')# 创建交互事实interaction_fact = self.clips_env.assert_string(f'(interaction (vehicle-id "{data["vehicleId"]}") 'f'(relative-distance {data["relativeDistance"]}) 'f'(relative-speed {data["relativeSpeed"]}) 'f'(ttc {data["ttc"]}) 'f'(lateral-distance {data["lateralDistance"]}))')# 添加机器学习预测事实for pred in ml_predictions:is_anomaly_str = "TRUE" if pred["is_anomaly"] else "FALSE"ml_fact = self.clips_env.assert_string(f'(ml-prediction (vehicle-id "{pred["vehicle_id"]}") 'f'(scene-type "{pred["scene_type"]}") 'f'(confidence {pred["confidence"]}) 'f'(is-anomaly {is_anomaly_str}) 'f'(anomaly-score {pred["anomaly_score"]}))')# 运行规则self.clips_env.run()# 收集检测到的场景for fact in self.clips_env.facts():# 检查是否是场景事实if fact.template.name == 'scene':scene = {'type': fact['type'],'vehicleId': fact['vehicle-id'],'confidence': fact['confidence'],'evidence': fact['evidence']}self.detected_scenes.append(scene)return self.detected_scenesdef get_detected_scenes(self):"""获取检测到的场景列表"""return self.detected_scenes# 测试函数
def test_scene_recognition():# 初始化场景识别系统system = SceneRecognitionSystem()# 生成测试数据test_data = [{"vehicleId": "V001","speed": 80.0,"acceleration": -5.2,"relativeDistance": 15.0,"relativeSpeed": 30.0,"ttc": 2.0,"lateralDistance": 0.5},{"vehicleId": "V002","speed": 60.0,"acceleration": -0.5,"relativeDistance": 8.0,"relativeSpeed": 2.0,"ttc": 4.0,"lateralDistance": 0.2},{"vehicleId": "V003","speed": 50.0,"acceleration": 0.0,"relativeDistance": 50.0,"relativeSpeed": 0.0,"ttc": 999.0,"lateralDistance": 1.8}]# 处理数据scenes = system.process_vehicle_data(test_data)# 输出检测结果print(f"Detected {len(scenes)} scenes:")for scene in scenes:print(f"Scene[type={scene['type']}, vehicle={scene['vehicleId']}, "f"confidence={scene['confidence']}, evidence={scene['evidence']}]")if __name__ == "__main__":test_scene_recognition()
4. 使用CLIPSpy的Python/CLIPS集成示例
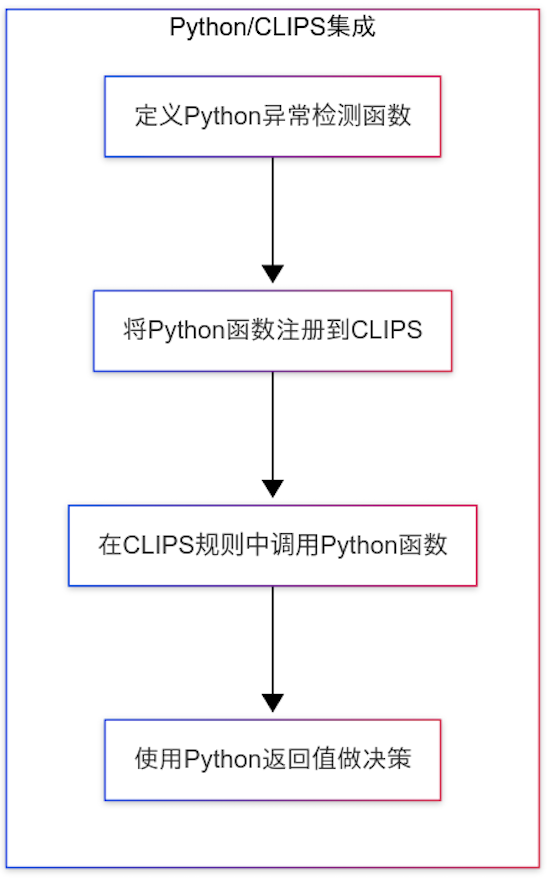
import clips
from sklearn.ensemble import IsolationForest
import numpy as npdef clips_python_integration_example():"""演示如何在CLIPS规则中调用Python函数"""# 创建CLIPS环境env = clips.Environment()# 定义一个Python函数,用于异常检测def detect_anomaly(acceleration, relative_speed, ttc):"""使用隔离森林检测异常"""# 创建简单的数据集X = np.array([[acceleration, relative_speed, ttc]])# 创建并训练隔离森林模型model = IsolationForest(contamination=0.1, random_state=42)model.fit(X)# 预测异常分数(-1表示异常,1表示正常)score = model.score_samples(X)[0]# 转换为0-1范围,1表示异常可能性高anomaly_score = 1 - (score + 0.5)return anomaly_score > 0.7, anomaly_score# 将Python函数注册到CLIPSenv.define_function(detect_anomaly)# 定义使用Python函数的CLIPS规则python_rule = """(defrule python-ml-anomaly-detection(vehicle (id ?id) (acceleration ?acc))(interaction (vehicle-id ?id) (relative-speed ?rs) (ttc ?ttc))=>(bind ?result (python-call detect_anomaly ?acc ?rs ?ttc))(bind ?is_anomaly (nth$ 1 ?result))(bind ?score (nth$ 2 ?result))(if ?is_anomaly then(assert (scene (type "ML_DETECTED_ANOMALY")(vehicle-id ?id)(confidence ?score)(evidence (str-cat "ML anomaly detection with score=" ?score))))))"""# 加载规则env.build("""(deftemplate vehicle(slot id (type STRING))(slot speed (type FLOAT))(slot acceleration (type FLOAT)))""")env.build("""(deftemplate interaction(slot vehicle-id (type STRING))(slot relative-distance (type FLOAT))(slot relative-speed (type FLOAT))(slot ttc (type FLOAT))(slot lateral-distance (type FLOAT)))""")env.build("""(deftemplate scene(slot type (type STRING))(slot vehicle-id (type STRING))(slot confidence (type FLOAT))(slot evidence (type STRING)))""")env.build(python_rule)# 插入测试数据env.assert_string('(vehicle (id "V001") (speed 80.0) (acceleration -5.2))')env.assert_string('(interaction (vehicle-id "V001") (relative-distance 15.0) (relative-speed 30.0) (ttc 2.0) (lateral-distance 0.5))')# 运行规则env.run()# 输出结果print("检测到的场景:")for fact in env.facts():if fact.template.name == 'scene':print(f"Scene[type={fact['type']}, vehicle={fact['vehicle-id']}, "f"confidence={fact['confidence']}, evidence={fact['evidence']}]")if __name__ == "__main__":clips_python_integration_example()
结论与未来展望
算法驱动的场景识别技术通过结合规则引擎与机器学习,为车辆交互分析和智能驾驶系统提供了强大的支持。特别是CLIPSpy等成熟的规则引擎与Python机器学习生态系统的结合,充分利用了规则引擎的明确逻辑表达和机器学习的模式识别能力,实现了高效、准确且具有良好可解释性的场景识别。
与其他规则引擎相比,CLIPSpy具有如下优势:
- 源自NASA的专业AI技术,成熟稳定
- 与Python生态系统的无缝集成
- 支持规则语言与Python代码的混合使用
- 采用了效率高的Rete算法
- 良好的文档和社区支持
未来,这种结合方式可以进一步扩展和优化:
- 增强在线学习能力:使系统能够从新数据中持续学习,动态调整规则和模型
- 融合多模态数据:整合视觉、雷达、V2X通信等多源数据,提高识别精度
- 边缘计算部署:优化算法效率,实现在车载计算平台上的实时场景识别
- 大规模知识图谱集成:将场景知识表示为知识图谱,增强系统的推理能力
通过CLIPSpy规则引擎与机器学习的深度结合,算法驱动的场景识别系统将继续在智能交通、自动驾驶和交通安全等领域发挥关键作用,推动智能交通系统的快速发展。


