目录
1.解压ISO
2.修改文件系统
3.生成新的ISO
3.1使用PowerISO软件生成ISO
3.2使用Linux脚本生成ISO
4.制作启动盘
4.1使用UltraISO软件制作启动盘
4.2使用Linux脚本制作启动盘
5.安装系统
1.解压ISO
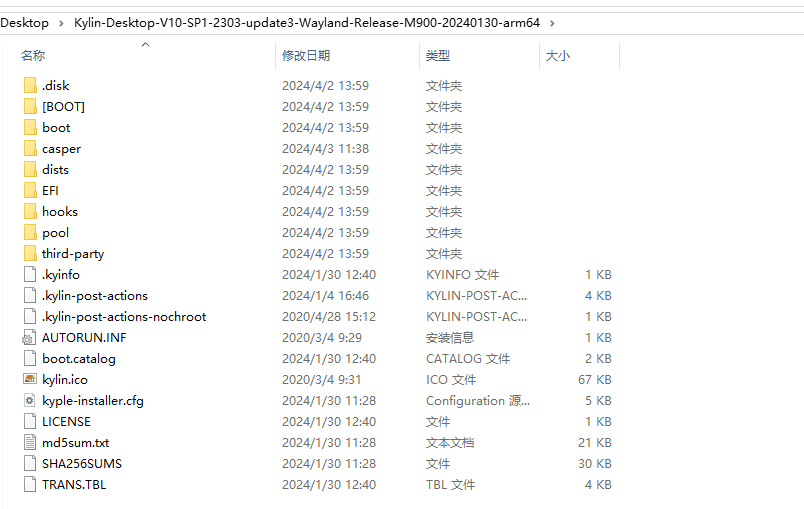
前段时间做的一个项目,用的soc是海思的M900,系统使用麒麟系统,因麒麟系统不开源,只能使用其公开的固件,我在该固件上负责修改、解决bug、增加功能,最后合成新固件。麒麟系统的固件为iso格式:Kylin-Desktop-V10-SP1-2303-update3-Wayland-Release-M900-20240130-arm64.iso。解压后的文件如下图所示:
在casper文件夹下存放着麒麟系统的文件系统文件filesystem.squashfs,如下图所示。
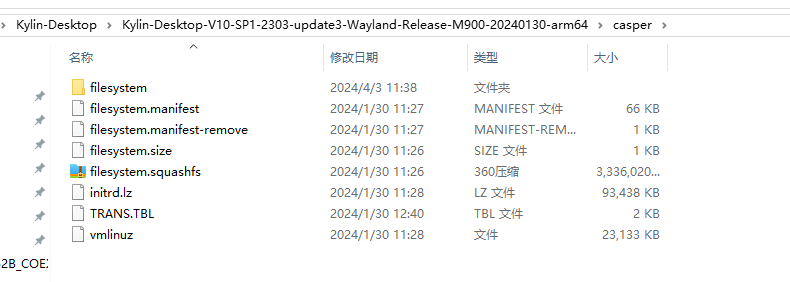
想要修改文件系统的内容,将filesystem.squashfs提取出来解压后修改再压缩即可。解压和压缩的命令如下所示。
解压 filesystem.squashfsunsquashfs filesystem.squashfs压缩 filesystem成filesystem.squashfsmksquashfs filesystem filesystem.squashfs2.修改文件系统
为了能让系统开机后自动执行一些命令,在root用户下执行“crontab -e”,将会生成文件:/var/spool/cron/crontabs/root,这个文件可以开机自动执行一些脚本命令或定时执行一定的任务。如:* * * * * date >> /home/log 每分钟执行一次。
crontab -e命令生成的/var/spool/cron/crontabs/root文件如下所示。
# DO NOT EDIT THIS FILE - edit the master and reinstall.
# (/tmp/crontab.bMsRWr/crontab installed on Wed Apr  3 15:33:54 2024)
# (Cron version -- $Id: crontab.c,v 2.13 1994/01/17 03:20:37 vixie Exp $)
# Edit this file to introduce tasks to be run by cron.
#
# Each task to run has to be defined through a single line
# indicating with different fields when the task will be run
# and what command to run for the task
#
# To define the time you can provide concrete values for
# minute (m), hour (h), day of month (dom), month (mon),
# and day of week (dow) or use '*' in these fields (for 'any').
#
# Notice that tasks will be started based on the cron's system
# daemon's notion of time and timezones.
#
# Output of the crontab jobs (including errors) is sent through
# email to the user the crontab file belongs to (unless redirected).
#
# For example, you can run a backup of all your user accounts
# at 5 a.m every week with:
# 0 5 * * 1 tar -zcf /var/backups/home.tgz /home/
#
# For more information see the manual pages of crontab(5) and cron(8)
#
# m h  dom mon dow   command
在/usr/local/bin/放置文件,如下所示。
8852bs.ko cfg80211.ko preinstall.sh biometric-driver-microarray-yukifinger_4.0.0-0-g88ffd86_arm64.deb
preinstall.sh脚本如下所示,该脚本会写到/var/spool/cron/crontabs/root文件里面,这样系统每次开机后就会执行preinstall.sh。
#!/bin/bashsetsignstatus  offif [ ! -e "/usr/local/bin/first_reboot_flag" ];
thensudo sh -c 'dpkg -i --force-overwrite /usr/local/bin/biometric-driver-microarray-yukifinger_4.0.0-0-g88ffd86_arm64.deb' >> /usr/local/bin/log
fitouch /usr/local/bin/first_reboot_flagsudo setstatus softmode -p#47wifi
sudo insmod /usr/local/bin/cfg80211.ko
sudo insmod /usr/local/bin/8852bs.kosetsignstatus warning
我的项目最终的 preinstall.sh脚本如下所示。
#!/bin/bashdate >> /usr/local/bin/log
setsignstatus  off
sudo setstatus softmode -psdio_proc="/sys/bus/sdio/devices"
sdio_device=""
wifi_device=""
sdio_device=$(ls ${sdio_proc})if [ ! -e "/usr/local/bin/first_boot_install_susses_flag" ];thencd /usr/local/bin/sle_driversudo ./make_sle_env.shcd -try_num=0while true;doremove_deb_num=0try_num=$((try_num+1))deb_name=$(dpkg -l | grep youker-assistant)if [[ $deb_name != "" ]];thenecho ">>>>>remove youker-assistant<<<<<" >> /usr/local/bin/logsudo sh -c 'dpkg -P youker-assistant' >> /usr/local/bin/logelsedeb_name=""remove_deb_num=$((remove_deb_num+1))fideb_name=$(dpkg -l | grep audio-service)if [[ $deb_name != "" ]];thenecho ">>>>>remove audio-service<<<<<" >> /usr/local/bin/logsudo sh -c 'dpkg -P audio-service' >> /usr/local/bin/logelsedeb_name=""remove_deb_num=$((remove_deb_num+1))fideb_name=$(dpkg -l | grep rtk-wifi-bt)if [[ $deb_name != "" ]];thenecho ">>>>>remove rtk-wifi-bt<<<<<" >> /usr/local/bin/logsudo sh -c 'dpkg -P rtk-wifi-bt' >> /usr/local/bin/logelsedeb_name=""remove_deb_num=$((remove_deb_num+1))fideb_name=$(dpkg -l | grep libukui-kwin4-effect-builtins1)if [[ $deb_name != "" ]];thenecho ">>>>>remove libukui-kwin4-effect-builtins1<<<<<" >> /usr/local/bin/logsudo sh -c 'dpkg -P libukui-kwin4-effect-builtins1 ' >> /usr/local/bin/logelsedeb_name=""remove_deb_num=$((remove_deb_num+1))fiecho $remove_deb_num >> /usr/local/bin/logif [[ $remove_deb_num == 4 ]];thenbreakelseif [[ $try_num == 100 ]];thenbreakfisleep 1fiecho 1donetry_num=0while true;doinstall_deb_num=0try_num=$((try_num+1))#add fix the issue of the toolbox lacking information about monitor model and manufacturerdeb_name=$(dpkg -l | grep youker-assistant)if [[ $deb_name == "" ]];thenecho ">>>>>youker-assistant_3.1.4.21-0k1.85px0.8.u_arm64.deb<<<<<" >> /usr/local/bin/logsudo sh -c 'dpkg -i --force-overwrite /usr/local/bin/deb/youker-assistant_3.1.4.21-0k1.85px0.8.u_arm64.deb' >> /usr/local/bin/logelsedeb_name=""install_deb_num=$((install_deb_num+1))fi#fix mic noisedeb_name=$(dpkg -l | grep audio-service)if [[ $deb_name == "" ]];thenecho ">>>>>audio-service_1.2.146_kos_arm64.deb<<<<<" >> /usr/local/bin/logsudo sh -c 'dpkg -i /usr/local/bin/deb/audio-service_1.2.146_kos_arm64.deb' >> /usr/local/bin/logelsedeb_name=""install_deb_num=$((install_deb_num+1))fi#add yamila finger driverdeb_name=$(dpkg -l | grep biometric-driver-ft9348)if [[ $deb_name == "" ]];thenecho ">>>>>biometric-driver-ft9348_1.2.3-24kord_arm64.deb<<<<<" >> /usr/local/bin/logsudo sh -c 'dpkg -i --force-overwrite /usr/local/bin/deb/biometric-driver-ft9348_1.2.3-24kord_arm64.deb' >> /usr/local/bin/logelsedeb_name=""install_deb_num=$((install_deb_num+1))fi#add yukifinger driver  deb_name=$(dpkg -l | grep biometric-driver-microarray-yukifinger)if [[ $deb_name == "" ]];thenecho ">>>>>biometric-driver-microarray-yukifinger_4.0.0-0-g88ffd86_arm64.deb<<<<<" >> /usr/local/bin/logsudo sh -c 'dpkg -i --force-overwrite /usr/local/bin/deb/biometric-driver-microarray-yukifinger_4.0.0-0-g88ffd86_arm64.deb' >> /usr/local/bin/logelsedeb_name=""install_deb_num=$((install_deb_num+1))fi#add 47 bt drivertry_search_wifi_num=0while true;dotry_search_wifi_num=$((try_search_wifi_num+1))sdio_device=$(ls ${sdio_proc})if [[ $sdio_device == "" ]];thensleep 1if [[ $try_search_wifi_num == 200 ]];thenbreakfielsebreakfidonedeb_name=$(dpkg -l | grep rtk-wifi-bt)if [[ $deb_name == "" ]];thenecho ">>>>>rtk-wifi-bt_1.2.3_arm64.deb<<<<<" >> /usr/local/bin/logsudo sh -c 'dpkg -i --force-overwrite /usr/local/bin/deb/rtk-wifi-bt_1.2.3_arm64.deb' >> /usr/local/bin/logcp /usr/local/bin/others/rtl8852bs_config /lib/firmware/rtlbtcp /usr/local/bin/others/rtl8852bs_fw /lib/firmware/rtlbtelsedeb_name=""install_deb_num=$((install_deb_num+1))fi#add Multi-screen Collaborationdeb_name=$(dpkg -l | grep gstreamer1.0-plugins-bad:arm64)if [[ $deb_name == "" ]];thenecho ">>>>>fix_broken deb<<<<<" >> /usr/local/bin/logsudo sh -c 'dpkg -i --force-overwrite /usr/local/bin/fix_broken_deb/*.deb' >> /usr/local/bin/logelsedeb_name=""deb_name=$(dpkg -l | grep miraclecast | grep 1.12.7.1-0k0.17update1)if [[ $deb_name == "" ]];thenecho ">>>>>miraclecast_1.12.7.1-0k0.17update1_arm64.deb<<<<<" >> /usr/local/bin/logsudo sh -c 'dpkg -i --force-overwrite /usr/local/bin/deb/miraclecast_1.12.7.1-0k0.17update1_arm64.deb' >> /usr/local/bin/logelsedeb_name=""install_deb_num=$((install_deb_num+1))fifi#solve the issue of flickering video window when playing local videos in extended mode and dragging the video to the HDMI secondary screendeb_name=$(dpkg -l | grep libukui-kwin4-effect-builtins1)if [[ $deb_name == "" ]];thenecho ">>>>>fix_video_shake deb<<<<<" >> /usr/local/bin/logsudo sh -c 'dpkg -i --force-overwrite /usr/local/bin/fix_video_shake_deb/*.deb' >> /usr/local/bin/logelsedeb_name=""install_deb_num=$((install_deb_num+1))fiecho $install_deb_num >> /usr/local/bin/logif [[ $install_deb_num == 7 ]];thentouch /usr/local/bin/first_boot_install_susses_flagbreakelseif [[ $try_num == 100 ]];thenecho "install deb fail!!!" /usr/local/bin/logbreakfisleep 1fidone
fi#Fingerprint Calibration
sudo mafp-factory calibratetry_search_wifi_num=0
while true;dotry_search_wifi_num=$((try_search_wifi_num+1))sdio_device=$(ls ${sdio_proc})if [[ $sdio_device == "" ]];thensleep 1if [[ $try_search_wifi_num == 200 ]];thenbreakfielsebreakfi
done#47 wifi and bt
wifi_device=$(cat ${sdio_proc}/${sdio_device}/device)
if [[ $wifi_device == "0xb852" ]]; thentry_enable_bt_num=0while true;dohci0=$(hciconfig | grep hci0)if [[ $hci0 == "" ]];thentry_enable_bt_num=$((try_enable_bt_num+1))echo ">>>>>enable bt.<<<<<" >> /usr/local/bin/logsudo echo 241 > /sys/class/gpio/exportsudo echo 0 > /sys/class/gpio/gpio241/valuesleep 0.5sudo echo 1 > /sys/class/gpio/gpio241/valuesudo echo 241 > /sys/class/gpio/unexportsudo systemctl restart rtk_wifi.servicesleep 3if [[ $try_enable_bt_num == 5 ]];thenecho "enable bt fail!!!" >> /usr/local/bin/logbreakfielsebreakfidoneecho ">>>>>insmod cfg80211.ko and 8852bs.ko.<<<<<" >> /usr/local/bin/logsudo insmod /usr/local/bin/ko/cfg80211.kosudo insmod /usr/local/bin/ko/8852bs.ko
fi#49
if [[ $wifi_device == "0x3733" ]]; thenecho ">>>>>insmod sle wifi and bt<<<<<" >> /usr/local/bin/logcd /usr/local/bin/sle_driversudo ./insmod_sle_wifi_dri.shsudo ./insmod_sle_bt_dri.shcd -
fisetsignstatus warning
date >> /usr/local/bin/log
使用的文件都放在/usr/local/bin/文件下,如下所示。
root@zwzn2064-CVN-Z690D5-GAMING-PRO:/home/zwzn2064/sda1/kylin_N14M9# tree squashfs-root/usr/local/bin/
squashfs-root/usr/local/bin/
├── DAssistantd -> /usr/bin/DAssistantd
├── deb
│ ├── audio-service_1.2.146_kos_arm64.deb
│ ├── biometric-driver-ft9348_1.2.3-24kord_arm64.deb
│ ├── biometric-driver-microarray-yukifinger_4.0.0-0-g88ffd86_arm64.deb
│ ├── miraclecast_1.12.7.1-0k0.17update1_arm64.deb
│ ├── rtk-wifi-bt_1.2.3_arm64.deb
│ └── youker-assistant_3.1.4.21-0k1.85px0.8.u_arm64.deb
├── fix_broken_deb
│ ├── gir1.2-gst-plugins-base-1.0_1.16.3-0kylin1.1_arm64.deb
│ ├── gir1.2-gstreamer-1.0_1.16.3-0kylin1.1k0.2_arm64.deb
│ ├── gstreamer1.0-alsa_1.16.3-0kylin1.1_arm64.deb
│ ├── gstreamer1.0-plugins-bad_1.16.2-2.1kylin1_arm64.deb
│ ├── gstreamer1.0-tools_1.16.3-0kylin1.1k0.2_arm64.deb
│ ├── gstreamer1.0-vaapi_1.16.2-2_arm64.deb
│ ├── gstreamer1.0-x_1.16.3-0kylin1.1_arm64.deb
│ ├── libde265-0_1.0.4-1build1_arm64.deb
│ ├── libfluidsynth2_2.1.1-2_arm64.deb
│ ├── libgssdp-1.2-0_1.2.3-0kylin0.20.04.1_arm64.deb
│ ├── libgstreamer-plugins-bad1.0-0_1.16.2-2.1kylin1_arm64.deb
│ ├── libgupnp-1.2-0_1.2.3-0kylin0.20.04.2_arm64.deb
│ ├── libgupnp-igd-1.0-4_0.2.5-5_arm64.deb
│ ├── libinstpatch-1.0-2_1.1.2-2build1_arm64.deb
│ ├── libmjpegutils-2.1-0_1%3a2.1.0+debian-6build1_arm64.deb
│ ├── libmodplug1_1%3a0.8.9.0-2build1_arm64.deb
│ ├── libmpeg2encpp-2.1-0_1%3a2.1.0+debian-6build1_arm64.deb
│ ├── libmplex2-2.1-0_1%3a2.1.0+debian-6build1_arm64.deb
│ ├── libnice10_0.1.16-1kylin0k0.1_arm64.deb
│ ├── libofa0_0.9.3-21_arm64.deb
│ ├── libsoundtouch1_2.1.2+ds1-1build1_arm64.deb
│ ├── libspandsp2_0.0.6+dfsg-2_arm64.deb
│ ├── libsrtp2-1_2.3.0-2_arm64.deb
│ ├── libusrsctp1_0.9.3.0+20190901-1kylin1k2_arm64.deb
│ ├── libvo-aacenc0_0.1.3-2_arm64.deb
│ ├── libvo-amrwbenc0_0.1.3-2_arm64.deb
│ ├── libwildmidi2_0.4.3-1_arm64.deb
│ ├── libzbar0_0.23-1.3_arm64.deb
│ ├── miraclecast-frontend_1.0.3.1-0k0.1_arm64.deb
│ ├── timgm6mb-soundfont_1.3-3_all.deb
│ └── va-driver-all_2.7.0-2kylin0k0.1_arm64.deb
├── fix_video_shake_deb
│ ├── libukui-kwin4-effect-builtins1_1.0.3.1-0k1.19hw4update4odmydhs326d0.2.u_arm64.deb
│ ├── libukui-kwineffects12_1.0.3.1-0k1.19hw4update4odmydhs326d0.2.u_arm64.deb
│ ├── libukui-kwinglutils12_1.0.3.1-0k1.19hw4update4odmydhs326d0.2.u_arm64.deb
│ ├── libukui-kwinxrenderutils12_1.0.3.1-0k1.19hw4update4odmydhs326d0.2.u_arm64.deb
│ ├── ukui-kwin_1.0.3.1-0k1.19hw4update4odmydhs326d0.2.u_all.deb
│ ├── ukui-kwin-common_1.0.3.1-0k1.19hw4update4odmydhs326d0.2.u_arm64.deb
│ ├── ukui-kwin-data_1.0.3.1-0k1.19hw4update4odmydhs326d0.2.u_all.deb
│ ├── ukui-kwin-wayland_1.0.3.1-0k1.19hw4update4odmydhs326d0.2.u_arm64.deb
│ ├── ukui-kwin-wayland-backend-drm_1.0.3.1-0k1.19hw4update4odmydhs326d0.2.u_arm64.deb
│ ├── ukui-kwin-wayland-backend-fbdev_1.0.3.1-0k1.19hw4update4odmydhs326d0.2.u_arm64.deb
│ ├── ukui-kwin-wayland-backend-virtual_1.0.3.1-0k1.19hw4update4odmydhs326d0.2.u_arm64.deb
│ ├── ukui-kwin-wayland-backend-wayland_1.0.3.1-0k1.19hw4update4odmydhs326d0.2.u_arm64.deb
│ ├── ukui-kwin-wayland-backend-x11_1.0.3.1-0k1.19hw4update4odmydhs326d0.2.u_arm64.deb
│ └── ukui-kwin-x11_1.0.3.1-0k1.19hw4update4odmydhs326d0.2.u_arm64.deb
├── ko
│ ├── 8852bs.ko
│ └── cfg80211.ko
├── others
│ ├── rtl8852bs_config
│ └── rtl8852bs_fw
├── preinstall.sh
└── sle_driver
├── bp_test.ko
├── bt
│ ├── ble_soc.ko
│ ├── bluetooth.ko
│ ├── ecc.ko
│ └── ecdh_generic.ko
├── firmware
│ ├── e
│ │ ├── btc_cali.bin
│ │ ├── wifi_cali.bin
│ │ ├── wow.bin
│ │ └── ws73.bin
│ └── us
│ ├── btc_cali.bin
│ ├── wifi_cali.bin
│ ├── wow.bin
│ └── ws73.bin
├── insmod_sle_bt_dri.sh
├── insmod_sle_wifi_dri.sh
├── make_sle_env.sh
├── readme
├── wifi
│ ├── cfg80211.ko
│ ├── plat_soc.ko
│ ├── sle_soc.ko
│ └── wifi_soc.ko
└── ws73_cfg.ini
执行脚本的文件root,将其复制到/var/spool/cron/crontabs/
# DO NOT EDIT THIS FILE - edit the master and reinstall.
# (/tmp/crontab.bMsRWr/crontab installed on Wed Apr  3 15:33:54 2024)
# (Cron version -- $Id: crontab.c,v 2.13 1994/01/17 03:20:37 vixie Exp $)
# Edit this file to introduce tasks to be run by cron.
#
# Each task to run has to be defined through a single line
# indicating with different fields when the task will be run
# and what command to run for the task
#
# To define the time you can provide concrete values for
# minute (m), hour (h), day of month (dom), month (mon),
# and day of week (dow) or use '*' in these fields (for 'any').
#
# Notice that tasks will be started based on the cron's system
# daemon's notion of time and timezones.
#
# Output of the crontab jobs (including errors) is sent through
# email to the user the crontab file belongs to (unless redirected).
#
# For example, you can run a backup of all your user accounts
# at 5 a.m every week with:
# 0 5 * * 1 tar -zcf /var/backups/home.tgz /home/
#
# For more information see the manual pages of crontab(5) and cron(8)
#
# m h  dom mon dow   command@reboot chmod 777 /usr/local/bin/preinstall.sh && /usr/local/bin/preinstall.sh
sudoers文件配置使用sudo时不用密码,将sudoers复制到/etc下,这样执行preinstall.sh脚本就不用输入密码了
将 %sudo ALL=(ALL:ALL) ALL
改成 %sudo ALL=(ALL:ALL) NOPASSWD:ALL
修改后的sudoers文件如下所示。
#
# This file MUST be edited with the 'visudo' command as root.
#
# Please consider adding local content in /etc/sudoers.d/ instead of
# directly modifying this file.
#
# See the man page for details on how to write a sudoers file.
#
Defaults        env_reset
Defaults        mail_badpass
Defaults        secure_path="/usr/local/sbin:/usr/local/bin:/usr/sbin:/usr/bin:/sbin:/bin:/snap/bin"Defaults        env_keep+="XMODIFIERS"Defaults        env_file="/etc/sudoers_env"# Host alias specification# User alias specification# Cmnd alias specification# User privilege specificationroot    ALL=(ALL:ALL) ALL# Members of the admin group may gain root privileges
%admin ALL=(ALL) ALL# Allow members of group sudo to execute any command
#%sudo  ALL=(ALL:ALL) ALL
%sudo  ALL=(ALL:ALL) NOPASSWD:ALL
# See sudoers(5) for more information on "#include" directives:#includedir /etc/sudoers.d
文件系统修改完毕,使用“mksquashfs filesystem filesystem.squashfs”命令压缩文件系统,脚本mkfilesystem.sh 如下所示。
#!/bin/bashrm filesystem.squashfs
mksquashfs squashfs-root filesystem.squashfs
3.生成新的ISO
3.1使用PowerISO软件生成ISO
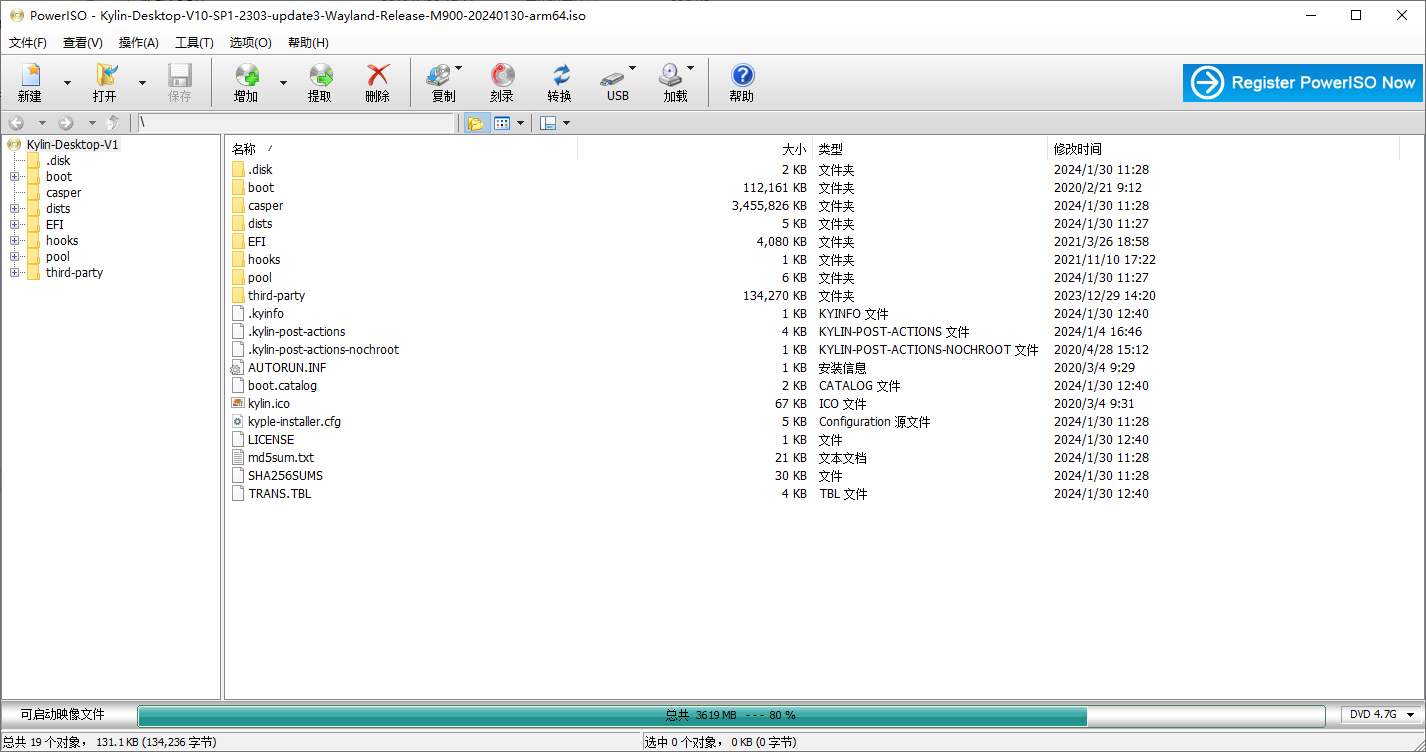
widows下打开PowerISO软件,并打开Kylin-Desktop-V10-SP1-2303-update3-Wayland-Release-M900-20240130-arm64.iso,如下图所示。
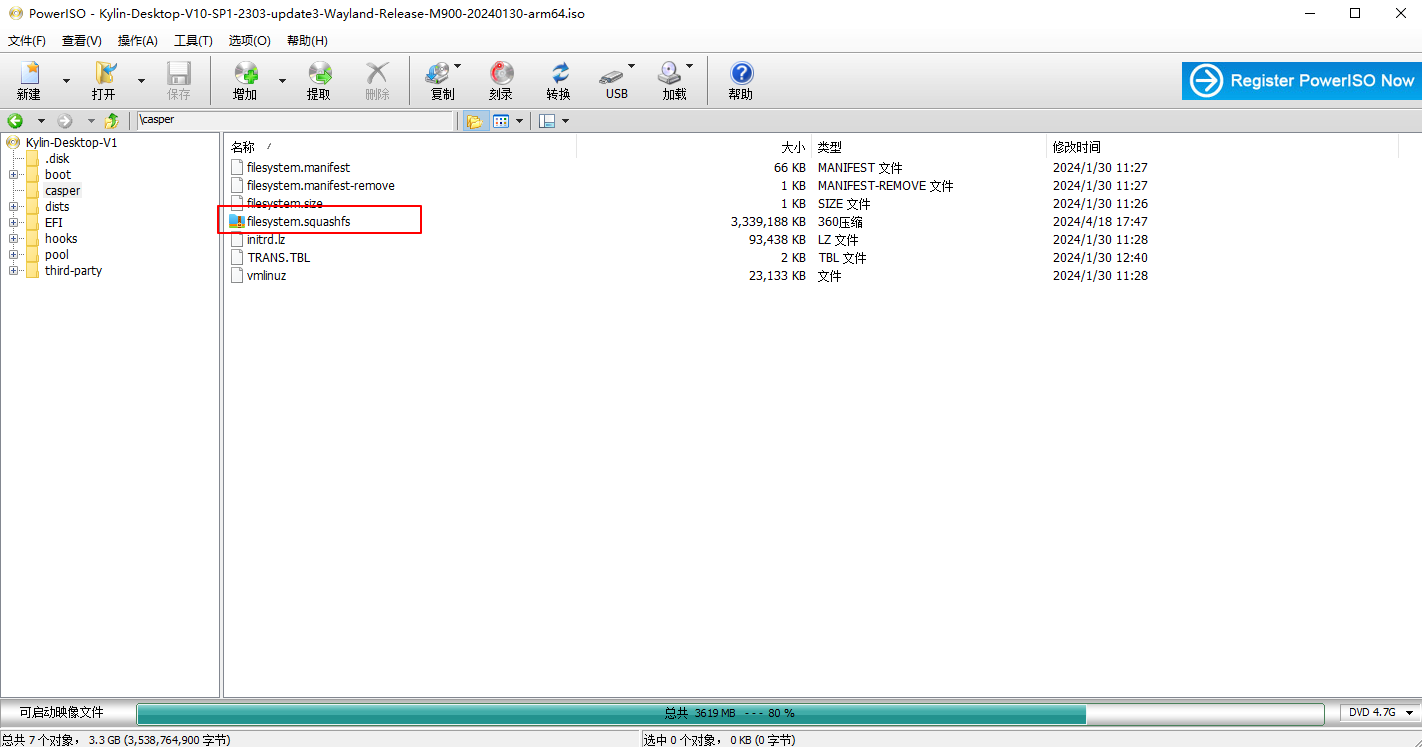
将filesystem.squashfs替换再保存即可生成新的系统固件,如下图所示。
3.2使用Linux脚本生成ISO
使用命令来生成ISO,脚本mkiso.sh如下所示。
#!/bin/bashrm -r out
mkdir out
mkdir -p out/iso_mount
mkdir -p out/iso_filesudo mount -o loop Kylin-Desktop-V10-SP1-2303-update3-Wayland-Release-M900-20240130-arm64.iso out/iso_mount
cp -r out/iso_mount/ out/iso_file
sudo umount out/iso_mount
rm out/iso_file/iso_mount/casper/filesystem.squashfs
cp filesystem.squashfs out/iso_file/iso_mount/casper/filesystem.squashfssudo mkisofs -r -o out/new_modified_iso.iso out/iso_file/iso_mount/
4.制作启动盘
4.1使用UltraISO软件制作启动盘
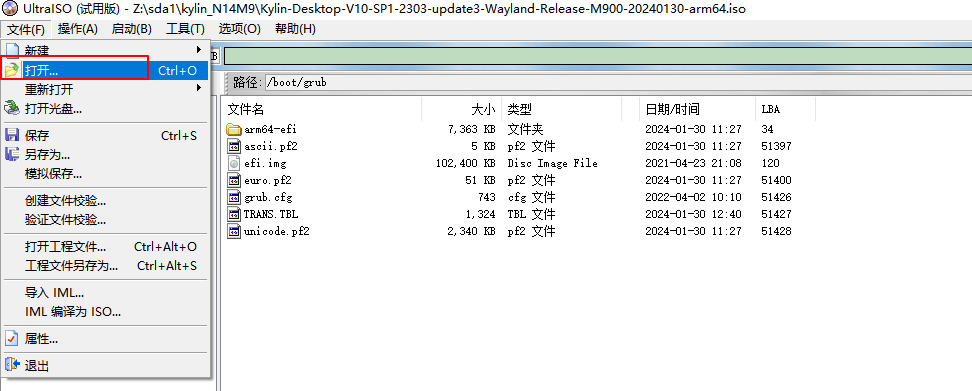
Windows下将U盘格式化为FAT32格式,用UltralISO软件打开ISO文件,如下图所示。
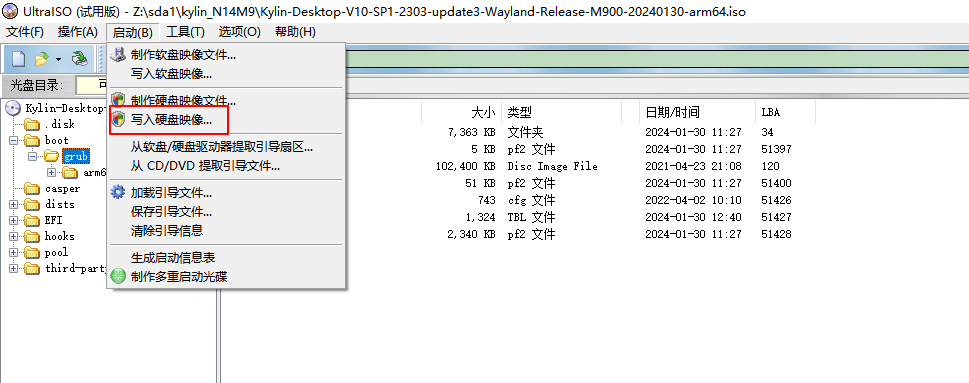
点击“写入硬盘映像...”,如下图所示。
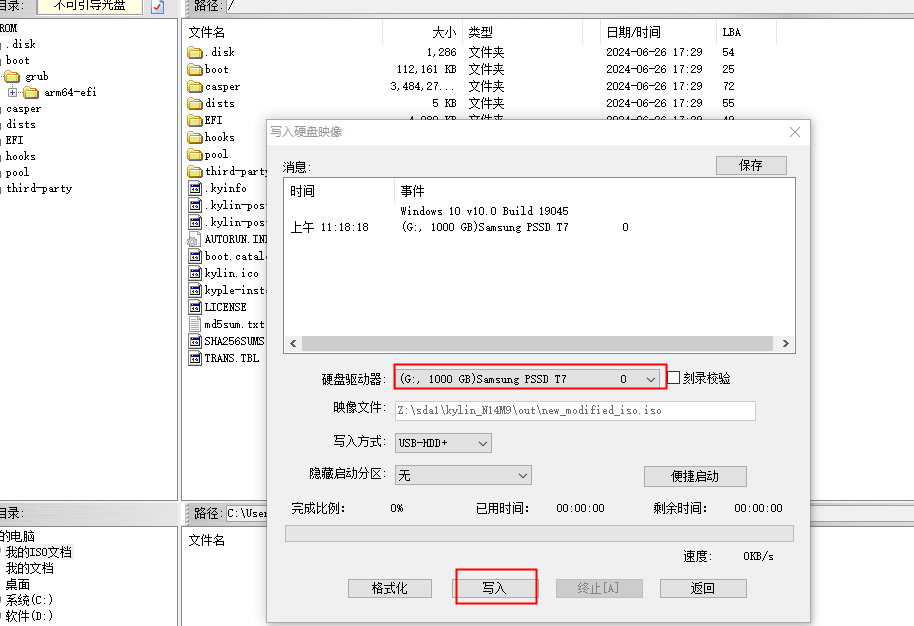
选择要写入的U盘,点击“写入”,等待写入成功即可,如下图所示。
4.2使用Linux脚本制作启动盘
假如U盘的文件节点为:“/dev/sdc4”,使用命令即可制作启动盘:“./make_bootdisk.sh /dev/sdc4”,脚本make_bootdisk.sh 如下所示,目前该方法制作的启动盘无法正常运行。
5.安装系统
将制作好的启动盘插入系统,开机,不断按下F7热键,选择U盘启动,进行后面的安装操作
有时启动盘只能运行一部分程序,后续的安装程序无法运行,可能是文件系统损坏,重新替换文件系统即可。


)


