上篇文章我们学习了事件传播的冒泡和捕获两种类型,现在我们在实际项目中演示一下;
● 首先我们先定义一个随机数
const randomInt = (min, max) => Math.floor(Math.random() * (max - min + 1) + min);
● 接着,我们使用随机数来创建随机的rgb,来实现随机颜色
const randomInt = (min, max) =>Math.floor(Math.random() * (max - min + 1) + min);const randomColor = () =>`rgb(${randomColor(0, 255)},${randomColor(0, 255)},${randomColor(0, 255)}})`;
● 接着我们来获取导航栏的连接,实现点击一下,随机更换颜色
const randomInt = (min, max) =>Math.floor(Math.random() * (max - min + 1) + min);const randomColor = () =>`rgb(${randomColor(0, 255)},${randomColor(0, 255)},${randomColor(0, 255)}})`;document.querySelector('.nav__link').addEventListener('click', function (e) {this.style.backgroundColor = randomColor();
});

● 接着我们将这个元素的父级元素全部添加上这样的点击事件
const randomInt = (min, max) =>Math.floor(Math.random() * (max - min + 1) + min);const randomColor = () =>`rgb(${randomInt(0, 255)},${randomInt(0, 255)},${randomInt(0, 255)})`;document.querySelector('.nav__link').addEventListener('click', function (e) {this.style.backgroundColor = randomColor();
});document.querySelector('.nav__links').addEventListener('click', function (e) {this.style.backgroundColor = randomColor();
});document.querySelector('.nav').addEventListener('click', function (e) {this.style.backgroundColor = randomColor();
});

● 我们会发现当我们点击子元素时候,点击事件会被触发,他的父元素也会被触发,这是因为当你点击子元素时,事件会向上冒泡到父元素,也就是说会在父元素上触发相同的事件。这种行为称为事件冒泡。
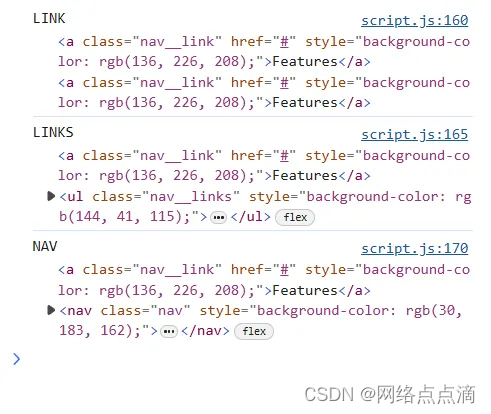
● 我们可以查看一下事件的源事件和发生事件
const randomInt = (min, max) =>Math.floor(Math.random() * (max - min + 1) + min);const randomColor = () =>`rgb(${randomInt(0, 255)},${randomInt(0, 255)},${randomInt(0, 255)})`;document.querySelector('.nav__link').addEventListener('click', function (e) {this.style.backgroundColor = randomColor();console.log('LINK', e.target, e.currentTarget);
});document.querySelector('.nav__links').addEventListener('click', function (e) {this.style.backgroundColor = randomColor();console.log('LINKS', e.target, e.currentTarget);
});document.querySelector('.nav').addEventListener('click', function (e) {this.style.backgroundColor = randomColor();console.log('NAV', e.target, e.currentTarget);
});

我们发现触发事件源事件都是相同的,但是此刻变化的事件是各自自己;
● 当然,我们也可以手动去停止事件传播
const randomInt = (min, max) =>Math.floor(Math.random() * (max - min + 1) + min);const randomColor = () =>`rgb(${randomInt(0, 255)},${randomInt(0, 255)},${randomInt(0, 255)})`;document.querySelector('.nav__link').addEventListener('click', function (e) {this.style.backgroundColor = randomColor();console.log('LINK', e.target, e.currentTarget);e.stopPropagation(); //停止事件传播
});document.querySelector('.nav__links').addEventListener('click', function (e) {this.style.backgroundColor = randomColor();console.log('LINKS', e.target, e.currentTarget);
});document.querySelector('.nav').addEventListener('click', function (e) {this.style.backgroundColor = randomColor();console.log('NAV', e.target, e.currentTarget);
});

● 我们可以通过事件类型的第三个参数来设置事件的传播类型,默认是flase,即冒泡
const randomInt = (min, max) =>Math.floor(Math.random() * (max - min + 1) + min);const randomColor = () =>`rgb(${randomInt(0, 255)},${randomInt(0, 255)},${randomInt(0, 255)})`;document.querySelector('.nav__link').addEventListener('click', function (e) {this.style.backgroundColor = randomColor();console.log('LINK', e.target, e.currentTarget);e.stopPropagation(); //停止事件传播
});document.querySelector('.nav__links').addEventListener('click', function (e) {this.style.backgroundColor = randomColor();console.log('LINKS', e.target, e.currentTarget);
});document.querySelector('.nav').addEventListener('click',function (e) {this.style.backgroundColor = randomColor();console.log('NAV', e.target, e.currentTarget);},true
);

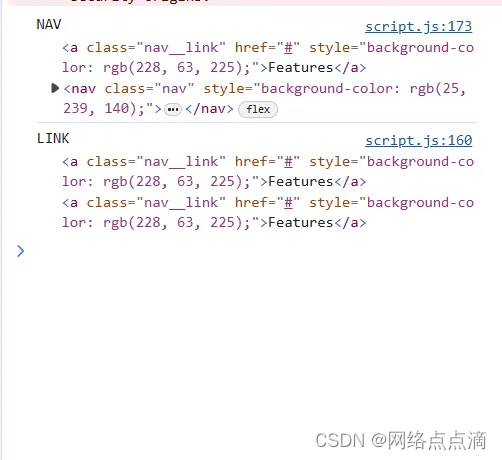
● 当我们将第三个参数设置为true,事件传播就会被设置为捕获,设置为捕获只会,刚开始是从父级元素开始变化,之后向下传播!


