一、组件的注册注解
(一)@Bean
@Bean用于在配置类中声明一个 Bean。通过使用 @Bean 注解的方法,Spring 容器会在启动时调用该方法,并将返回的对象注册为一个 Bean。
1.基本用法
@Bean 注解可以应用于方法上,该方法返回的对象会被 Spring 容器管理。通常,@Bean 注解会与 @Configuration 注解一起使用,以定义配置类。
2.详细说明
- 方法签名:方法名通常与 Bean 的名称相同,但也可以通过 @Bean 注解的 name 或 value 属性来指定 Bean 的名称;方法的返回类型就是 Bean 的类型。
- 参数注入:@Bean 方法可以接受参数,Spring 容器会自动注入这些参数;参数可以是其他 Bean 或配置属性。
- 作用域:默认情况下,@Bean 注解声明的 Bean 的作用域是单例(singleton);可以通过 @Scope 注解来改变 Bean 的作用域。
- 初始化和销毁方法:可以通过 initMethod 和 destroyMethod 属性来指定 Bean 的初始化和销毁方法。
@Configuration
public class PersonConfig {@Bean(name = "customPerson")@Scope("prototype")public Person person() {return new Person("John Doe", 30);}
}
3.@Bean与@Component的区别与联系
共同点:
依赖注入:两者都是用于将类注册到Spring容器中,使其成为Spring管理的Bean。
简化配置:都能减少XML配置文件的使用,使代码更加简洁。区别:
1. 定义方式
@Component:是一个类级别的注解,直接标注在类上;自动扫描并注册到Spring容器中,前提是需要开启组件扫描(如通过`@ComponentScan`);适用于简单的组件或业务逻辑类。
@Bean:是一个方法级别的注解,通常用于配置类中的方法;需要在配置类中显式定义Bean,灵活性更高;适用于复杂的Bean创建逻辑,例如需要动态参数或条件创建Bean。2. 作用范围
@Component:主要用于标记普通的组件类,如Service、Repository、Controller等;适合不需要复杂初始化逻辑的简单Bean。
@Bean:可以用于更复杂的场景,如工厂方法、代理对象、第三方库的集成等;提供了更多的控制权,可以自定义Bean的生命周期和属性。3. 配置位置
@Component:直接标注在类上,无需额外的配置类。
@Bean:必须在配置类(通常是带有`@Configuration`注解的类)中定义。4.命名规则
@Component:默认的Bean名称是类名首字母小写(如`Student`类,默认Bean名称为`student`),但可以通过`@Component("customName")`指定自定义名称。
@Bean:Bean名称默认为方法名,但也可以通过`@Bean(name = "customName")`指定自定义名称。
(二)@ComponentScan:批量扫描
用于配置组件扫描的规则。它告诉 Spring 容器在指定的包及其子包中查找并注册所有带有 @Component, @Service, @Repository, @Controller 等注解的类为 Spring 管理的 Bean。
@ComponentScan(basePackages = "com.example.myapp")可以使用 includeFilters 和 excludeFilters 参数来指定哪些类应该被包含或排除。
@ComponentScan(basePackages = "com.example.myapp",includeFilters = @ComponentScan.Filter(type = FilterType.ANNOTATION, classes = MyAnnotation.class),excludeFilters = @ComponentScan.Filter(type = FilterType.ASSIGNABLE_TYPE, classes = MyExcludedClass.class))(三)MVC分层注解
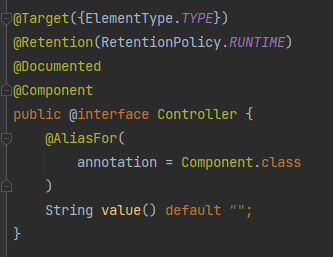
@Component:通用的,可以应用于任意的类
@Controller:写在Controller层上
@Service:写在Service层上
@Repository:写在Dao层上
这4个注解的作用是一样的,都是把当前的类加入到Spring容器中分层注解底层都是@Component
(四)@Configuration
告诉Spring容器,这是一个配置类
(五)@Import:导入第三方组件
@Import(CoreConstants.class) // 按需导入
@Configuration
public class AppConfig {
}
(六)@Scope(管理的Bean的作用域)与@Lazy(懒加载)
默认情况下,Spring Bean 的作用域是单例(singleton),即在整个 Spring 容器中只有一个实例。
@Scope("prototype"):非单实例:
容器启动的时候不会创建非单实例组件的对象;
什么时候获取,什么时候创建。
@Scope("singleton"):单实例,默认值容器启动的时候会创建单实例组件的对象;
容器启动完成之前就会创建好。
@Lazy:懒加载
容器启动完成之前不会创建懒加载组件的对象
什么时候获取,什么时候创建。
@Scope("request"):同一个请求单实例
@Scope("session"):同一次会话单实例
UserController 类中,如果想改变它的作用域,可以在类上添加 @Scope 注解。例如,如果想让 UserController 每次请求时都创建一个新的实例,可以这样写:
@Controller
@Scope("prototype")
public class UserController {
}
其他写法:
@Scope(value = "prototype")
@Scope("prototype")
@Scope(ConfigurableBeanFactory.SCOPE_PROTOTYPE)
(七)FactoryBean接口:创建复杂的Bean实例
FactoryBean在容器中存放的组件类型,是接口中泛型指定的类型,组件的名字是工厂名
package com.javatest.spring.ioc.bean;
public class Car {
}package com.javatest.spring.ioc.factory;
@Component
public class BYDFactory implements FactoryBean<Car> {/*** 调用此方法给容器中制造对象* @return* @throws Exception*/@Overridepublic Car getObject() throws Exception {return new Car();}/*** 说明造的东西的类型* @return*/@Overridepublic Class<?> getObjectType() {return Car.class;}/*** 是否为单例* @return true:是单例;false:不是单例*/@Overridepublic boolean isSingleton() {return true;}
}@SpringBootApplication
public class Spring01IcoApplication {public static void main(String[] args) {ConfigurableApplicationContext ioc =SpringApplication.run(Spring01IcoApplication.class, args);System.out.println("----------------io容器创建完成---------------");Car car = ioc.getBean(Car.class);System.out.println(car);// com.javatest.spring.ioc.bean.Car@46044faaMap<String, Car> beansOfType = ioc.getBeansOfType(Car.class);System.out.println(beansOfType);// {BYDFactory=com.javatest.spring.ioc.bean.Car@46044faa}}
}
(八)@Conditional条件注解
@Conditional注解用于根据特定条件决定是否创建某个 Bean 或配置类。通过使用 @Conditional 注解,你可以实现更细粒度的控制,使得某些 Bean 只在满足特定条件时才会被注册到 Spring 容器中。
1.基本用法
@Conditional 注解可以应用于类或方法上。当应用于类时,整个配置类中的所有 Bean 都会根据条件进行判断;当应用于方法时,只有该方法返回的 Bean 会根据条件进行判断。
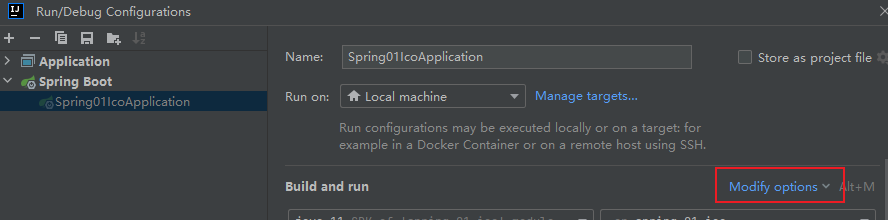
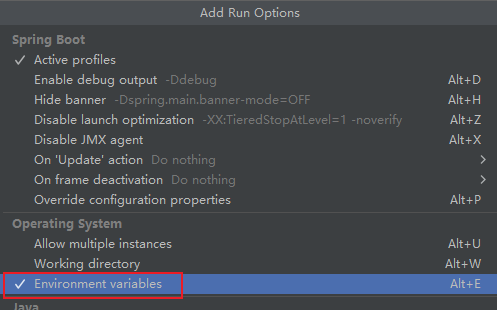
案例:根据当前系统,注入不同的bean
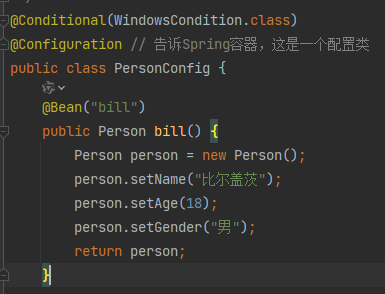
@Configuration // 告诉Spring容器,这是一个配置类
public class PersonConfig {@Conditional(WindowsCondition.class)@Bean("bill")public Person bill() {Person person = new Person();person.setName("比尔盖茨");person.setAge(18);person.setGender("男");return person;}@Conditional(MacCondition.class)@Bean("jobs")public Person jobs() {Person person = new Person();person.setName("乔布斯");person.setAge(28);person.setGender("男");return person;}@Bean("zhangsan") // 跟容器中注入一个自己的组件public Person zhangsan() {Person person = new Person();person.setName("zhangsan");person.setAge(18);person.setGender("男");return person;}@Bean("lisi") // 跟容器中注入一个自己的组件public Person lisi() {Person person = new Person();person.setName("lisi");person.setAge(18);person.setGender("男");return person;}
}
public class WindowsCondition implements Condition {@Overridepublic boolean matches(ConditionContext conditionContext, AnnotatedTypeMetadata annotatedTypeMetadata) {// 判断环境变量中的OS 是否是windowsEnvironment environment = conditionContext.getEnvironment();String property = environment.getProperty("OS");return property.contains("Windows");}
}public class MacCondition implements Condition {@Overridepublic boolean matches(ConditionContext conditionContext, AnnotatedTypeMetadata annotatedTypeMetadata) {Environment environment = conditionContext.getEnvironment();String property = environment.getProperty("OS");return property.contains("mac");}
}
@SpringBootApplication
public class Spring01IcoApplication {static ConfigurableApplicationContext ioc =SpringApplication.run(Spring01IcoApplication.class);public static void main(String[] args) {Map<String, Person> personMap = ioc.getBeansOfType(Person.class);personMap.forEach((k, v) -> System.out.println(k + "=" + v));ConfigurableEnvironment environment = ioc.getEnvironment();String property = environment.getProperty("OS");System.out.println(property); }
}如果当前电脑的操作系统是Windows,那么结果:
bill=Person(name=比尔盖茨, age=18, gender=男)
zhangsan=Person(name=zhangsan, age=18, gender=男)
lisi=Person(name=lisi, age=18, gender=男)
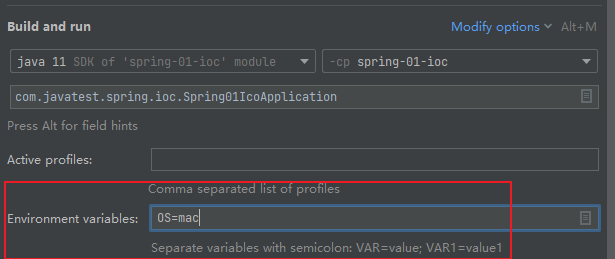
Windows_NT可以修改当前操作系统为mac:

结果:
jobs=Person(name=乔布斯, age=28, gender=男)
zhangsan=Person(name=zhangsan, age=18, gender=男)
lisi=Person(name=lisi, age=18, gender=男)
mac
修改当前操作系统为linux:
zhangsan=Person(name=zhangsan, age=18, gender=男)
lisi=Person(name=lisi, age=18, gender=男)
linux
如果将@Conditional放在整个类上:
运行结果:
linux2.@Conditional派生注解
Spring 提供了一些内置的条件注解,可以简化常见的条件判断:
@ConditionalOnProperty:根据配置属性的值来决定是否创建 Bean。
@ConditionalOnClass:只有当指定的类存在于类路径中时,才创建 Bean。
@ConditionalOnMissingClass:只有当指定的类不存在于类路径中时,才创建 Bean。
@ConditionalOnBean:只有当指定的 Bean 存在于 Spring 容器中时,才创建 Bean。
@ConditionalOnMissingBean:只有当指定的 Bean 不存在于 Spring 容器中时,才创建 Bean。
@ConditionalOnExpression:根据 SpEL 表达式的值来决定是否创建 Bean。
@ConditionalOnWebApplication:只有在 Web 应用环境中,才创建 Bean。
@ConditionalOnNotWebApplication:只有在非 Web 应用环境中,才创建 Bean。
二、依赖注入的注解
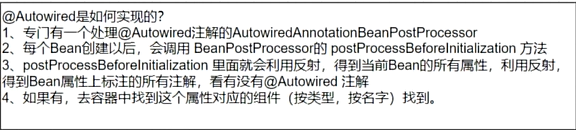
(一)@Autowired
1.自动装配流程
1.按照类型,找到该组件 (先按照类型,再按照名称)
1.1 有且只有找到一个,直接注入,名字任意
1.2 如果找到多个,再按照名称去找;变量名就是名字
1.2.1 如果找到,直接注入;
1.2.2 如果找不到,报错。
2.原理:Spring调用 容器.getBean
2.代码示例
@Data
@Controller
public class UserController {@AutowiredUserService userService;@Autowired  // 当有多类型的Person Bean时,先按照类型,再按照名称Person bill;@Autowired // 注入多个BeanList<Person> personList;@Autowired // 注入Map类型的Bean Key是bean的名称Map<String,Person> personMap;@Autowired // 注入ioc容器ApplicationContext applicationContext;
}
(二)@Primary与@Qualifier
1.@Primary:指定默认Bean
当有多个相同类型的Bean时,@Primary 注解可以指定一个默认的 Bean。Spring容器在需要注入该类型Bean时会优先选择被标记为@Primary 的 Bean。
@Service
@Data
public class UserService {@Autowired  // 容器中有多个Person类Person person;
}
@Conditional(WindowsCondition.class)
@Configuration // 告诉Spring容器,这是一个配置类
public class PersonConfig {@Bean("bill")public Person bill() {Person person = new Person();person.setName("比尔盖茨");person.setAge(18);person.setGender("男");return person;}@Conditional(MacCondition.class)@Bean("jobs")public Person jobs() {Person person = new Person();person.setName("乔布斯");person.setAge(28);person.setGender("男");return person;}@Primary // 指定默认为该bean@Bean("zhangsan") // 跟容器中注入一个自己的组件public Person zhangsan() {Person person = new Person();person.setName("zhangsan");person.setAge(18);person.setGender("男");return person;}@Bean("lisi") // 跟容器中注入一个自己的组件public Person lisi() {Person person = new Person();person.setName("lisi");person.setAge(18);person.setGender("男");return person;}
}public static void main(String[] args) {UserService userService = ioc.getBean(UserService.class);System.out.println(userService);
}结果:
UserService(person=Person(name=zhangsan, age=18, gender=男))2.@Qualifier:显式指定 Bean
作用:@Qualifier注解用于显式指定要注入的 Bean 名称或别名。它可以帮助 Spring 精确地选择某个特定的 Bean,即使存在多个同类型的 Bean。
即:精确指定,如果容器中同类型的组件存在多个,且有默认组件,可以使用@Qualifier精确指定组件名。@Primary一旦存在,修改属性名也无法实现组件切换,需要使用@Qualifier精确指定。
结果:
UserService(person=Person(name=比尔盖茨, age=18, gender=男))(三)@Resource
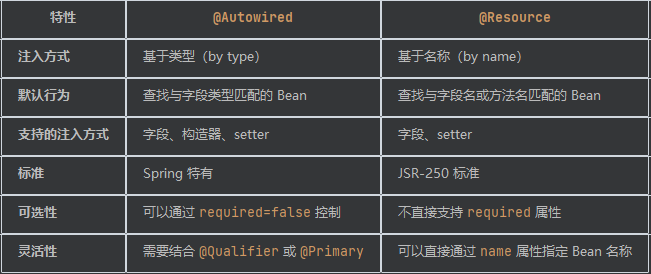
@Autowired 和 @Resource的区别与联系
二者都可以实现依赖注入
- @Resource属于javax包下,默认是根据名称(byName)进行依赖注入的。如果没有显式指定名称,则使用字段名或方法名作为Bean的名称。。
- @Autowired是Spring框架的,默认是根据类型(byType)进行依赖注入的。
在实际项目中通常推荐使用@Autowired,因为它更符合Spring的设计哲学,并且提供了更多的灵活性和功能。
详细解释:
@Resource和@Autowired都是Java Spring框架中用于实现依赖注入(DI)的重要注解。以下是两者的区别与共同点:
一、共同点
- 目的相同:都是为了解决依赖关系的装配问题,使得开发者能够更专注于业务逻辑的实现,而不用关心对象之间的依赖关系如何创建和配置。
- 简化配置:两者都极大地简化了Spring应用程序的配置工作,减少了手动配置和代码编写的复杂性。
- 自动装配:都支持自动装配功能,能够根据一定的规则自动将合适的bean注入到需要的地方。
- 与Spring容器集成:两者都与Spring容器的集成非常紧密,能够在Spring框架中无缝使用。
二、区别
来源不同:
- @Resource:来源于JSR-250规范,是Java EE的标准注解,因此在Java EE环境中也能使用。需要导入
javax.annotation.Resource包。- @Autowired:是Spring框架特有的注解,专门用于Spring IoC容器中的自动装配。需要导入
org.springframework.beans.factory.annotation.Autowired包。查找顺序和注入方式不同:
- @Resource:默认按名称进行装配。如果找不到指定名称的bean,则会回退到按类型查找。它支持通过name和type属性来指定要注入的bean的名称和类型。如果既不指定name也不指定type属性,则通过反射机制使用byName自动注入策略。
- @Autowired:只根据类型(byType)进行注入,不会去匹配名称。如果涉及到type无法辨别注入对象时,需要依赖@Qualifier或@Primary注解一起来修饰。
属性注入范围不同:
- @Resource:可以注入任何属性,包括基本类型和字符串(尽管这在实际应用中较少见,因为Spring通常管理的是bean对象)。
- @Autowired:只能注入bean对象,包括Spring容器中的bean对象以及自定义的bean对象。
异常处理不同:
- @Resource:如果找不到匹配的bean,它会直接抛出异常。
- @Autowired:在找不到匹配的bean时,默认情况下也会抛出异常。但是,它提供了一个required属性,当设置为false时,如果找不到匹配的bean,则不会抛出异常,而是注入一个null值。然而,这可能会导致运行时空指针异常的风险,因此在现代Spring版本中不推荐使用此属性。
使用范围和灵活性不同:
- @Resource:可以用于字段和setter方法上,但不支持构造函数注入。由于它同时支持按名称和类型进行装配,因此在某些特定场景下可能更加灵活。
- @Autowired:可以用于字段、setter方法、构造函数以及任意方法上(例如配置方法)。它提供了更广泛的注入方式和更高的灵活性。特别是构造函数注入,它是Spring推荐的最佳实践之一,因为它可以确保在对象创建时就完成了依赖项的注入。
与Spring特性的集成深度不同:
- @Autowired:作为Spring特有的注解,它与Spring的其他特性(如AOP、事务管理等)的集成更加紧密和顺畅。
- @Resource:虽然也可以在Spring中使用,但与Spring特性的集成可能没有@Autowired那么深入。
综上所述,@Resource和@Autowired在Spring框架中都有各自的应用场景和优势。开发者在选择使用哪个注解时,应根据具体的需求和场景来做出决策。
(四)构造器注入
构造器注入是依赖注入的一种方式,它通过构造函数将依赖项传递给类。构造器注入具有许多优点,包括不可变性、强制依赖和更好的测试性。
@Service
public class UserService {private final UserRepository userRepository;@Autowiredpublic UserService(UserRepository userRepository) {this.userRepository = userRepository;}public User getUserById(Long id) {return userRepository.findById(id).orElse(null);}
}
(五)Setter 注入
Setter注入是依赖注入的一种方式,它通过 setter 方法将依赖项传递给类。Setter 注入具有一定的灵活性,但也有一些潜在的缺点。
Setter 注入的缺点:
- 可变性:依赖项可以在对象的生命周期内改变,可能导致对象状态的不一致。
- 测试复杂性:由于依赖项可以在对象创建后设置,单元测试时需要确保依赖项在测试前正确设置。
- 潜在的空指针异常:如果依赖项没有通过 setter 方法设置,可能会导致空指针异常。
@Service
public class UserService {private UserRepository userRepository;@Autowiredpublic void setUserRepository(UserRepository userRepository) {this.userRepository = userRepository;}public User getUserById(Long id) {return userRepository.findById(id).orElse(null);}
}
(六)@xxxAware:感知接口
在 Spring 框架中,Aware 接口提供了一种机制,允许 Bean 在初始化过程中感知并获取 Spring 容器中的特定对象或信息。这些接口通常以 Aware 结尾,例如 BeanNameAware、ApplicationContextAware 等。通过实现这些接口,Bean 可以获取到容器提供的各种上下文信息,从而实现更复杂的逻辑。
@ToString
@Getter
@Service
public class DogService implements EnvironmentAware, BeanNameAware {private Environment environment;private String myName;@Overridepublic void setEnvironment(Environment environment) {this.environment = environment;}public String getOsType() {return environment.getProperty("OS");}@Overridepublic void setBeanName(String name) {this.myName = name;}
}
public static void main(String[] args) {DogService dogService = ioc.getBean(DogService.class);System.out.println(dogService);String dogServiceOsType = dogService.getOsType();System.out.println(dogServiceOsType);String dogServiceMyName = dogService.getMyName();System.out.println(dogServiceMyName);
}结果:
DogService(environment=StandardEnvironment {activeProfiles=[], defaultProfiles=[default], propertySources=[ConfigurationPropertySourcesPropertySource {name='configurationProperties'}, PropertiesPropertySource {name='systemProperties'}, OriginAwareSystemEnvironmentPropertySource {name='systemEnvironment'}, RandomValuePropertySource {name='random'}]}, myName=dogService)
Windows_NT
dogService
(七)@Value:给属性赋值
@Value注解用于将配置文件中的属性值注入到 Spring 管理的 Bean 中。它非常适用于需要从配置文件(如 application.properties 或 application.yml)中读取配置信息的场景。
基本用法:
- @Value("字面值"):直接赋值
- @Value("${key}"):动态地从配置文件中取出来某一项的值
- @Value("#{SpEL}"):Spring Expression Language:Spring表达式语言
表达式参考规则:SpEL表达式规则
@Data
@Component
public class Dog {@Value("旺财")private String name;@Value("${dog.age}")private Integer age;@Value("#{10*20}")private String color;// T表示静态调用@Value("#{T(java.util.UUID).randomUUID().toString()}")private String id;@Value("#{'Hello World!'.substring(0,5)}")private String msg;@Value("#{1>2?'aaa':'bbb'}")private String flag;@Value("#{new String('shepherd').toUpperCase()}")private String brand;@Value("#{new int[]{1,2,3}}")private int[] country;public Dog() {System.out.println("dog constructor");}
}
application.properties:
spring.application.name=spring-01-iocdog.age=3public static void main(String[] args) {Dog dog = ioc.getBean(Dog.class);System.out.println(dog);
}结果:
Dog(name=旺财,
age=3,
color=200,
id=c839f4a2-a9a2-46ac-a0d9-152ac315cfb0,
msg=Hello,
flag=bbb,
brand=SHEPHERD,
country=[1, 2, 3])
(八)@PropertySource:指定外部属性文件的位置
@PropertySource注解用于指定外部属性文件的位置,并将其加载到 Spring 的环境配置中。通过 @PropertySource 注解,可以将自定义的属性文件(如 .properties 文件)引入到 Spring 容器中,从而可以在应用程序中使用这些属性。
@PropertySource("classpath:cat.properties") // 说明属性来源:把指定的文件导入容器中,供取值使用
@Data
@Component
public class Cat {@Value("${cat.name:Tom3}") // :后面是取不到的时候的默认值private String name;@Value("${cat.age:5}")private Integer age;
}
cat.properties:
cat.name=tom
cat.age=3
public static void main(String[] args) {Cat cat = ioc.getBean(Cat.class);System.out.println(cat);
}运行结果:
Cat(name=tom, age=3)注意:如果cat.properties文件在config包下,那么注解内容要更改
@PropertySource("classpath:config/cat.properties")另外:classpath*表示从所有包的路径下找资源
(九)ResourceUtils:获取资源
public static void main(String[] args) throws IOException {File file = ResourceUtils.getFile("classpath:img1.png");System.out.println(file);int available = new FileInputStream(file).available();System.out.println(available);
}
结果:
G:\develop\workspace\three\oldBaseCode\ssm-parent\spring-01-ioc\target\classes\img1.png
77701
(十)@Profile
@Data
public class MyDataSource {
}@ConfigurationProperties(prefix = "app.datasource")
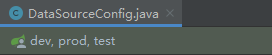
@Configuration
public class DataSourceConfig {@Bean@Profile("dev")public MyDataSource devDataSource() {return new MyDataSource();}@Bean@Profile("test")public MyDataSource testDataSource() {return new MyDataSource();}@Bean@Profile("prod")public MyDataSource prodDataSource() {return new MyDataSource();}
}
application-dev.properties:
app.datasource.url=jdbc:h2:mem:devdb
app.datasource.username=sa
app.datasource.password=
app.datasource.driver-class-name=org.h2.Driverapplication-test.properties:
app.datasource.url=jdbc:h2:mem:testdb
app.datasource.username=sa
app.datasource.password=
app.datasource.driver-class-name=org.h2.Driverapplication-prod.properties:
app.datasource.url=jdbc:mysql://localhost/proddb
app.datasource.username=myuser
app.datasource.password=mypassword
app.datasource.driver-class-name=com.mysql.cj.jdbc.Driverapplication.properties:
spring.application.name=spring-01-ioc
spring.profiles.active=prod
public static void main(String[] args) {Environment env = ioc.getEnvironment();String[] activeProfiles = env.getActiveProfiles();System.out.println("Active Profiles: " + String.join(", ", activeProfiles));
}运行结果:
![]()
三、容器的生命周期
@Bean指定生命周期初始化和销毁方法

)

)


